This article describes how to set up a development environment for Raspberry Pi Pico or Raspberry Pi Pico W with PlatformIO, Visual Studio Code and C/C++.
IMPORTANT: The solution proposed here does not correspond to the development environment for C/C++ proposed by Raspberry Pi. This article is about a development environment that might be interesting for people who already know PlatformIO – PlatformIO and Visual Studio Code are also used in many other articles on schaerens.ch. At the time of writing, the PlatformIO-based environment is not supported by the Raspberry Pi, but by the community.
At the time of writing, there exist several different PlatformIO integrations for Raspberry Pi Pico, e.g.:
- Raspberry Pi Pico (Arduino libraries)
- Arduino-Pico (Arduino and Pico SDK), see also Github.
- wizio-pico (only? Pico SDK)
Here we use Arduino-Pico. It is based on the official Raspberry Pi Pico integration but supports in addition the official Pico SDK from Raspberry Pi.
Preparing PicoProbe for debugging
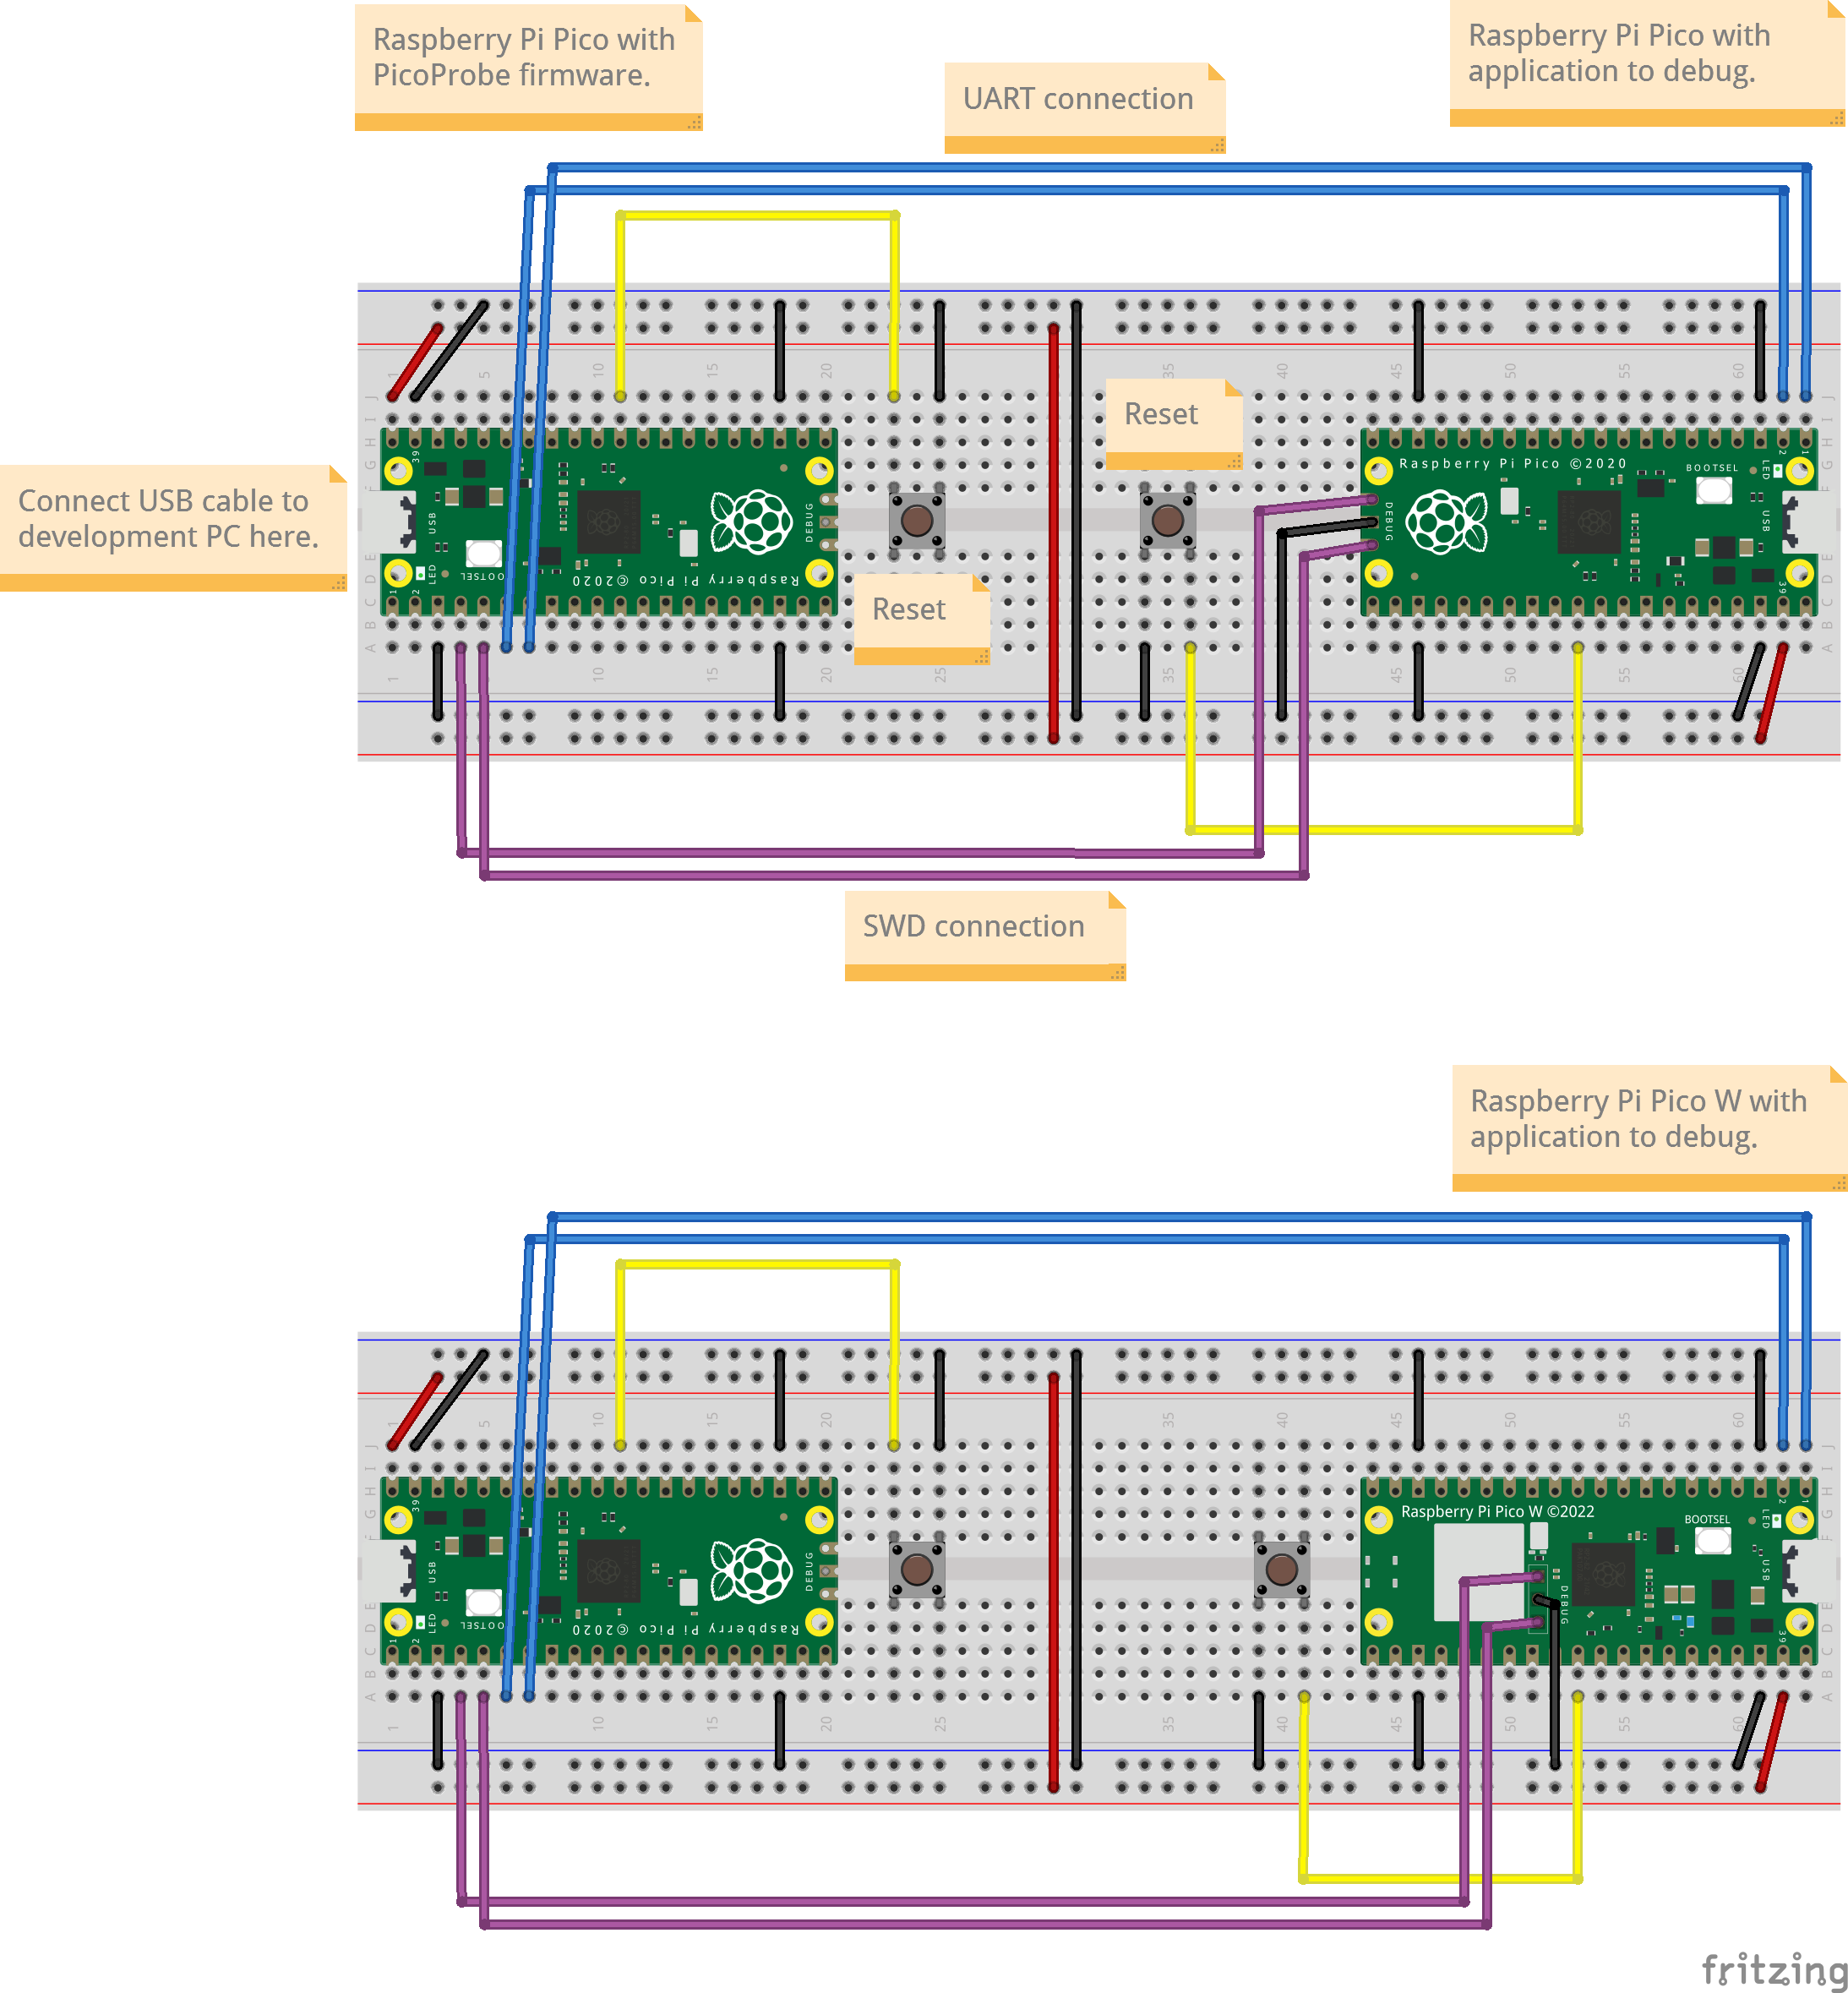
For remote debugging with breakpoints, variable inspection etc. a second Raspberry Pi Pico, connected between the development PC and the target Pico (the one we want to debug), is required. This second Pico is called PicoProbe. The following picture shows the wiring between the PicoProbe and a target Pico or Pico W. The PicoProbe is connected to the development PC using an USB cable.
On the second Pico the PicoProbe firmware must be installed:
- Download the PicoProbe firmware (UF2 file) from the Raspberry Pi Documentation page, search on the page for “Debugging using another Raspberry Pi Pico”.
- While pressing the BOOTSEL button on the second Pico, connect it to an USB port of your PC. A Windows File Explorer should be opened automatically showing the content of the PRI-RP2 drive (Pico file system). Release the BOOTSEL button.
- Copy the file with the PicoProbe firmware to the Pico file system. As soon as copying has finished the File Explorer with the Pico file system is automatically closed. The PicoProbe firmware is now running (the green on-board LED is on).
The PicoProbe firmware emulates two USB connection on the single connector: One for uploading and debugging the application, and one for connecting the target Pico’s UART0 to the development PC. that’s why Windows requires a special USB driver (libusb-win32) to be installed. Please see Getting started with Raspberry Pi Pico, chapter ‘Install Picoprobe driver (only needed on Windows)‘ for instructions on how to install this USB driver and how to connect from Windows to the UART output/input using PuTTY.
Using Visual Studio Code / PlatformIO:
We assume you have already installed Visual Studio Code (download from https://code.visualstudio.com) and the VC Code extension PlatformIO IDE.
If you don’t have already done, install Visual Studio Code: Download from https://code.visualstudio.com.
Start VS Code and install the extension PlatformIO IDE.
First we have to install the platform integration for Raspberry Pi Pico:
Restart VS Code, open the PlatformIO Home pane (click the PlatformIO Home icon in the blue statusbar), select Platforms, select the Embedded tab, search for Raspberry and select Raspberry Pi RP2040 and click the blue Install button.
Create a new project for Raspberry Pi Pico:
Close any open project (File -> Close Folder).
Click the PlatformIO icon on the left, then click the PlatformIO Home icon in the statusbar -> this opens again the PlatformIO Home pane.
Click New Project, enter a name select the board Raspberry Pi Pico (even if you have a Raspberry Pi Pico W), select the Framework Arduino and choose a location (parent directory) for the new project. Click Finish. The new PlatformIO project is created.
To use the Arduino-Pico integration, change the file platformio.ini to this:[env:pico]
platform = https://github.com/maxgerhardt/platform-raspberrypi.git
board = pico
framework = arduino
board_build.core = earlephilhower
upload_protocol = picoprobe
debug_tool = picoprobe
debug_init_break = tbreak loop
For Raspberry Pi Pico W add the following line to platformio.ini, this allows to use the Pico SDK functions specific to the Pico W:build_flags = -D ARDUINO_RASPBERRY_PI_PICO_W
In the project file src/main.cpp you can start the implementation of your Pico application.
Set any breakpoints by clicking to the left of the line numbers. Before start up to four breakpoints can be set (one is already defined in platformio.ini).
To compile, upload to Pico and start the application, click on the left side the Run and Debug icon (or Ctrl+Shift+D) and then the green Start Debugging button (or F5) on the top-left.
Be patient: after the compilation is finished, it takes some time until the application has been uploaded and started!
The execution stops when the loop() function is called for the first time (the initial breakpoint is configured in platformio.ini: debug_init_break = tbreak loop).
Don’t forget to start PuTTY and connect to the COM port of the Pico (PicoProbe) to see any outputs of your application or to enter inputs. To get the name of the COM port, open in VS Code the PlatformIO Home and select Devices. There you should see the USB Serial Port with its COM port. In the PuTTY configuration, enter the COM port in Serial line, select the Serial communication type and enter 115200 in Speed.
Examples
Example application using Arduino libraries, see https://github.com/schaeren/pico-pio-blink-01:
#include <Arduino.h>

// the external LED is connected to pin GP15
pin_size_t gpioLed = 15;

void setup() {
    Serial1.begin(115200);
    while(!Serial1);

    pinMode(gpioLed, OUTPUT);
}

int loopCount = 0;

void loop() {
    Serial1.printf("Loop %3d:\r\n", ++loopCount);
    Serial1.printf("    LED on GP%d ON.\r\n", gpioLed);
    digitalWrite(gpioLed, HIGH);
    delay(100);
    Serial1.printf("    LED on GP%d OFF.\r\n", gpioLed);
    digitalWrite(gpioLed, LOW);
    delay(900);
}
Example WLAN scanner application using Arduino libraries and Pico SDK libraries (cyw43_… functions), requires Raspberry Pi Pico W, see: https://github.com/schaeren/pico-pio-scanWlans-01
#include "Arduino.h"
#include "pico/cyw43_arch.h"

static int scan_result(void *env, const cyw43_ev_scan_result_t *result) {
    if (result) {
        Serial1.printf("ssid: %-32s rssi: %4d chan: %3d mac: %02x:%02x:%02x:%02x:%02x:%02x sec: %u\r\n",
            result->ssid, result->rssi, result->channel,
            result->bssid[0], result->bssid[1], result->bssid[2], result->bssid[3], result->bssid[4], result->bssid[5],
            result->auth_mode);
    }
    return 0;
}

void setup() {
	Serial1.begin(115200);

    if (cyw43_arch_init()) {
        Serial1.println("failed to initialise cyw43_arch");
        while(true);
    }

    cyw43_arch_enable_sta_mode();
}

absolute_time_t scan_test = nil_time;
bool scan_in_progress = false;

void loop() {

    if (absolute_time_diff_us(get_absolute_time(), scan_test) < 0) {
        if (!scan_in_progress) {
            cyw43_wifi_scan_options_t scan_options = {0};
            int err = cyw43_wifi_scan(&cyw43_state, &scan_options, NULL, scan_result);
            if (err == 0) {
                Serial1.printf("\nPerforming wifi scan\r\n");
                scan_in_progress = true;
            } else {
                Serial.printf("Failed to start scan: %d\r\n", err);
                scan_test = make_timeout_time_ms(10000); // wait 10s and scan again
            }
        }
        else if (!cyw43_wifi_scan_active(&cyw43_state)) {
            scan_test = make_timeout_time_ms(10000); // wait 10s and scan again
            scan_in_progress = false;
        }
    }
    // the following #ifdef is only here so this same example can be used in multiple modes;
    // you do not need it in your code
#if PICO_CYW43_ARCH_POLL
    // if you are using pico_cyw43_arch_poll, then you must poll periodically from your
    // main loop (not from a timer) to check for WiFi driver or lwIP work that needs to be done.
    cyw43_arch_poll();
    sleep_ms(1);
#else
    // if you are not using pico_cyw43_arch_poll, then WiFI driver and lwIP work
    // is done via interrupt in the background. This sleep is just an example of some (blocking)
    // work you might be doing.
    sleep_ms(5000);
#endif
}