In this post, we will show how to implement hardware-aware application that uses multithreading to perform multiple tasks simultaneously using .NET 6 and C# on a Raspberry Pi single-board computer. The peripherals used are digital inputs/outputs (buttons and LEDs), analog-to-digital converter via SPI bus, and an LCD display. The solution here is similar to the one based on the Arduino Mega presented at the end of the article “Arduino – FreeRTOS” in chapter “Advanced example”. For an introduction on how to setup the development environment on Windows for Raspberry Pi see “Raspi – Software development with Visual Studio Code, C# and .NET 6, Debugging“.
| Source code of the full example is available on GitHub: https://github.com/schaeren/iot-raspi-multithreading |
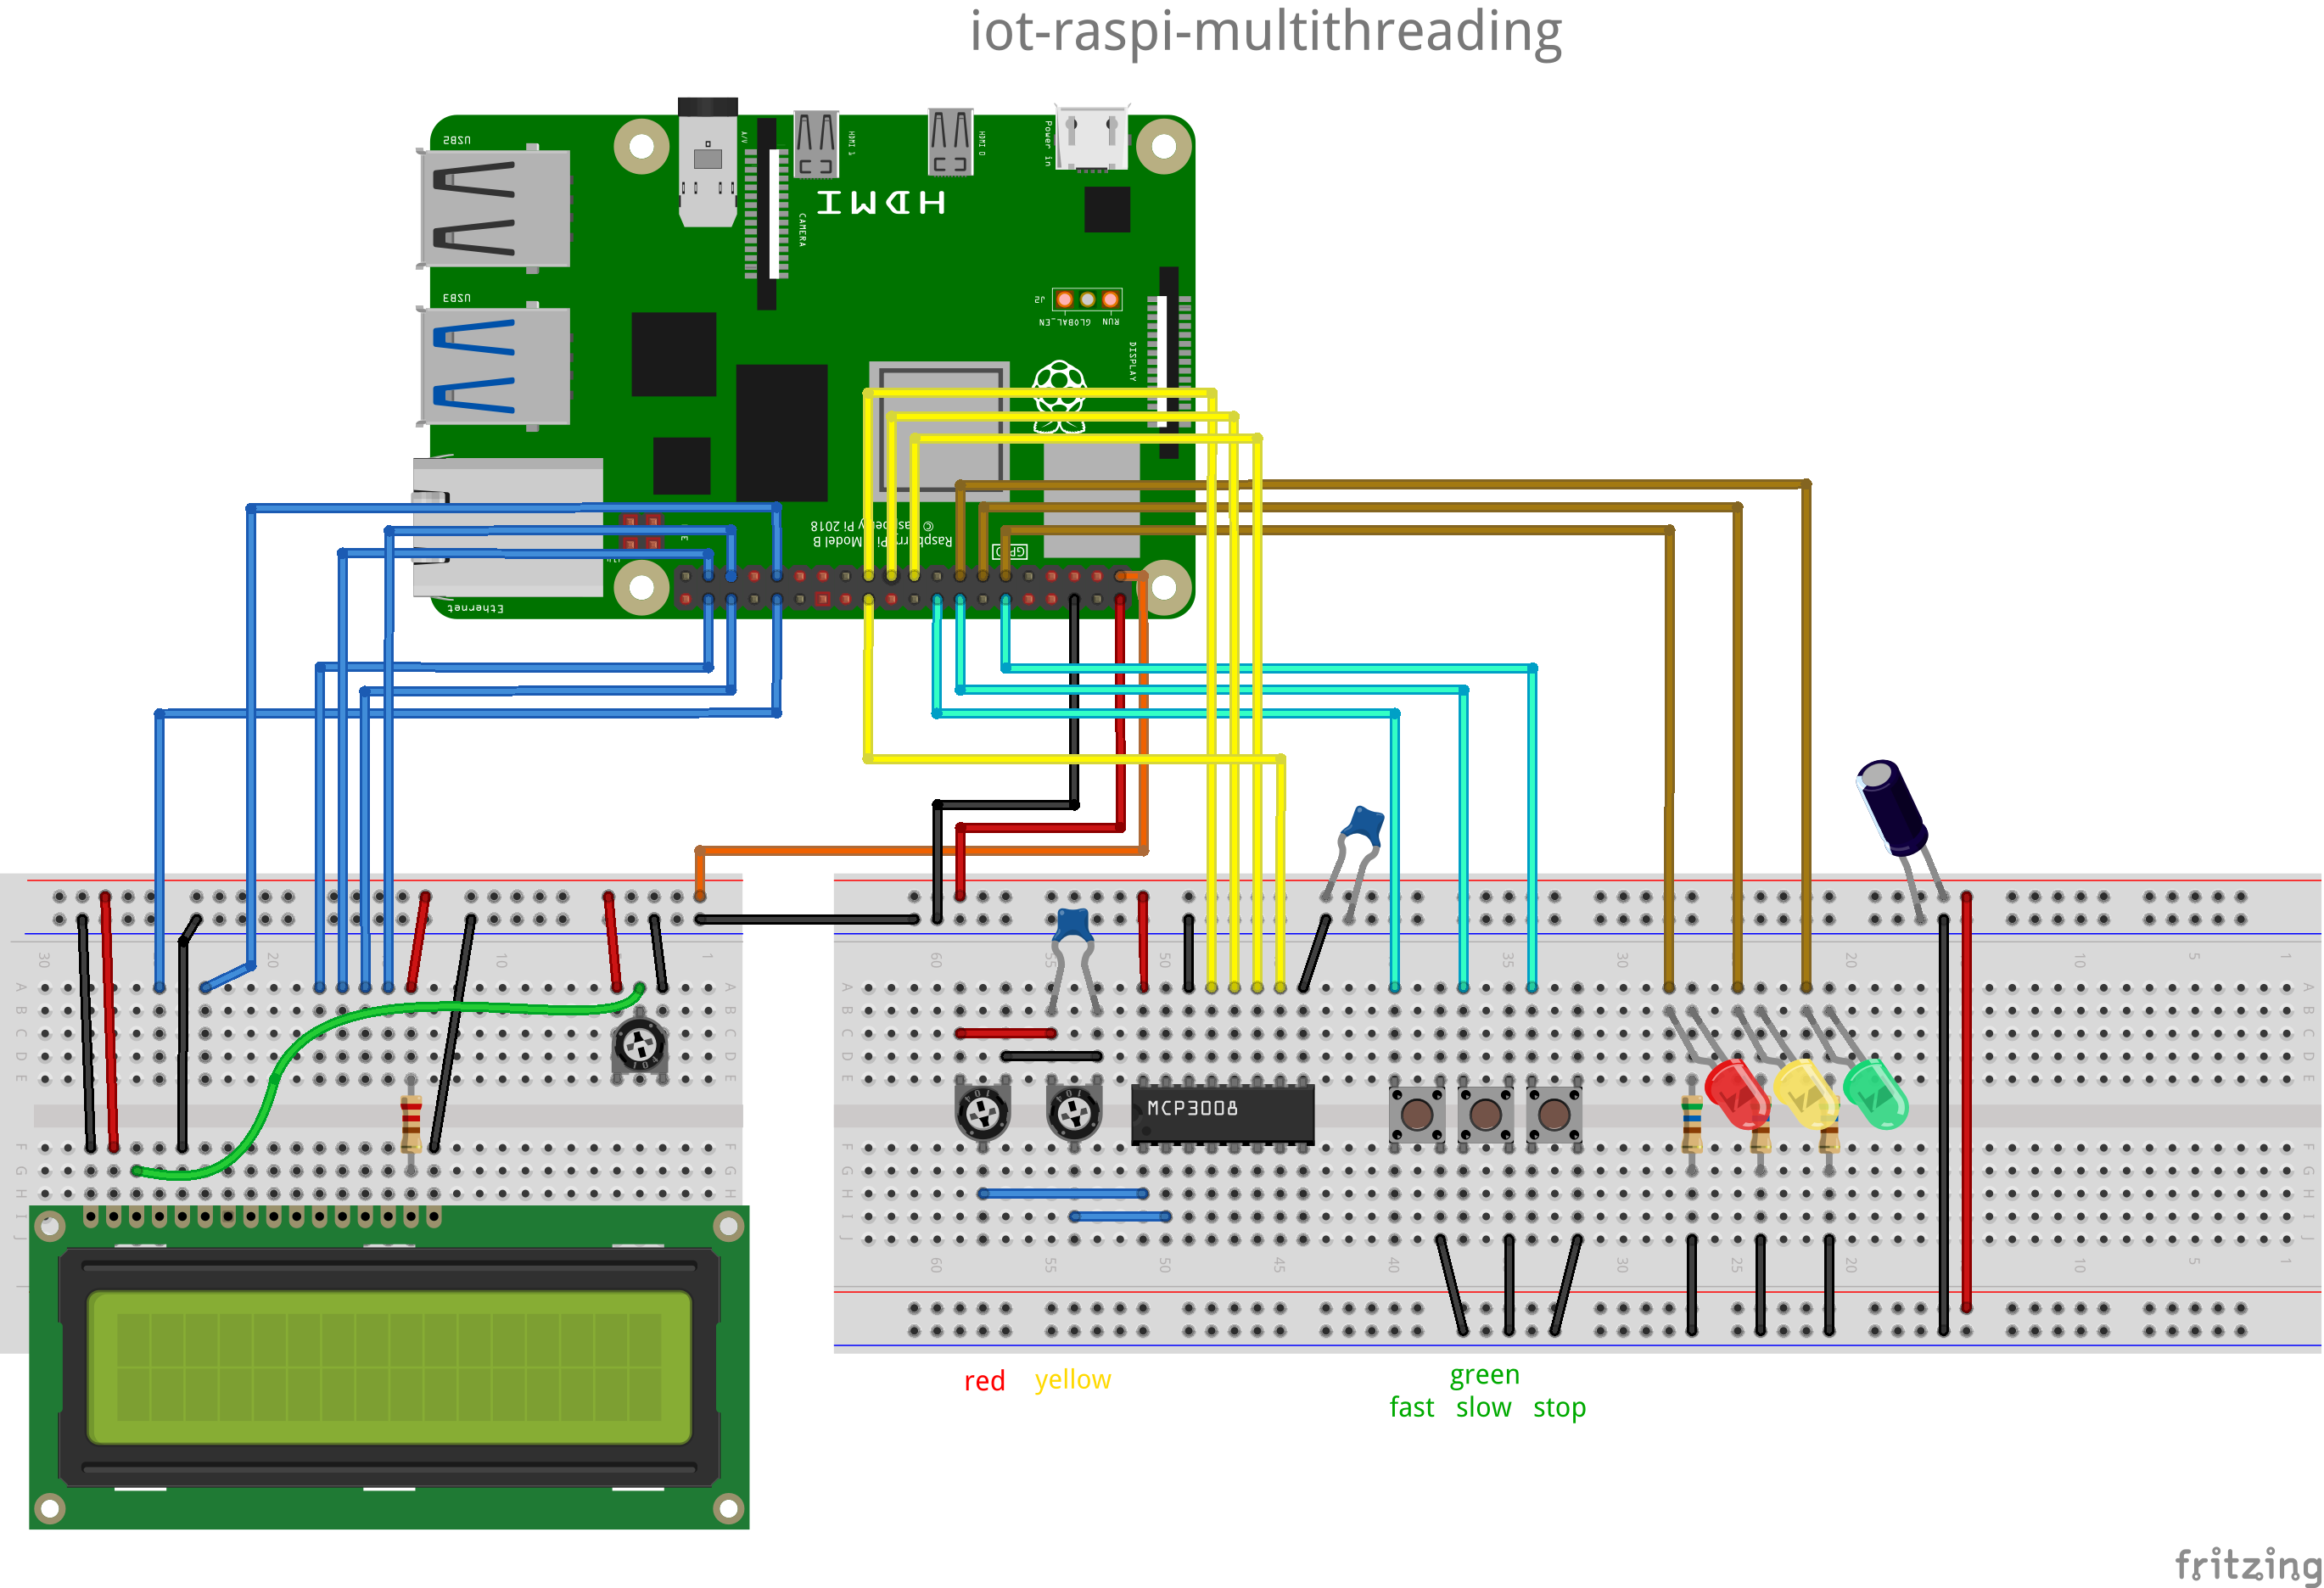
Inputs:
- 2 potentiometers allowing to control the blinking frequency of the red and yellow LEDs (range 0.5…20 Hz).
The voltages on the potentiometer wipers (middle pins) are fed to the input 0 and 1 of the Analog-Digital Converter (ADC) MCP3008. The ADC is connected to the Raspberry Pi using the Serial Peripheral Interface (SPI) of the Pi. - 3 buttons allowing to select the blinking frequency of the green led (off, 1Hz, 10Hz).
Outputs:
- 3 LEDs red, yellow and green.
The blinking frequency of the LEDs is controlled by the 2 potentiometers and through the 3 buttons. - Liquid Cristal Display (LCD) showing the current blinking frequency of the 3 LEDs as half period time in milliseconds
(frequency = 1000 / half-period-time). The LCD is reused from the Arduino Starter Kit (Hitachi HD44780)
Program structure
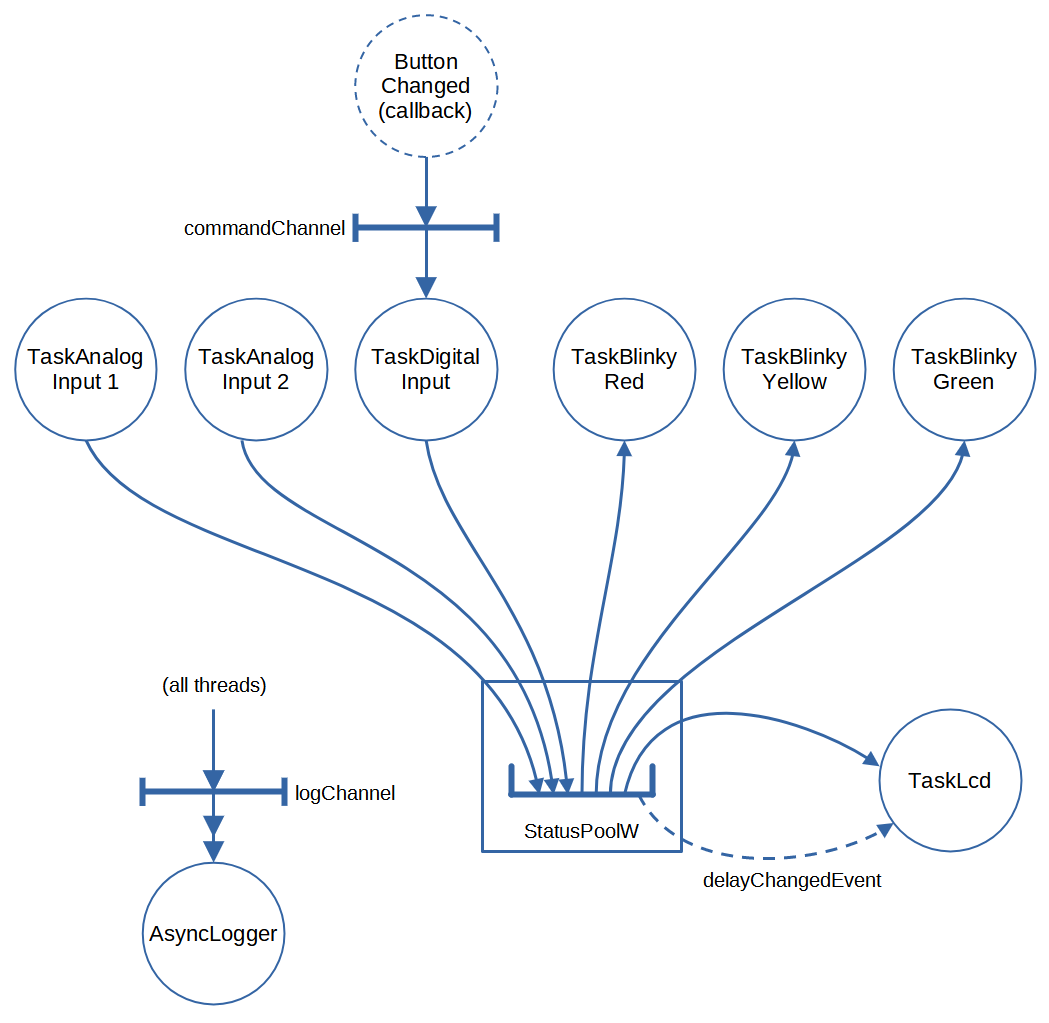
StatusPool:
- The StatusPool encapsulates status information used by different tasks/threads.
It holds the current delay values for the red, yellow and green LEDs. A delay value is equal to the half period time and defines the blinking frequency. The access to delay values is protected by mutex, even this isn’t neccessary in this case, because integer variables are read or written using atomic operations (without interruption by another thread). Each time a value is changed, an EventWaitHandle is set to signal TaskLcd that a delay value has been changed.
Tasks:
- AsyncLogger
AsyncLogger provides a logger whose output (to the console) is asynchronous. This means the logger methods WriteInfoAsync() and WriteInfo() write the messages into a .NET channel (logChannel). The Loop() method, which runs as an independent thread, reads from this channel and writes the messages to the console output.
- TaskLcd
TaskLcd displays the current delays for the red, yellow and green LEDs on a Liquid Cristal Display (LCD). The Start() method creates a thread which initializes the LCD of type HD44780 with 2 lines, each with 16 characters. After the initialization the thread executes an endless loop to wait for an EventWaitHandle, which is signaled by StatusPool each time a delay has been changed. After receiving the signal the delays are read from StatusPool (using delegates) and displayed on the LCD.
- TaskBlinky (started 3 times, once for each LED read, yellow, green)
TaskBlinky controls the blinking of one LED according to the delay read from StatusPool. The Start() method creates a thread which reads the delay time (half period time in ms) from StatusPool using a delegate, switches the LED on or off and sleeps for the given delay, all this is executed in an endless loop.
- TaskAnalogInput (started 2 times, once for each potentiometer/analog input)
TaskAnalogInput implements the input from a potentiometer used to control the blinking frequency of a LED. The Start() method creates a thread which reads in the analog value (voltage from potentiometer) using an Analog-Digital-Converter (ADC), maps the value to the range minDelay…minDelay (25…1000 ms) and updates the delay time (half period time) for the corresponding LED in the StatusPool using a delegate, All this is executed in an endless loop.
Remark: The ADC chip is connected to the Raspberry Pi via SPI (Serial Peripheral Interface), the chip supports 8 analog input channels with 10-bit resolution.
- TaskDigitalInput
TaskDigitalInput implements the input from 3 buttons used to control the blinking frequency of the green LED by registering a callback method for all 3 buttons and starting a thread. A press of one of the 3 buttons ‘stop blinking’, ‘slow blinking’ and ‘fast blinking’ starts the callback method (~ interrupt handler), which determines the command (stop, slow, fast) depending on the button pressed and sends it via a .NET Channel (System.Threading.Channels.Channel<T>) to a thread. The thread receives the command and updates the delay time (half period time) for the green LED in the StatusPool using a delegate.
Queues:
- TaskDigitalInput.commandChannel
This channel of type System.Threading.Channels.Channel<ECommand> is used to send commands (“stop”, “slow”, “fast”) from the callback method triggered by button presses to the thread executing TaskDigitalInpit.Loop(). - AsyncLogger.logChannel
This channel of type System.Threading.Channels.Channel<string> is used to synchronize log messages produced by all threads and acts as a buffer between threads and the Console output. The log messages are formatted and written to this channel by the static methods AsyncLogger.WriteInfoAsynch() and AsyncLogger.WriteInfo(). A thread executing AsyncLogger.Loop() reads from this channel an writes the messages to the Console output.
| Source code of the full example is available on GitHub: https://github.com/schaeren/iot-raspi-multithreading |
Thread creation
With .NET a thread can be created in many different ways. In this sample application we use the following pattern:
public class TaskClass
{
    private int parameter1;
    private Thread? thread;

    private TaskBlinky(int parameter1)
    {
        this.parameter1 = parameter1;
    }

    public static TaskClass Start(string threadName, int parameter1)
    {
        var instance = new TaskClass(parameter1);
        instance.thread = new Thread(instance.Loop);
        instance.thread.Name = threadName;
        instance.thread.Start();
        return instance;
    }

    private async void Loop()
    {
	await AsyncLogger.WriteInfoAsync($"Started, parameter1: {parameter1}.");
	// initialize resources
	// ...
	while(true)
	{
	    // Execute the thread's task ...
	    ...
	}
    }
}
- The private constructor forces to use the Start() method.
- The taskName can be any string. It is also visible in the VS Code’s debugger UI.
- Any parameters may be passed to the thread wenn calling the Start() method.
- The Loop() method is started as new task.
Mutex
Mutex may be used to protect access to shared variables/objects.
public class Pool
{
    private string sharedVar1;
    private Mutex mutex1 = new Mutex();

    public Pool(string sharedVar1InitialValue)
    {
        sharedVar1 = sharedVar1InitialValue;
    }

    public string SharedVar1()
    {
	mutex1.WaitOne();
	return sharedVar1;
	mutex1.ReleaseMutex();
    }

    public void SetSharedVar1(string value)
    {
	mutex1.WaitOne();
	sharedVar1 = value;
	mutex1.ReleaseMutex();
    }
}
- The pool may contain any number of protected shared variables.
- Each variable may be protected by its own mutex or several variables my be protected by one mutex, e.g. to maintain their consitency.
- In this example a int variable is probably not required to be protected with a mutex or any other lock, because integer variables are read or written using atomic operations (without interruption by another thread). This may be not true for e.g. 64-bit integers (type long) on a 32-bit system.
- The usage of Mutex may be overkill here because it is a .NET wrapper around an operating system construct, and can be used for system-wide synchronization. To protect access to a variable only in the same application domain, you may use the C# lock statement, but be aware of the following recommendation:
- Always use a separate variable (of type object) for the lock().
- If possible, use a lock variable which is only visible where it is needed, so that no one else can use it mistakenly, too.
- Even if the lock statement is only a kind of wrapper around System.Threading.Monitor class, don’t use Monitor if possible (the use of Monitor is much more delicate).
- To protect access to simple counter variables you may possibly use the System.Threading.Interlocked class.
EventWaitHandle
EventWaitHandle can be used for synchronization between threads through notifications/signals. In a simple scenario, a thread waiting due a call to EventWaitHandle.WaitOne() can be signaled (resumed) by another thread using EventWaitHandle.Set().
// create EventWaitHandle
static EventWaitHandle somthingChangedEvent = new EventWaitHandle(false, EventResetMode.AutoReset);

// thread A: wait for EventWaitHandle
somthingChangedEvent.WaitOne();

// thread B: signal thread AutoReset
somthingChangedEvent.Set();
- Constructor public EventWaitHandle (bool initialState, System.Threading.EventResetMode mode):
- initialState: when true the EventWaitHandle is initially signaled.
- mode = AutoReset: When signaled, the EventWaitHandle resets automatically after releasing a single thread. If no threads are waiting, the EventWaitHandle remains signaled until a thread blocks, and resets after releasing the thread.
- mode = ManualReset: When signaled, the EventWaitHandle releases all waiting threads and remains signaled until it is manually reset.
- Other methods of EventWaitHandle allows to wait for many events and continue as soon as one or all events are signaled, and/or specify a timeout.
Channels
.NET supports different types of (message) queues and stacks. System.Threading.Channels.Channel<T> is probably the most versatile of them.
// create a channel with limited size, queue entries (messages) are of type string
int myChannelCapacity = 10;
static Channel<string> myChannel = Channel.CreateBounded<string>(myChannelCapacity);

// write a message into a channel asynchronously
await myChannel.Writer.WriteAsync("this is a message");

// write a message into a channel synchronously
bool writeWasSuccessfull = myChannel.Writer.TryWrite("this is a message");

// read a message from a channel asynchronously
var message = await myChannel.Reader.ReadAsync();

// read a message from a channel synchronously
string message;
bool readWasSuccessfull = myChannel.Reader.TryRead(out message);
- Channels can be created with unlimited or limited size:
- Channel.CreateBounded(channelCapacity): limited
- Channel.CreateUnbound(): unlimited
- Overloads allow to specify more channel options.
- A synchronous write into a channel may block the thread if the channel is full.
- A asynchronous read from a channel may block the thread if the channel is empty.