This article uses user pi to install Docker and Mosquitto.
All commands have to be executed on the Raspberry Pi (log in to Raspberry Pi directly or use ssh from your PC) with a user allowed to use the sudo command..
Setting up Docker
The recommended method is to install Docker Desktop, this works on Linux, Windows and Mac plattforms and includes everything you need (installation guide). Here we describe an alternative way to install Docker manually:
Install Docker on Raspberry Picurl -sSL https://get.docker.com | sh
Some of the affected directories:
/var/lib/docker
/etc/docker
/opt/containerd
Add user pi to group docker (this enables you to use the docker command without sudo):sudo usermod -aG docker pi
This Guide uses also Docker Compose. If Docker Compose is not installed with Docker, you have to install it manually.
sudo reboot
Setting up Mosquitto (MQTT Broker)
Create the following directory tree (you may select any other directory as root):
/docker
/docker/mosquitto
/docker/mosquitto/config
/docker/mosquitto/data
/docker/mosquitto/log
Create the config file for Mosquitto with the following content:nano /docker/mosquitto/config/mosquitto.conf
# Config file for mosquito
listener 1883
#protocol websockets
persistence true
persistence_location /mosquitto/data/
log_dest file /mosquitto/log/mosquitto.log
allow_anonymous false
Create the config file for docker-compose with the following content (pay attention to the indentation of the lines in the YAML file, use 4 spaces per indentation, no tabs):cd /docker
sudo nano docker-compose.yaml
version: '3'

services:
    mosquitto:
        container_name: mosquitto
        restart: always
        image: eclipse-mosquitto
        ports:
            - "1883:1883"
            - "9001:9001"
        volumes:
            - ./mosquitto/config/mosquitto.conf:/mosquitto/config/mosquitto.conf
            - ./mosquitto/data:/mosquitto/data
            - ./mosquitto/log:/mosquitto/log
        networks:
            - default

networks:
    default:
Now you can install and start Mosquitto:docker compose up -d
Check if Mosquitto is running:docker ps
Create a password file for Mosquitto. with the user mqtt-user
docker exec -it mosquitto sh executes a (temporary) shell in the running mosquitto service (you may use any username and password):docker exec -it mosquitto sh
mosquitto_passwd -c /mosquitto/data/pwfile mqtt-user
Password: anyPassword
exit
Update the Mosquitto config file with the path to the password file (add the following line to the file):
Mosquitto must be stopped during editing the config file.sudo docker stop mosquitto
sudo nano /docker/mosquitto/config/mosquitto.conf
| … password_file /mosquitto/data/pwfile |
sudo docker start mosquitto
sudo docker ps
Testing the MQTT brocker
For testing the Mosquitto service you may start two terminals on Raspberry Pi or log in twice using ssh.
The -u and -p options specify username and password. You must replace them with the values you used when creating the Mosquitto user (see above).
On terminal A execute the following commands to start a subscriber client:docker exec -it mosquitto sh
mosquitto_sub -u mqtt-user -P pw4mqtt-user -d -t home/kitchen/temperature
On terminal B execute the following commands to start a publisher client:docker exec -it mosquitto sh
mosquitto_pub -u mqtt-user -P pw4mqtt-user -d -t home/kitchen/temperature -m "21.3"
Terminal A must display all messages send from Terminal B if both are using the same topic (home/kitchen/temperature). E.g.
Client null sending CONNECT
Client null received CONNACK (0)
Client null sending SUBSCRIBE (Mid: 1, Topic: home/kitchen/temperature, QoS: 0, Options: 0x00)
Client null received SUBACK
Subscribed (mid: 1): 0
Client null received PUBLISH (d0, q0, r0, m0, 'home/kitchen/temperature', ... (4 bytes))
21.3
Client null received PUBLISH (d0, q0, r0, m0, 'home/kitchen/temperature', ... (4 bytes))
21.7
Client null sending PINGREQ
Client null received PINGRESP
Tools for debugging MQTT
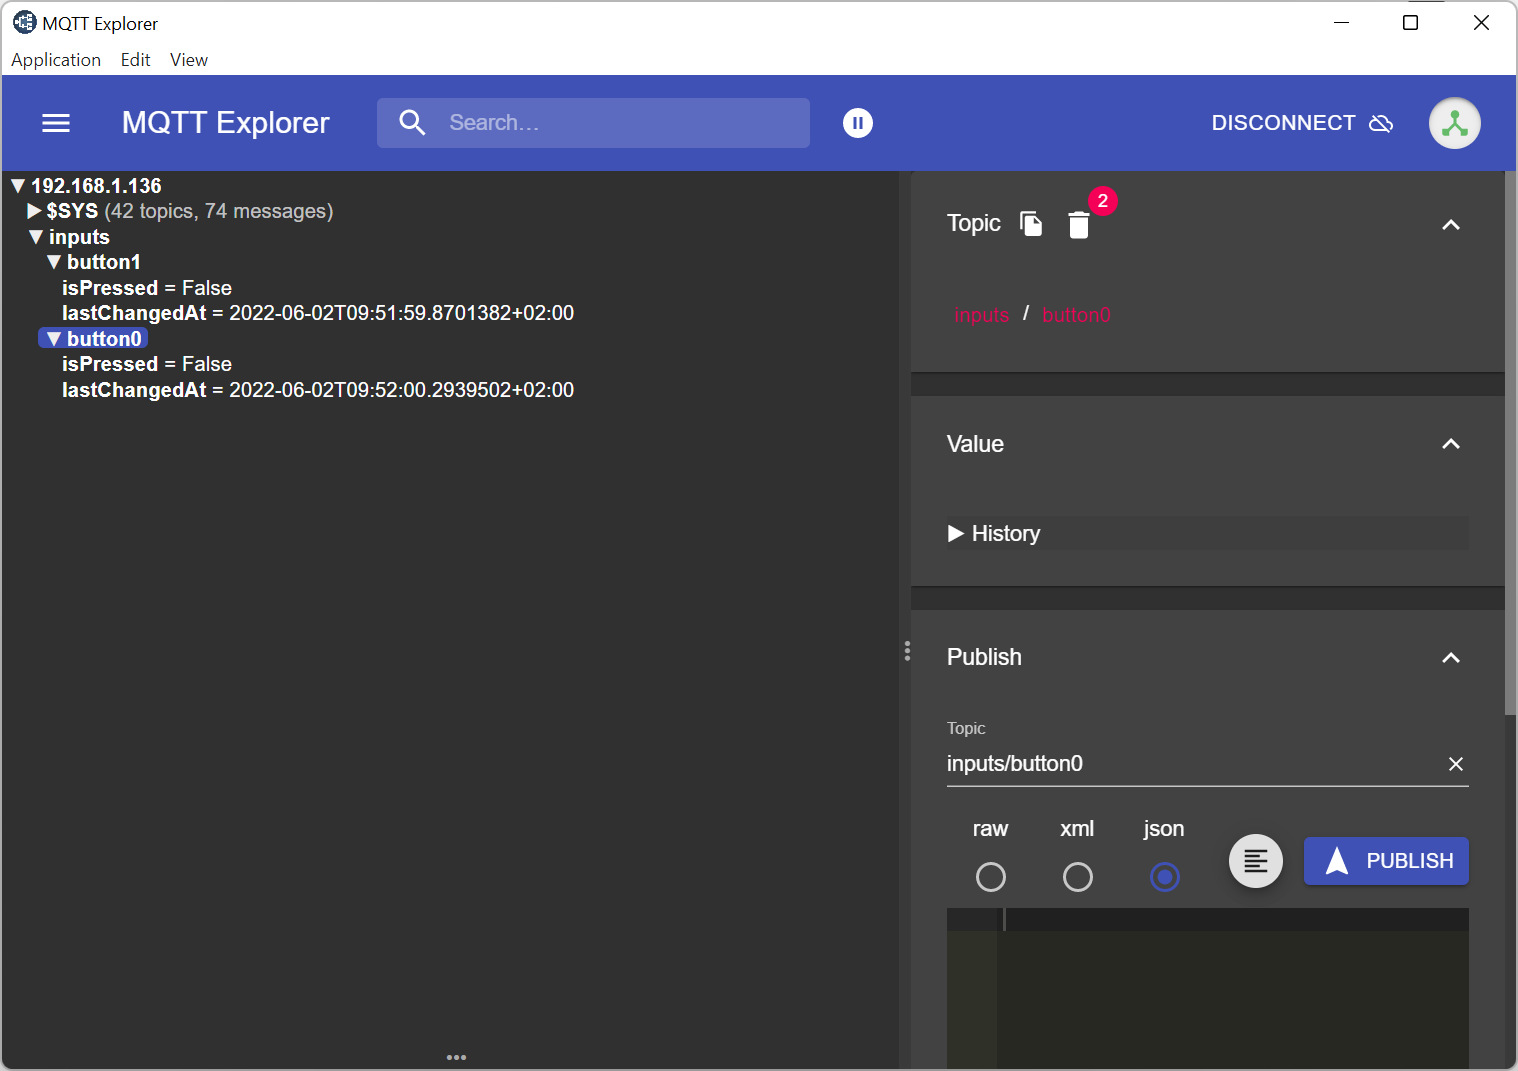
MQTT Explorer
MQTT Explorer can be installed on the development PC (may be it can also be install on Raspberry Pi OS using the Snap package manager – I haven’t tested it). After connecting to a MQTT broker the MQTT Explorer displays all topics and it allows also to publish topics.

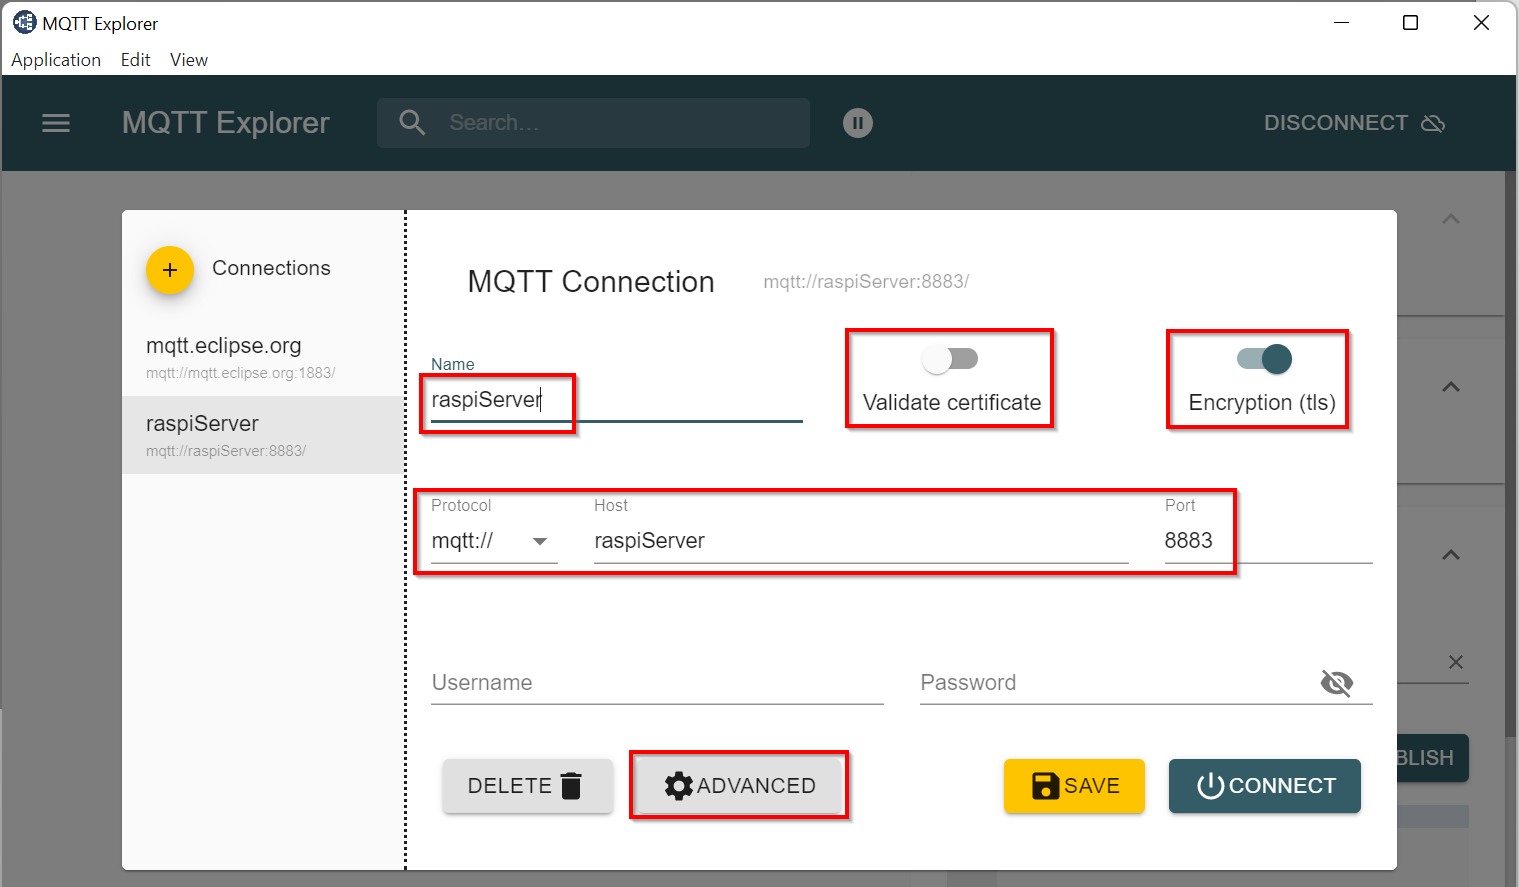
Using MQTT Explorer with TLS and (self-signed) client certificate:
Wireshark
Wireshark is a network protocol analyzer for Windows, MacOS or Linux/Raspberry Pi OS. To avoid problems with the promiscuous mode in connection with network switches, Wireshark should be installed directly on the computer running Mosquitto.
sudo apt-get install wireshark
sudo wireshark
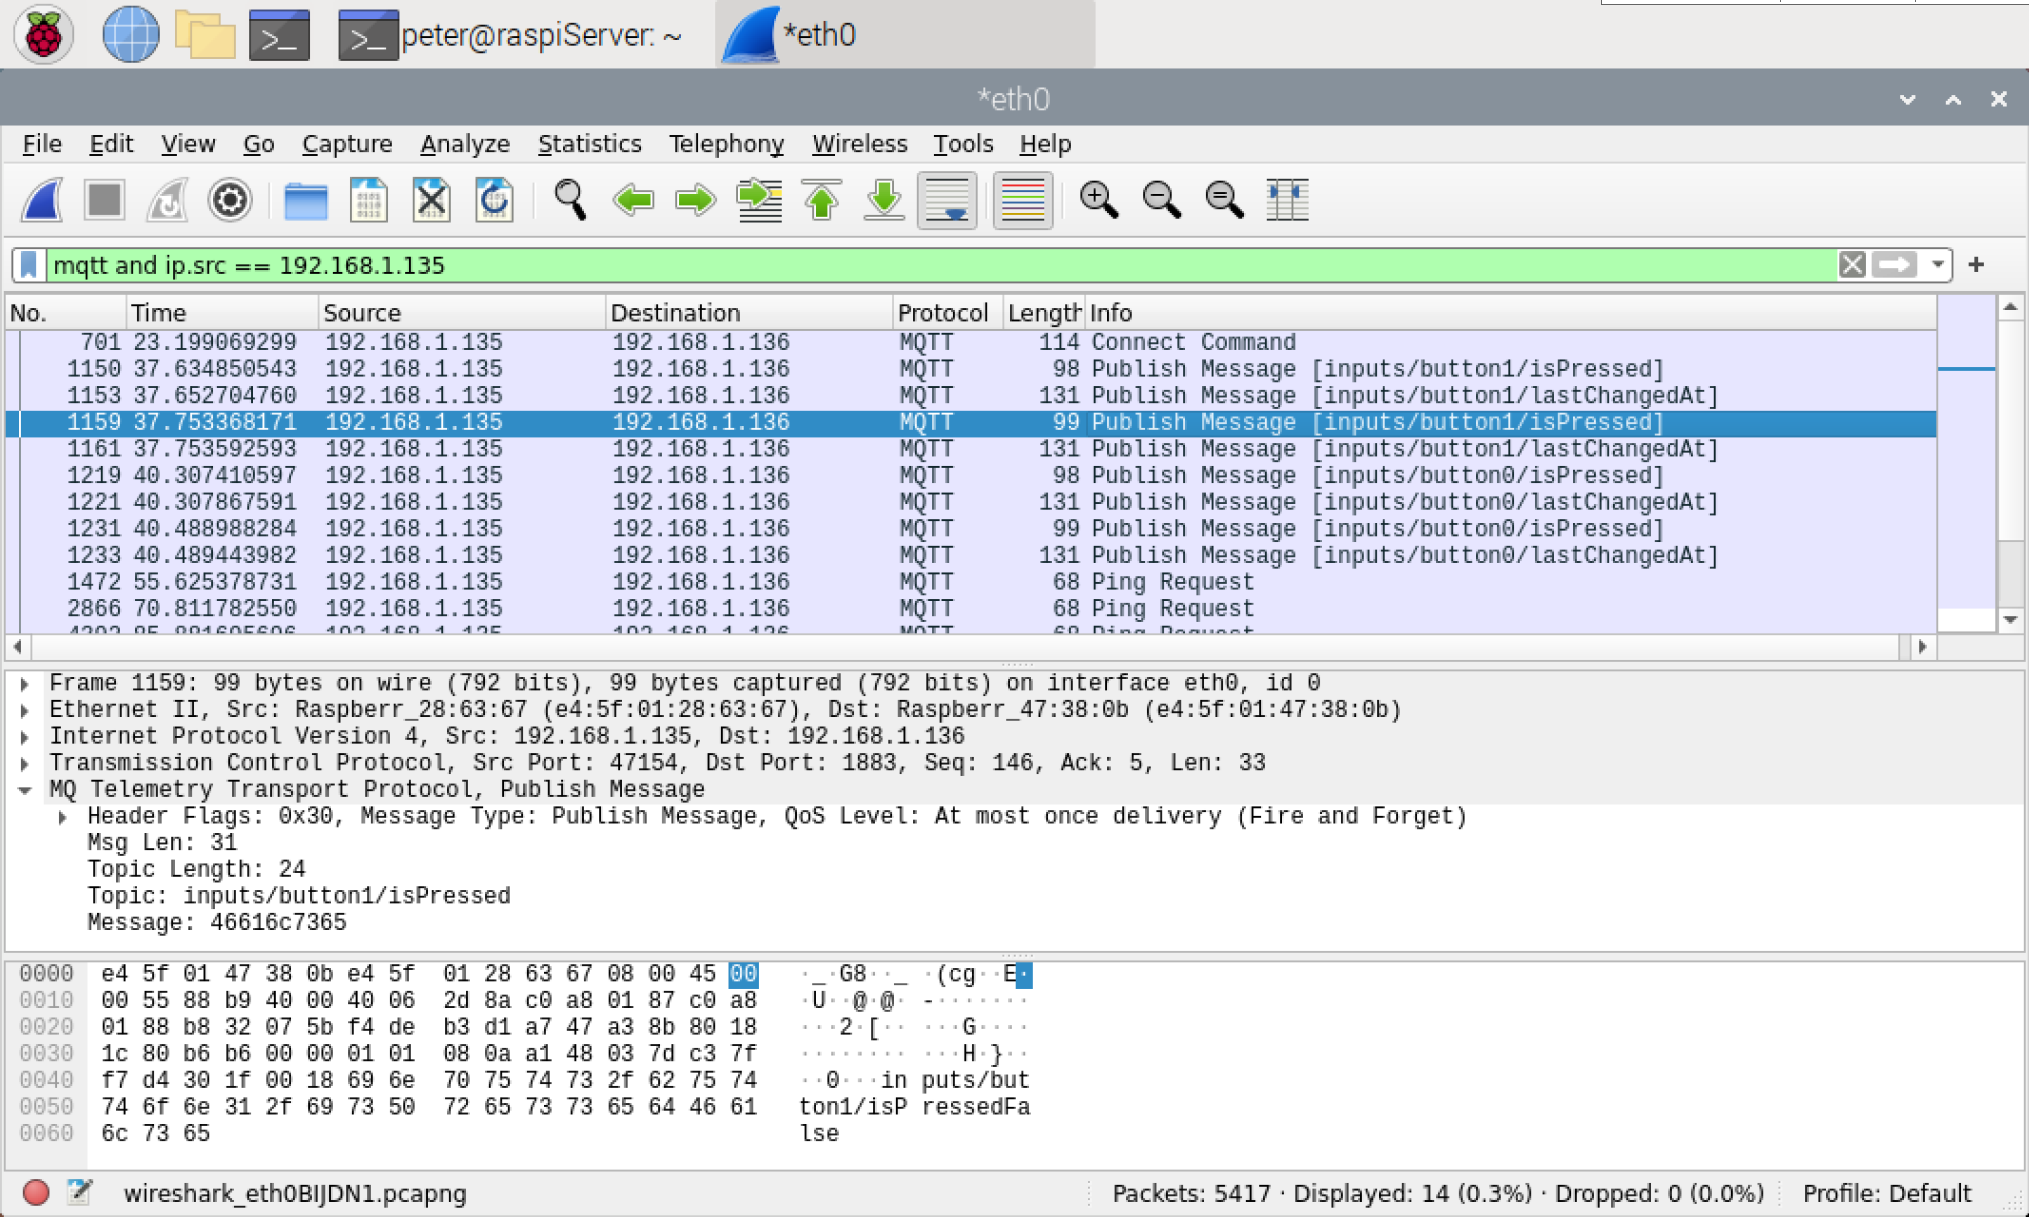
Wireshark knows the MQTT protocol and can decode it:
Configuring Mosquitto for SSL/TLS
The configuration of Mosquitto for SSL/TLS is optional. As long as you use the MQTT broker only in an internal/private network (intranet), you can do without it. However, if the broker is also accessible from the Internet, TLS (Transport Layer Security) should be used.
The easiest way is to create the certificates directly on the Raspberry Pi.
Create CA certificate
First we have to create a symmetric key pair and a certificate for the Certificate Authority (CA).
cd ~
mkdir certs
cd certs
Create CA key pairopenssl genrsa -des3 -out ca.key 2048
pass phrase: myPassPhrase (enter a pass phrase to protect the private key)
-> ca.key
Create CA certificateopenssl req -new -x509 -days 3650 -key ca.key -out ca.crt
pass phrase: (enter you pass phrase used when creating the CA key pair)
You may enter empty strings to all inputs, except …
… common Name (e.g. server FQDN or YOUR name): MyCA (or whatever you want to call it)
-> ca.crt
If you want to install the new CA certificate into the systemwide certificate store of Raspberry Pi OS you can do this but it is not required for Mosquitto (further instructions are available in /etc/ca-certificates.conf):
Copy CA certificate to /user/share/ca-certificates:
sudo cp ca.crt /usr/share/ca-certificates/my-ca.crt
Update CA certificates in /etc/ssl/certs…:
sudo dpkg-reconfigure ca-certificates
In the certificates list displayed by dpkg-reconfigure you must find and select your new CA certificate, my-ca.crt.
Create Server Certificate used by Mosquitto for SSL/TLS
The server certificate must be signed with the CA certificate just created.
Create key pair for Mosquittoopenssl genrsa -out mosquitto_server.key 2048
-> mosquito_server.key
Create Certificate Signing Requestopenssl req -new -out mosquitto_server.csr -key mosquitto_server.key
You may enter empty strings to all inputs, except …
… common Name (e.g. server FQDN or YOUR name): MyServer (enter hostname or IP address of your server)
-> mosquito_server.csr
Verify and Sign the Certificate Requestopenssl x509 -req -in mosquitto_server.csr -CA ca.crt -CAkey ca.key -CAcreateserial -out mosquitto_server.crt -days 3650
pass phrase: (enter you pass phrase used when creating the CA key pair)
-> mosquito_server.crt
-> ca.srl
Move all files to a secure place.
Configuring Mosquitto
From the keys and certificates just created copy the following ones to the Mosquitto volume:
cd ~/certs
sudo mkdir /docker/mosquitto/certs
sudo cp ca.crt /docker/mosquitto/
sudo cp mosquitto_server.crt /docker/mosquitto/certs/
sudo cp mosquitto_server.key /docker/mosquitto/certs/
Update the Mosquitto config file with the listener for port 8883 and the paths to the certificate and key files. If you want to use the broker in a production and/or Internet environment, you should remove listener 1883. However, for development it is very useful to support both, since debugging can be easier without encryption, e.g. with Wireshark (see below).
Mosquitto must be stopped during editing the config file.sudo docker stop mosquitto
sudo nano /docker/mosquitto/config/mosquitto.conf
# Config file for mosquito
listener 1883
listener 8883
#protocol websockets
persistence true
persistence_location /mosquitto/data/
log_dest file /mosquitto/log/mosquitto.log
allow_anonymous false
password_file /mosquitto/data/pwfile

cafile /mosquitto/certs/ca.crt
certfile /mosquitto/certs/mosquitto_server.crt
keyfile /mosquitto/certs/mosquitto_server.key
Update docker-compose.yaml to include the the port 8883 and the certs volume (pay attention to the indentation of the lines in the YAML file, use 4 spaces per indentation, no tabs):sudo nano /docker/docker-compose.yaml
version: '3'

services:
    mosquitto:
        container_name: mosquitto
        restart: always
        image: eclipse-mosquitto
        ports:
            - "1883:1883"
            - "8883:8883"
            - "9001:9001"
        volumes:
            - ./mosquitto/config/mosquitto.conf:/mosquitto/config/mosquitto.conf
            - ./mosquitto/data:/mosquitto/data
            - ./mosquitto/log:/mosquitto/log
            - ./mosquitto/certs:/mosquitto/certs
        networks:
            - default

networks:
    default:
sudo docker start mosquitto
sudo docker ps
Check in the Mosquitto log file that no errors occurred:sudo cat /docker/mosquitto/log/mosquitto.log
If you see any errors, stop the Mosquitto container again, try to fix them in the config files and start the container again. IMPORTANT: If you have made any changes to the docker-compose.yaml you must install and start again with the following command (docker start ignores changes in the YAML file):cd /dockerdocker-compose up -d
Using client certificates
Client certificates are optional, but they can further increase security. Instead of username and password client certificates can be used to authenticate the client device against the MQTT broker.
cd ~/certs
Create key pair for client:openssl genrsa -out device001_client.key 2048
-> device001_client.key
Create certificate request for client certificate:openssl req -new -out device001_clientdevice001_client
You may enter empty strings to all inputs, except …
… common Name (e.g. server FQDN or YOUR name): device001 (or whatever you want to call it)
-> device001_client.csr
Create certificate from certificate request:openssl x509 -req -in device001_client.csr -CA ca.crt -CAkey ca.key -CAcreateserial -out device001_client.crt -days 3650
pass phrase: (enter you pass phrase used when creating the CA key pair)
-> device001_client.crt
Create PFX (personal information exchange) file, it contains the client certificate and the private key:openssl pkcs12 -export -out device001_client.pfx -inkey device001_client.key -in device001_client.crt
Export Password: anyPassword (enter a password to protect the PFX file)
-> device001_client.pfx
Optionally, a Mosquitto user with the same username can be set up. This is not absolutely necessary, but makes the whole thing clearer if the additional authentication with username and password is required (which is recommended, see also following comments on use_identity_as_username or use_subject_as_username).
sudo docker exec -it mosquitto sh
mosquitto_passwd -b /mosquitto/data/pwfile device001 anyPassword
Verify that the user was added to the password file:
cat /mosquitto/data/pwfile
Update the Mosquitto config file with settings for client certificate:sudo nano /docker/mosquitto/config/mosquitto.conf
# Config file for mosquito
listener 1883
listener 8883
#protocol websockets
persistence true
persistence_location /mosquitto/data/
log_dest file /mosquitto/log/mosquitto.log
allow_anonymous false
password_file /mosquitto/data/pwfile

cafile /mosquitto/certs/schaeren_ca.crt
certfile /mosquitto/certs/mosquitto_server.crt
keyfile /mosquitto/certs/mosquitto_server.key

require_certificate true
use_identity_as_username false
use_subject_as_username false
- require_certificate true -> clients must specify a client certificate during connection establishment. I.e. only clients whose certificate was issued by the same Ceriticate Authority CA as the server certificate are accepted.
- use_identity_as_username false -> do not use the CN value in the subject of the certificate as username.
- use_subject_as_username false -> do not use the (entire) certificate subject as username.
- Because both use_…_as_username are configured to false, username and password are additionally required for authentication. This has the advantage that a client/user’s access can be revoked later by simply deleting the corresponding line from the Mosquitto password file. Otherwise, you will have to deal with a certificate revocation list to prevent access again afterwards.
If either of the two entries is true, any client with a valid certificate is accepted (it’s not necessary that a identity/subject is equal to a username in the Mosquitto password file)
Mosquitto must be restarted for the changes in the configuration file to take effect:sudo docker restart mosquitto
The client certificate files (e.g. device001_client.pfx) must be transmitted by the MQTT clients during the connection establishment to the broker.
Testing SSL/TLS and client certificates
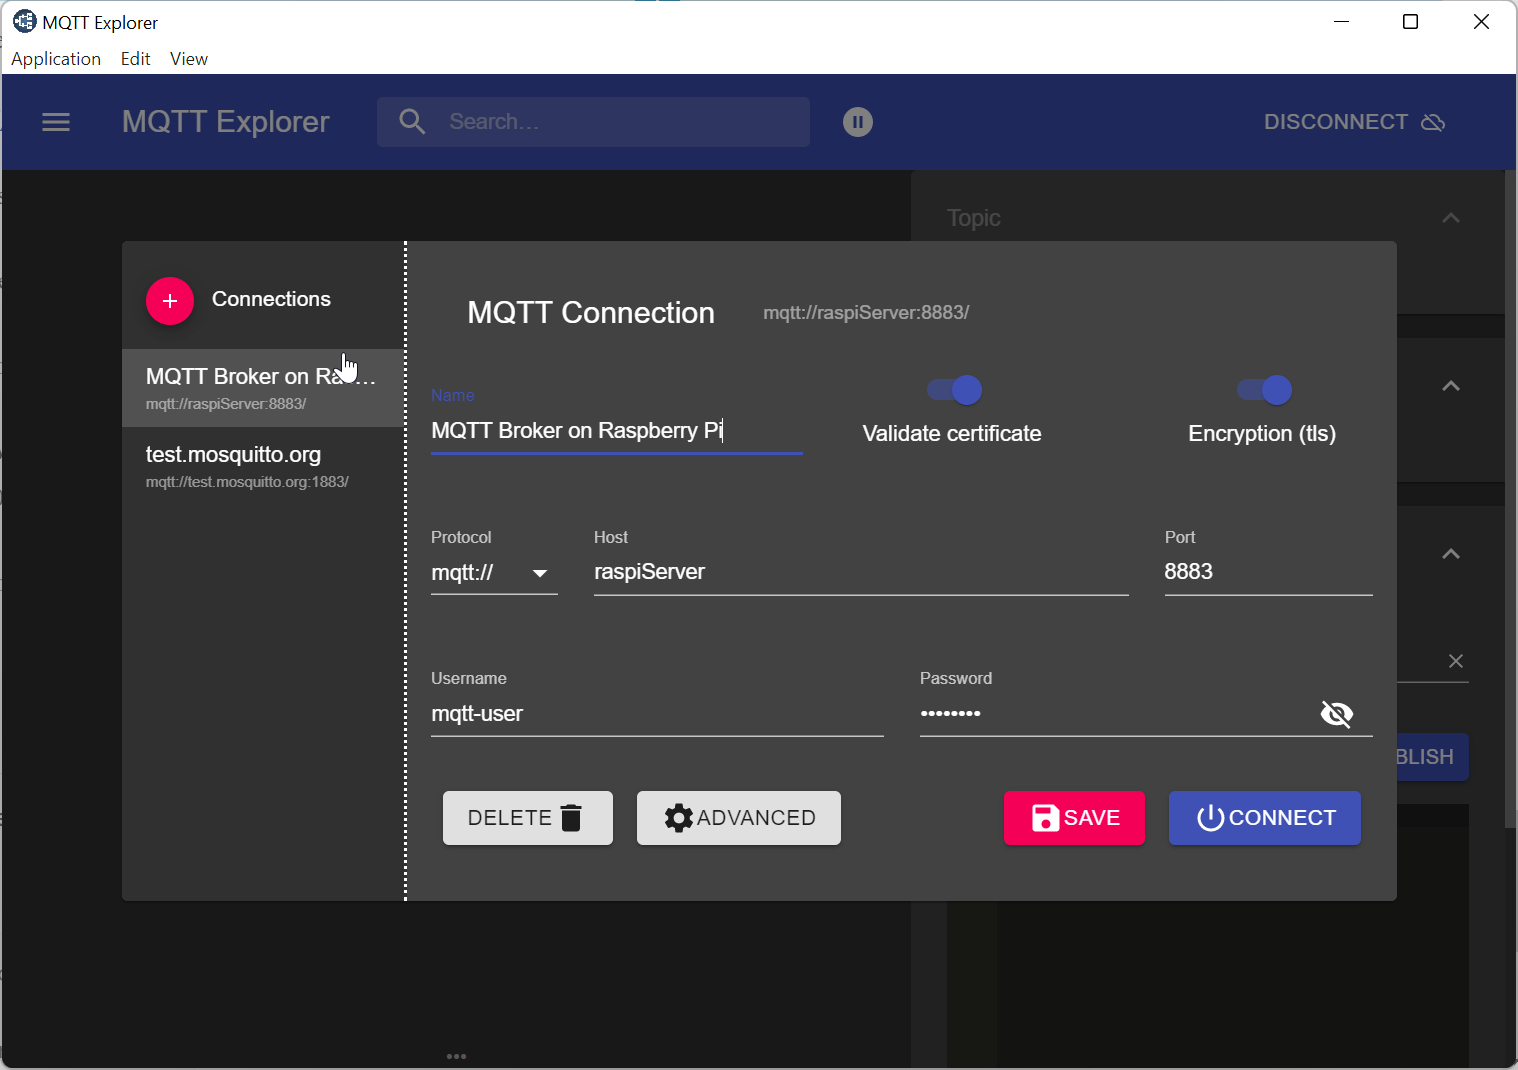
A test is possible e.g. with the MQTT Explorer tool:
On the connection page enable the options Validate certificate and Encryption (tls), enter the hostname or IP address and port number of the broker, enter username and password …
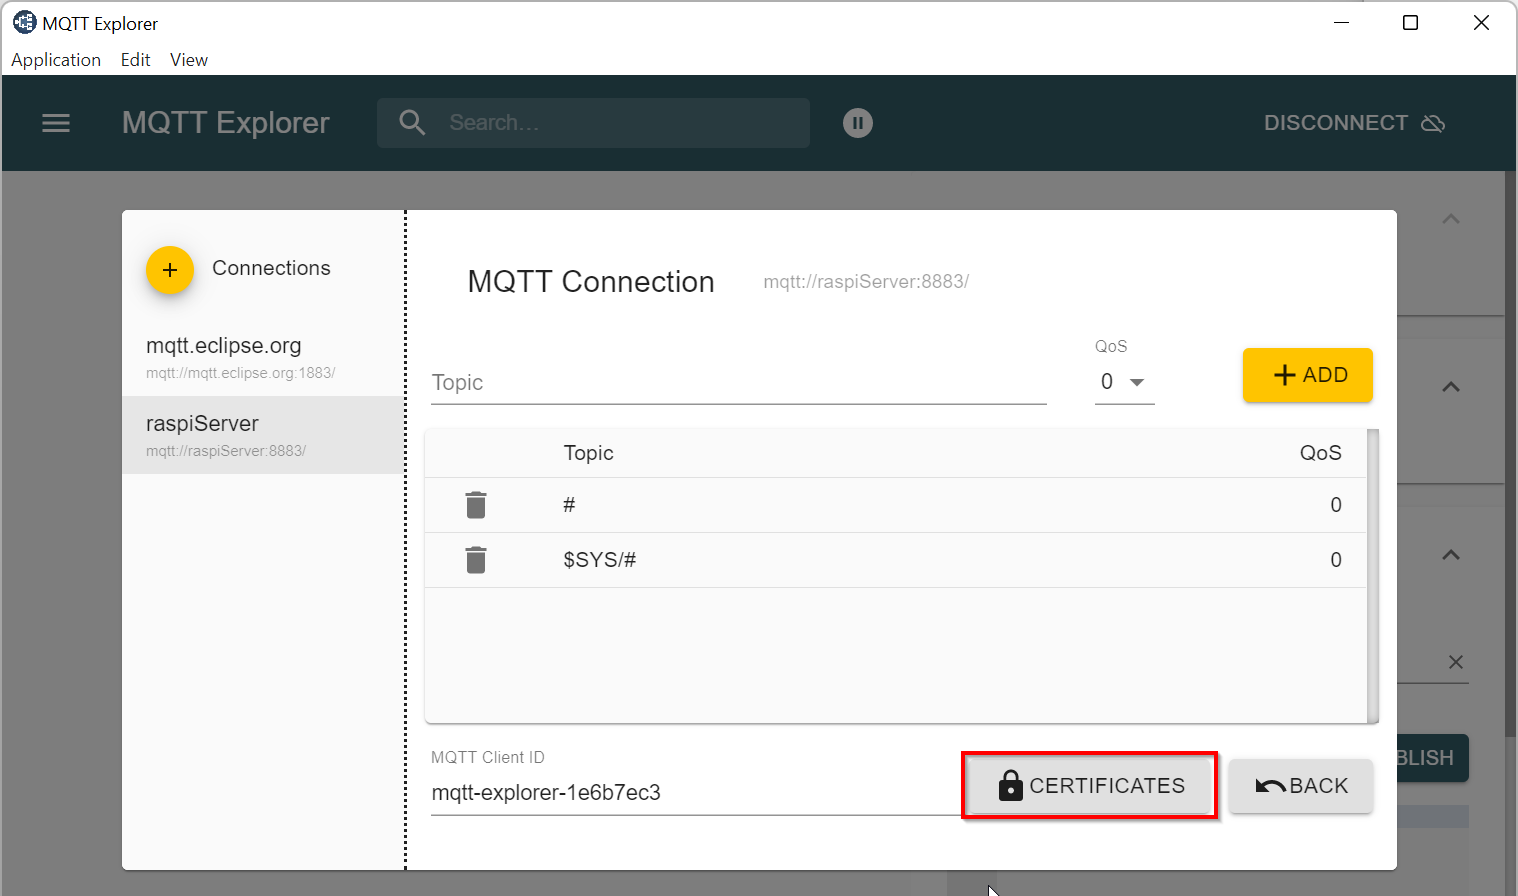
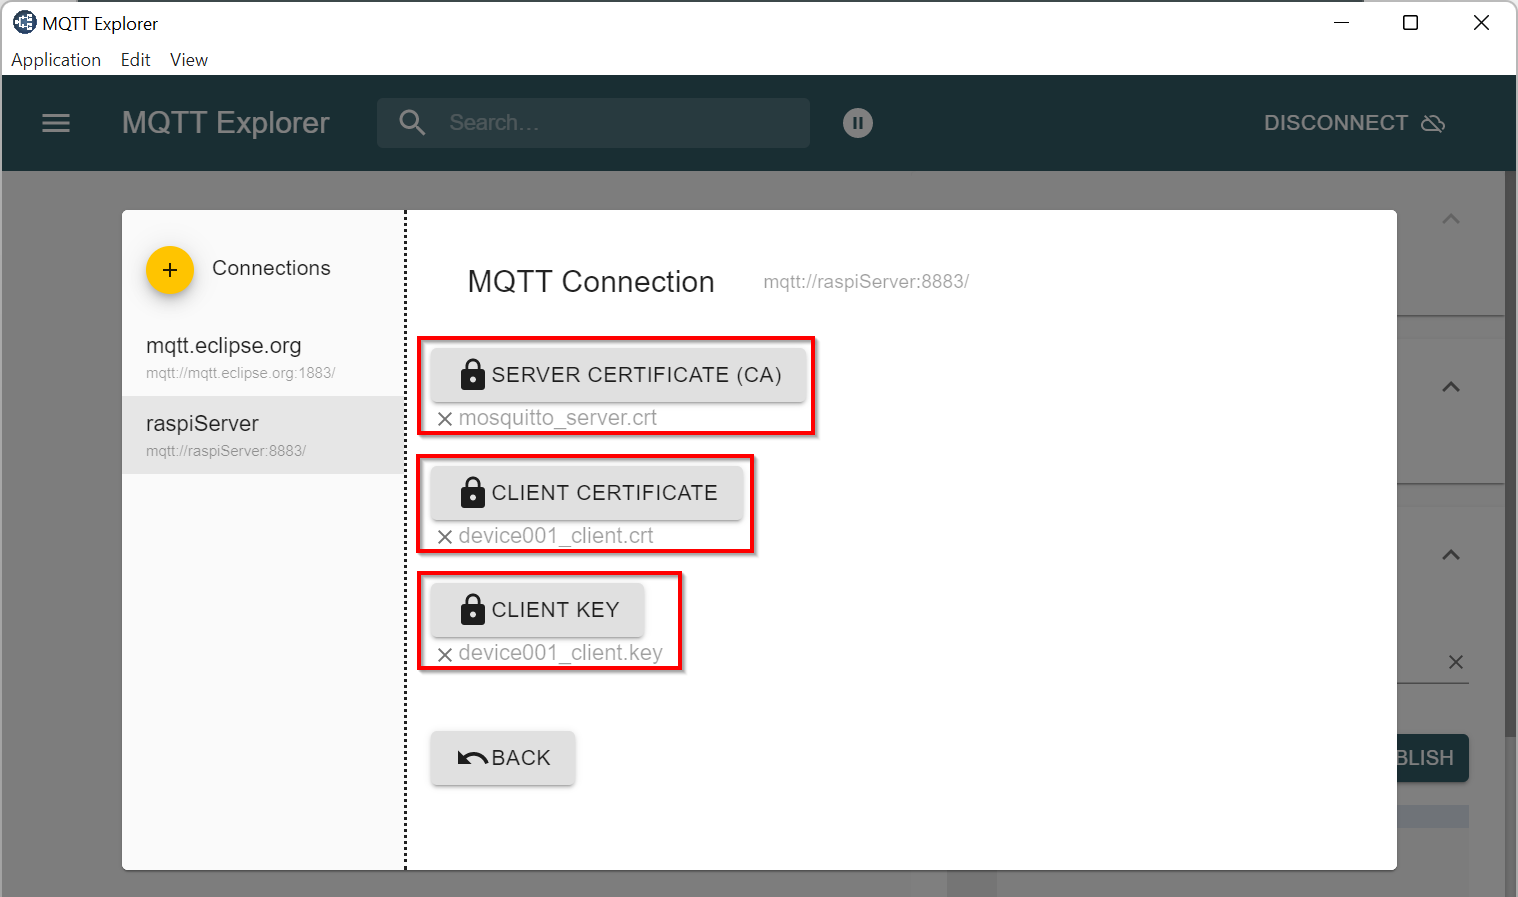
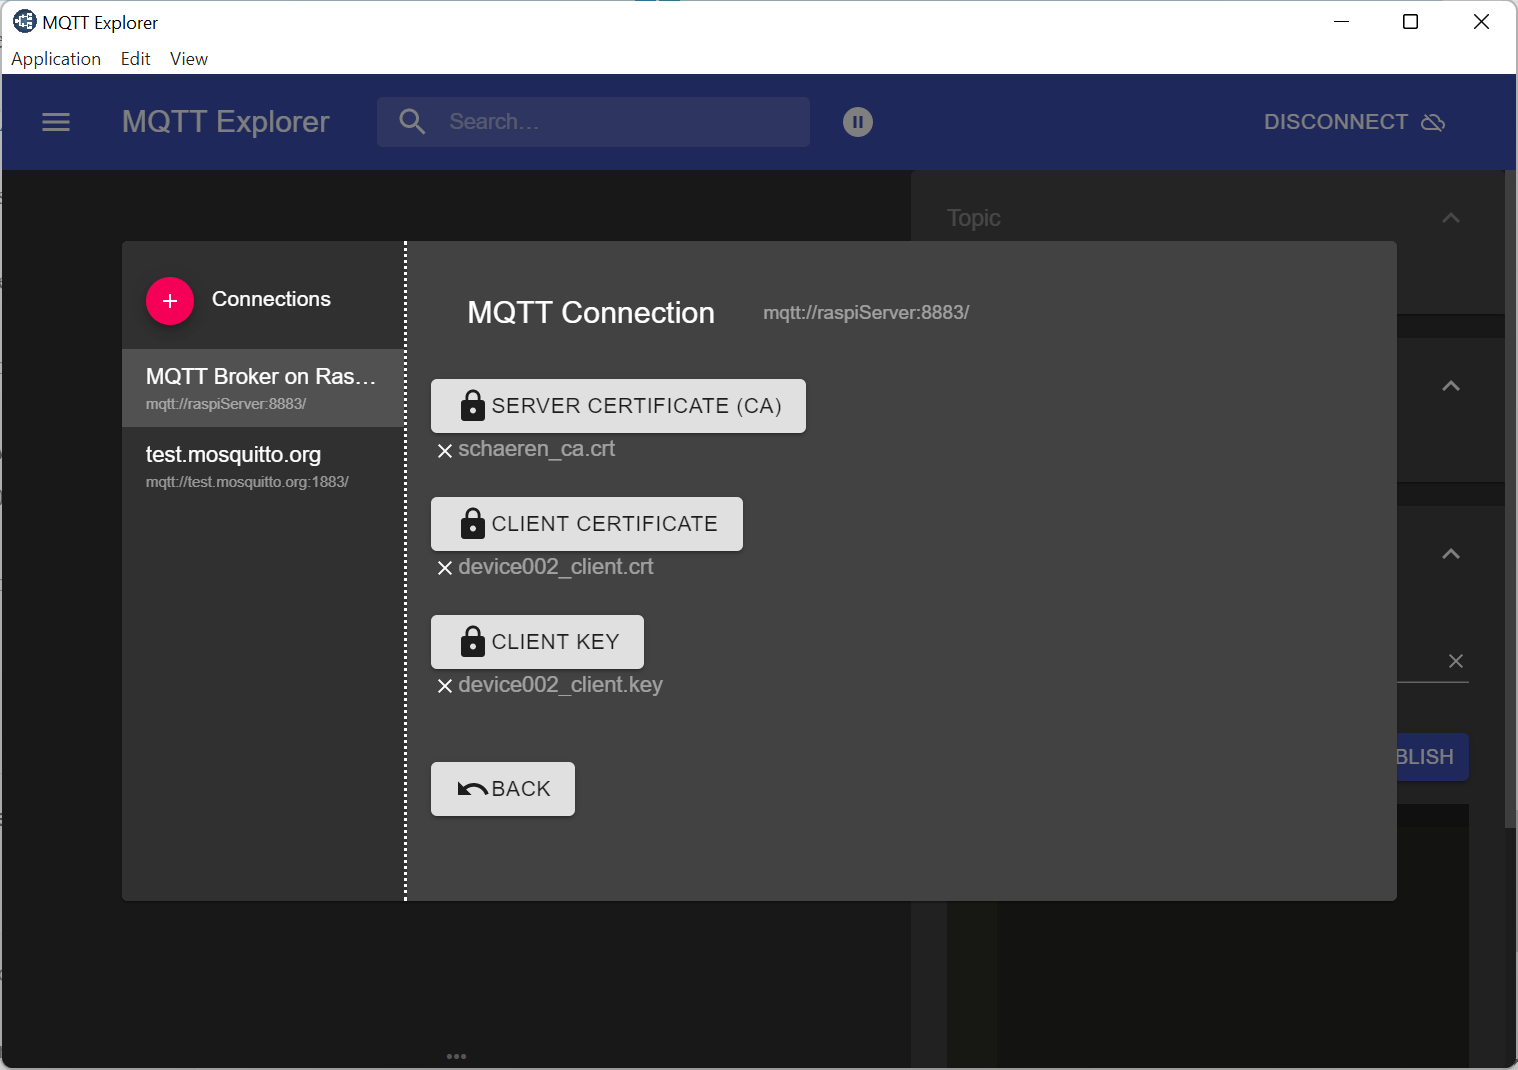
… click ADVANCED and then CERTIFICATES and load the CA certificate (e.g. ca.crt), the client certificate (e.g. device001_client.crt) and the client key (e.g. device001_client.key).
Click BACK twice and and CONNECT.
If you have problems with the hostname not matching the CN in the server certificate or with the CA certificate, you may disable the option Validate certificate and try again.