This article describes how the debugging of an application can be made much easier with a so-called debug probe (on-chip debugging). The debug target used here are the Arduino MKR 1010 or MKR 1310, but the solution works exactly the same for all other Arduino MKR boards and similarly for many other boards.
The article ‘Arduino – Software development with Visual Studio Code and PlatformIO, Debugging‘ describes how to debug an application without additional hardware tools (using the avr-debugger library). This pure software based solution has significant limitations.
Some limitation of software base debugging vs debugging with debug probe (like Atmel ICE):
- avr-debugger is only available for certain microcontrollers (e.g. ATmega328P and ATmega2560 on the boards Arduino UNO and Arduino Mega 2560 respectively).
- Breakpoints cannot be set everywhere (e.g. not in interrupt handlers).
- Serial output can’t be used by the application, because it’s already used by the avr-debugger.
- Not suitable for multitasking applications.
- The flash memory is collaterally aged because every breakpoint must be stored in the flash and cleared again.
- It runs not very stable (according to my experience).
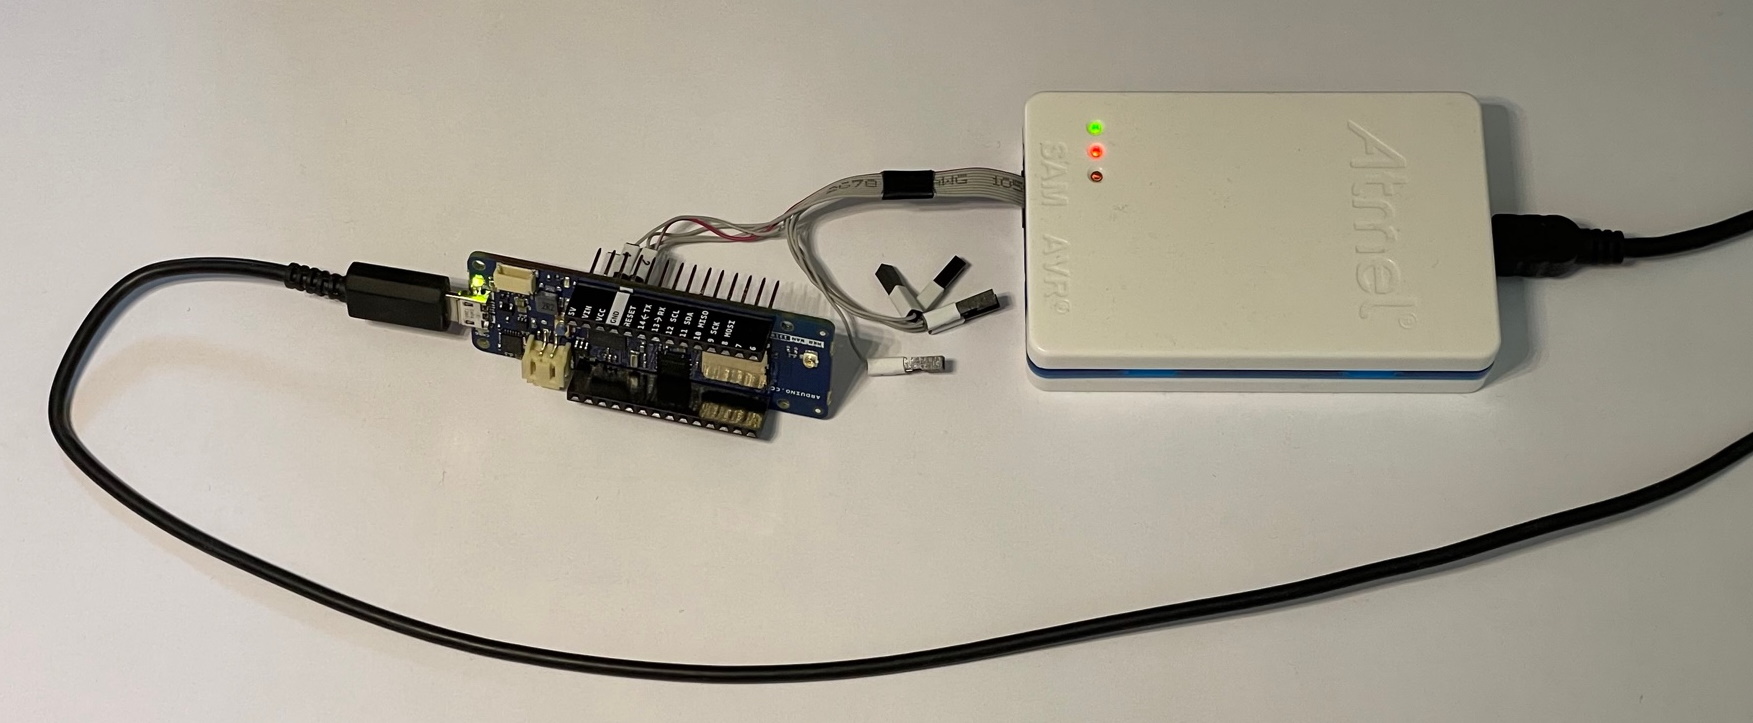
This article shows a much better solution using the Atmel ICE debug probe. The debug probe is connected on one side via USB cable to the development PC, on the other side a direct connection to the hardware debug interface of the microcontroller must be established, for which depending on the board or depending on the connector on it an appropriate cable is required. Depending on the microcontroller different interfaces are supported for connecting the debug probe. Atmel ICE supports many of them, primarily of course for the microcontrollers from Microchip/Atmel, i.e. the families SAM (based on Arm® Cortex®-A/-R/-M cores), AVR (ATmega) and tinyAVR. We use the Serial Wire Debug SWD interface here.
Hardware setup
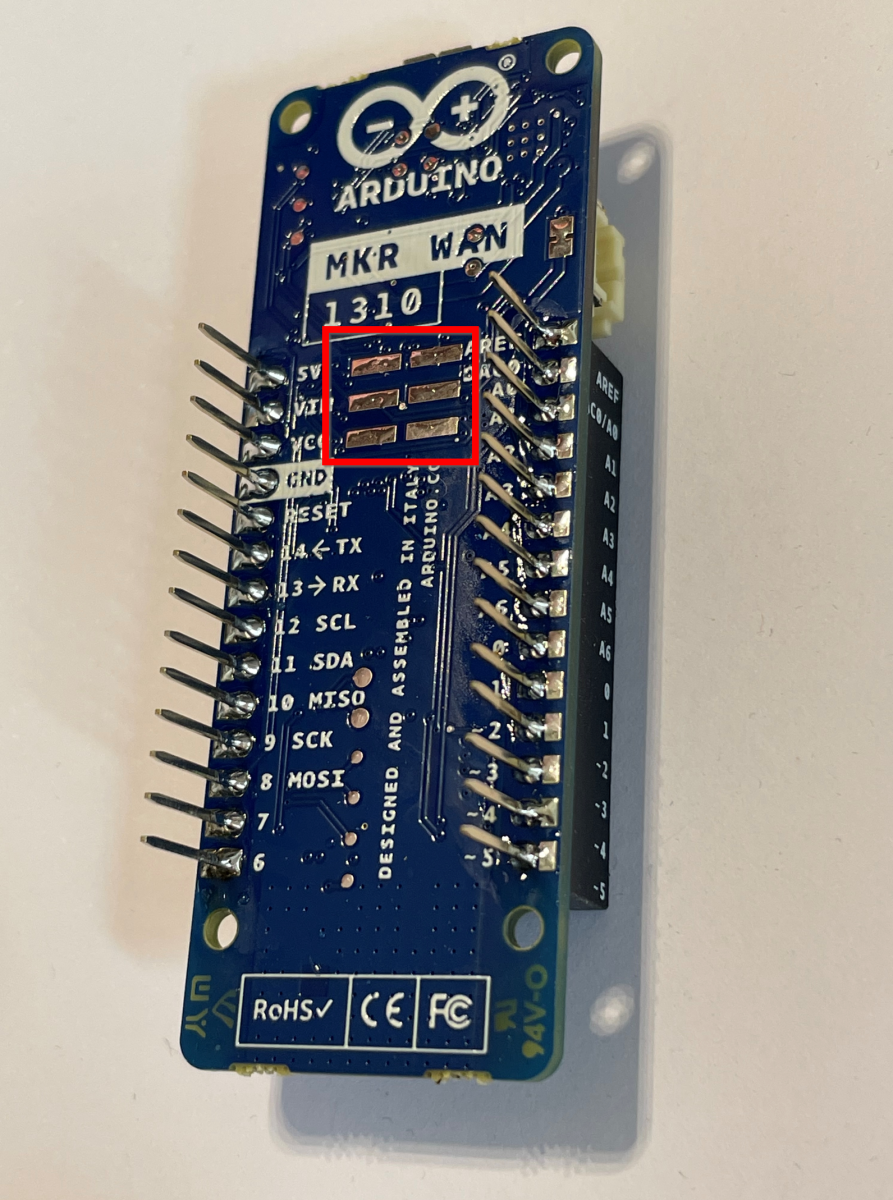
Unfortunately the Arduino MKR boards have no connector for the SWD interface, but they have 6 solder pads on the backside of the board:
One solution to connect the Atmel ICE probe cables to the MKR board is like this (the MKR board is shown from the backside):
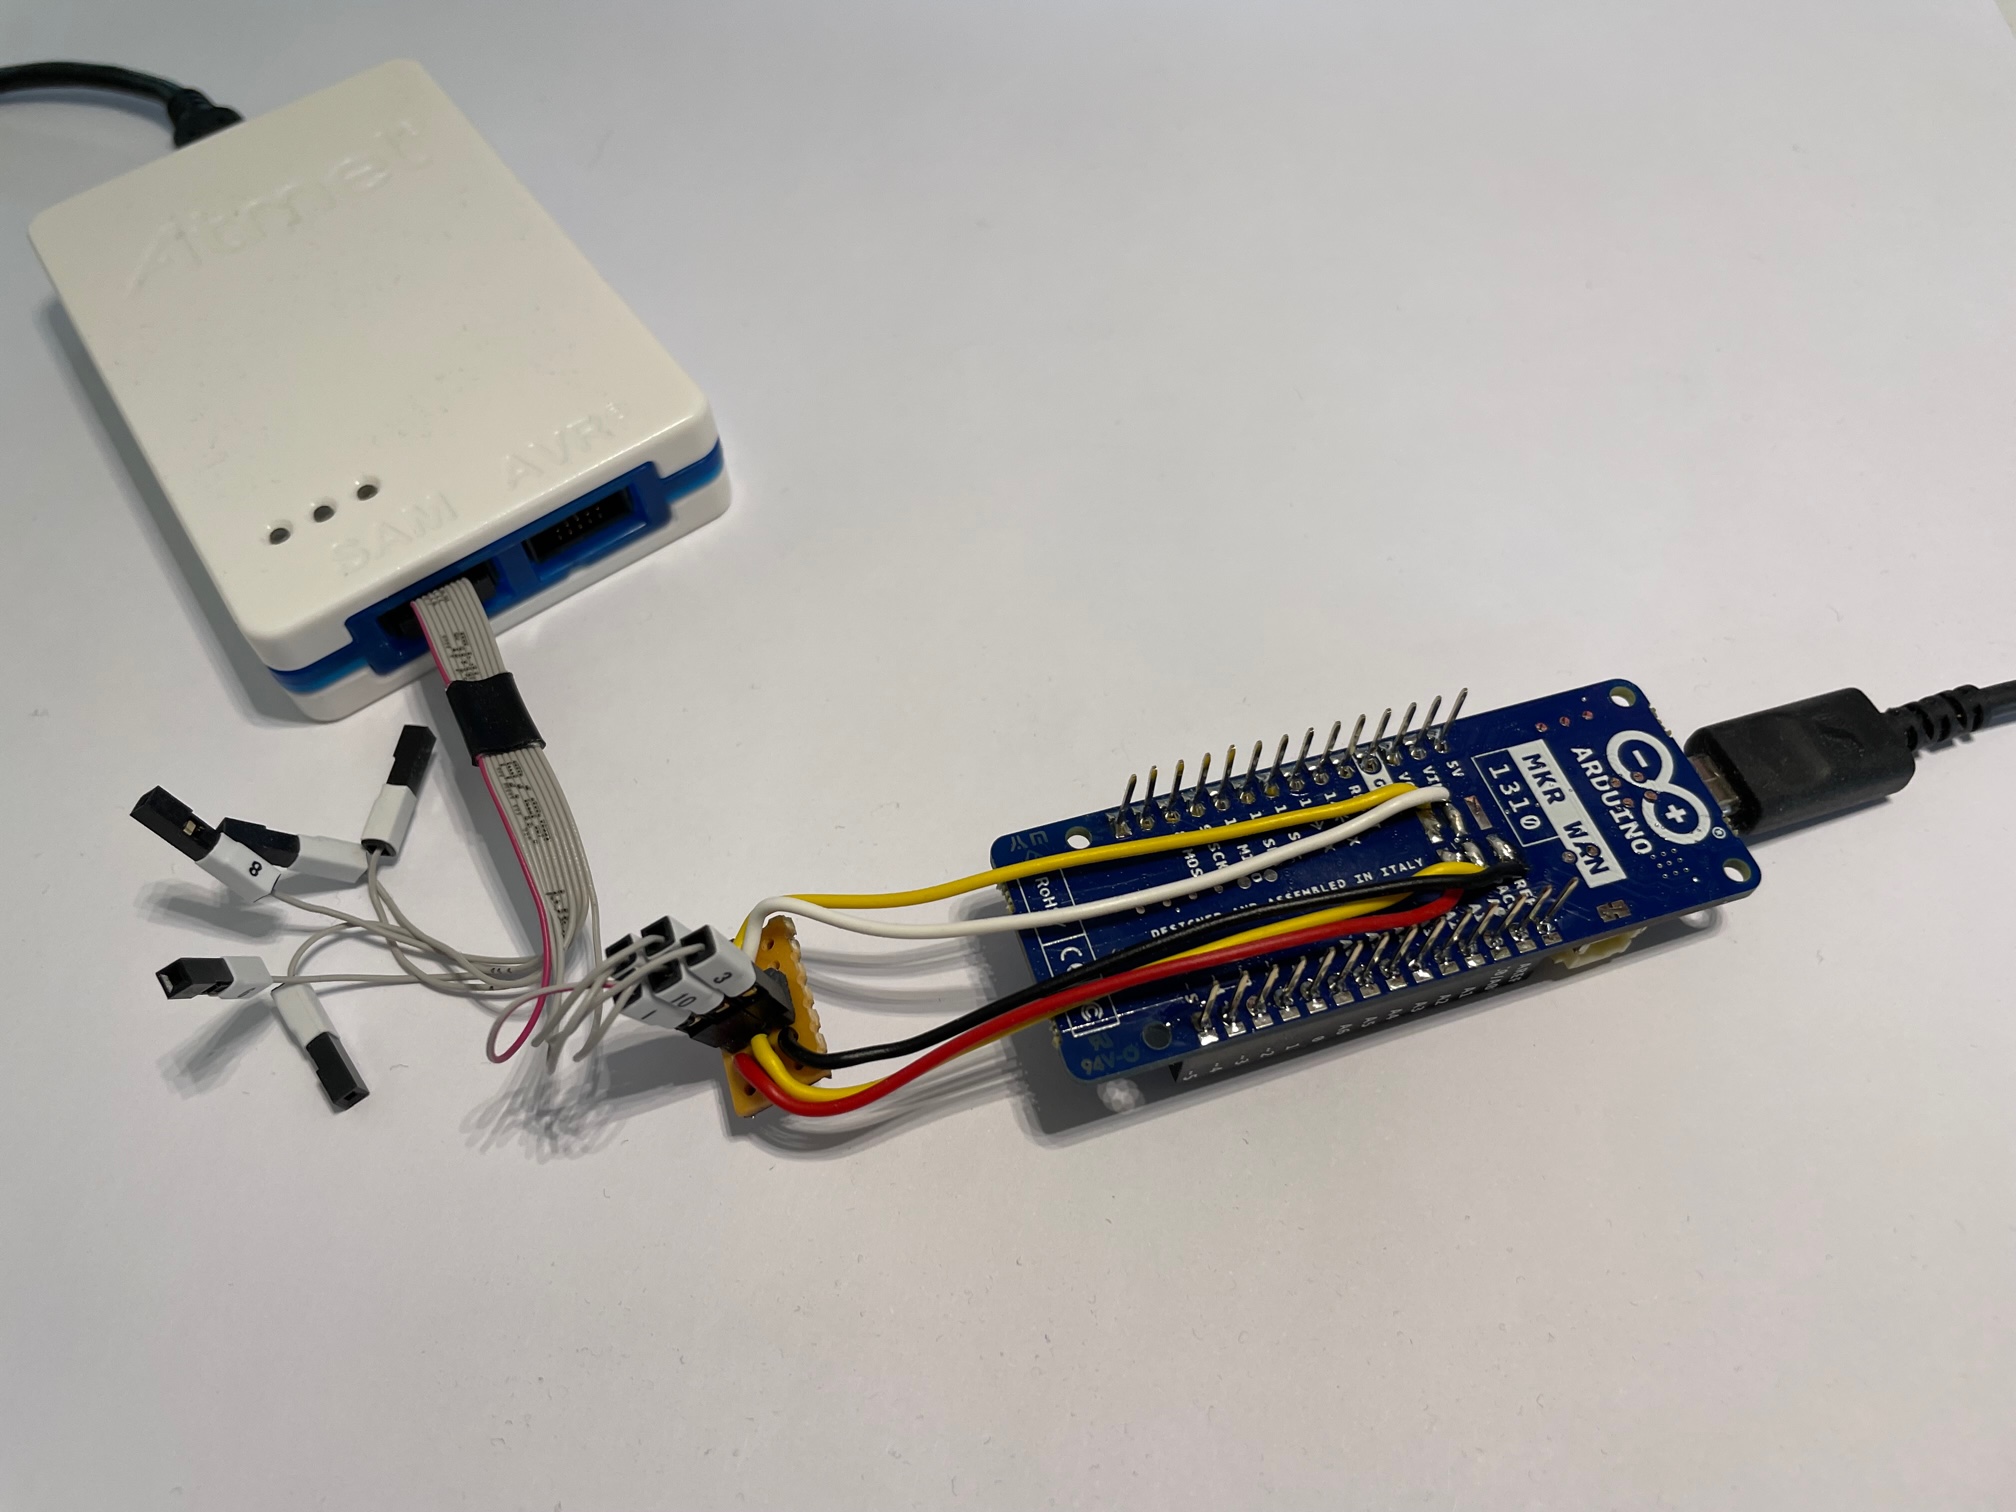
The five cables are soldered to the pads of the MKR board at one end, and connected to a 2×3 pin header at the other end.
These five connections of the SWD interface of the MKR board are used (view from backside):
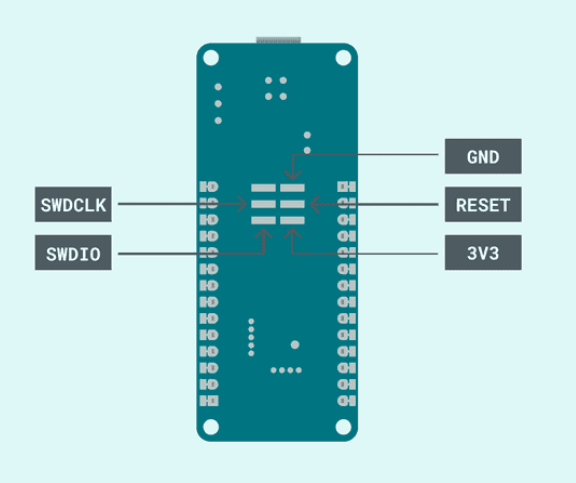
The five cables are connected as follows:
| MKR board | Atmel ICE squid cable connected to the SAM probe connector |
|---|---|
| SWDCLK | 4 |
| SWDIO | 2 |
| GND | 3 |
| RESET | 10 |
| 3V3 | 1 |
Alternatively, a 2×6 pin header for SMD mounting can be soldered directly on the SWD interface pads on the backside of the MKR board:

I prefer the solution with the soldered cables, because it takes almost no space under the MKR board and thus the board can be easily plugged onto breadboard or an MKR shield or any other board. Apart from that, soldering the cables is easier than with the SMD pin header.
For further information on the hardware solution see the following articles:
- Debugging SAM-Based Arduino® Boards with Atmel-ICE
- Arduino Uno Atmel-ICE Connection (I’m not sure but I think it’s not usable for debugging on Arduino UNO, but only for programming the flash memory).
Debugging with Visual Studio Code, PlatformIO and Atmel ICE
Installation of Visual Studio Code and PlatformIO is covered in the article ‘Arduino – Software development with Visual Studio Code and PlatformIO, Debugging‘.
Install the IDE Microchip Studio even if you don’t plan to use it – it will install the necessary device drivers for the Atmel ICE probe.
When you plug the Atmel ICE probe’s USB cable into the PC for the first time, the necessary USB drivers will be installed.
Connect also the Arduino board with a USB cable to the PC.
In your VS Code project you have to adjust the platformio.ini file to use the Atmel ICE. The important entries are debug_tool and upload_protocol. If your application uses Serial input/output via USB, you should also configure Serial Monitor using monitor_port and monitor_speed.
[env:mkrwan1310]
platform = atmelsam
board = mkrwan1310
framework = arduino

monitor_port = COM3
monitor_speed = 115200

debug_tool = atmel-ice
upload_protocol = atmel-ice
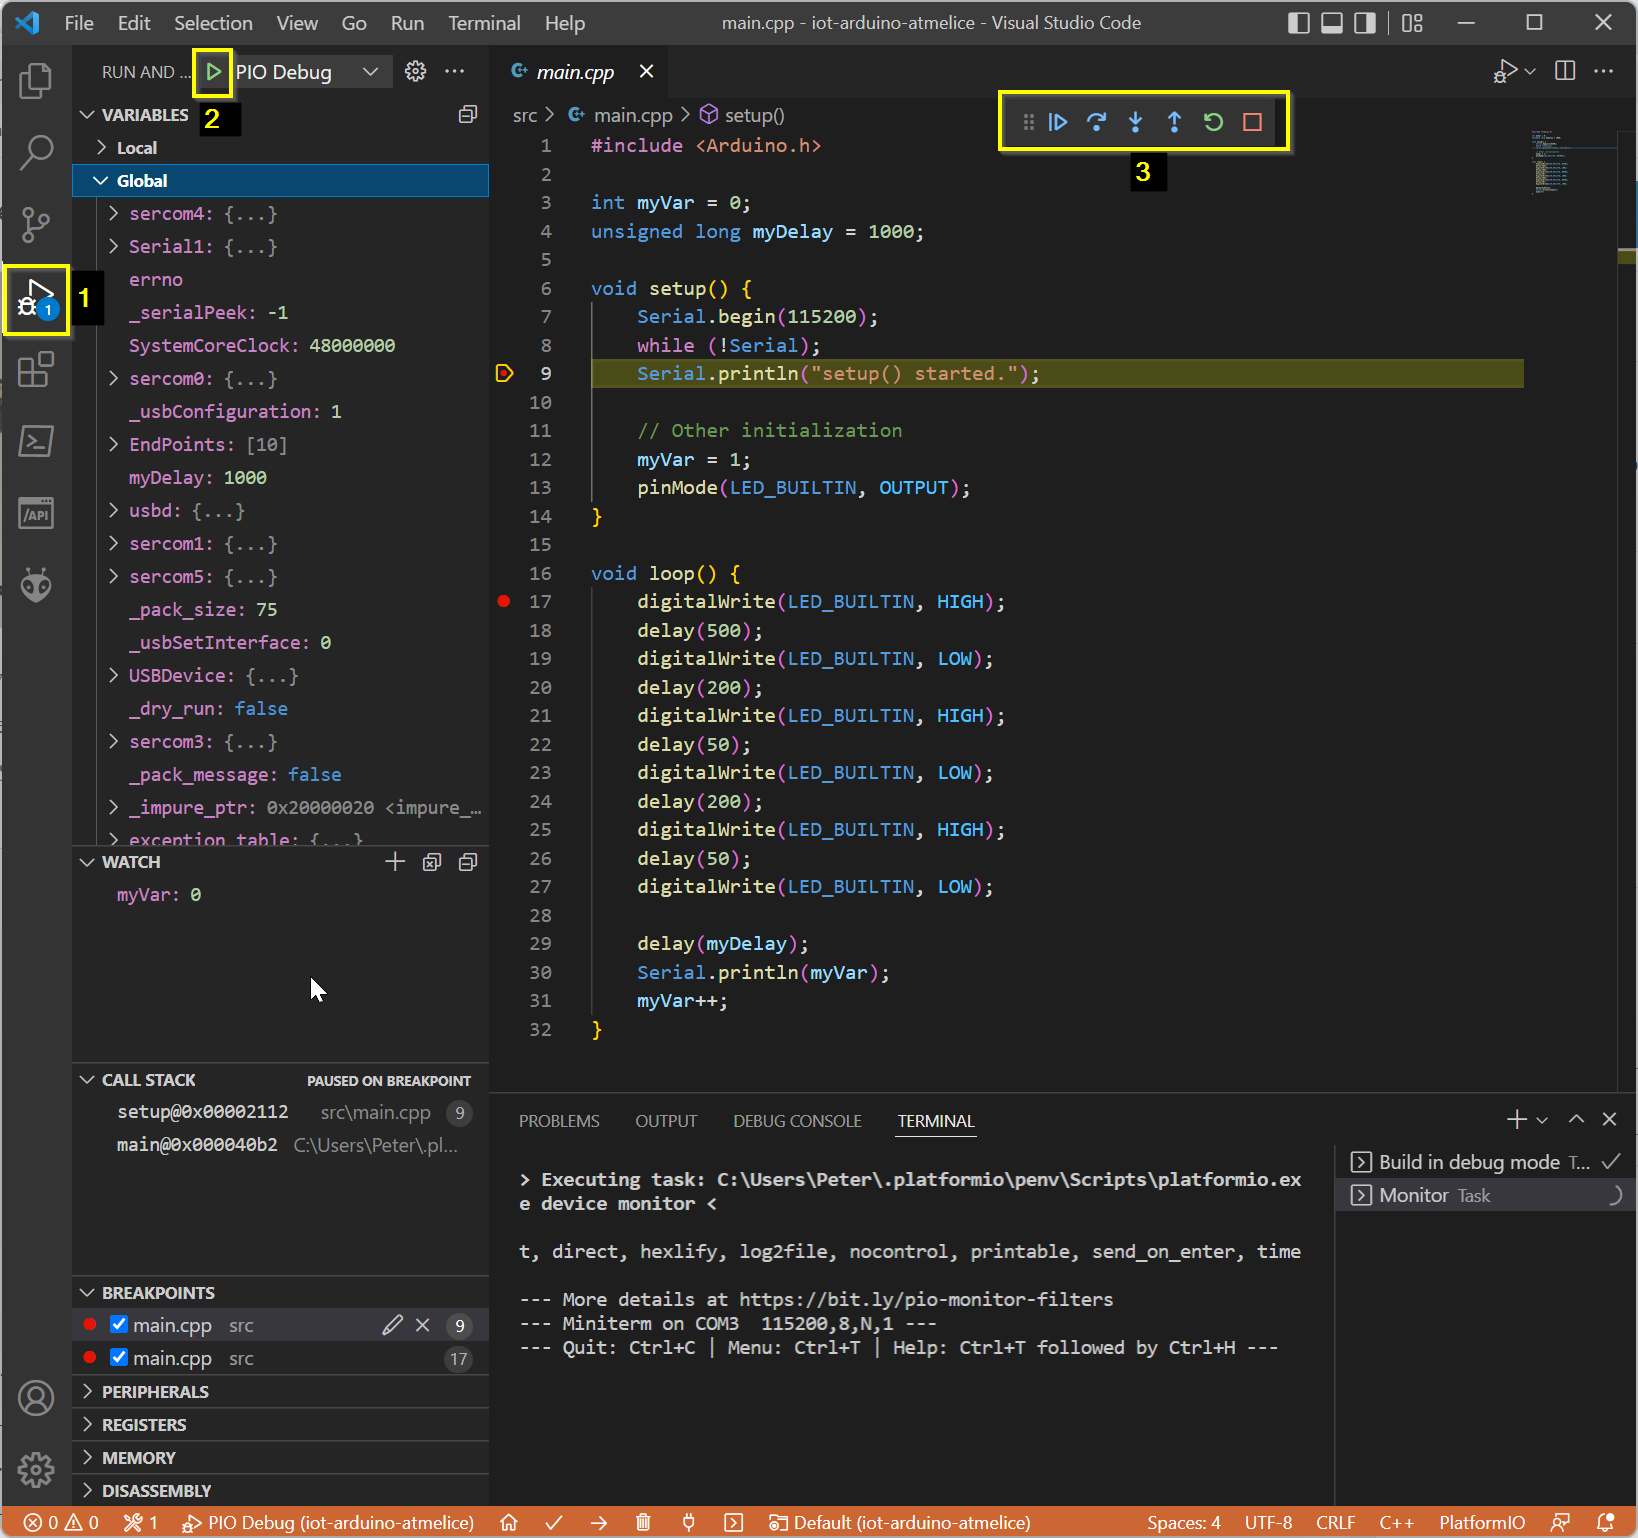
In VS Code select the Run and Debug view, set breakpoints and start the debugger. The debugger may stop in the library initialization code. In this case click the Continue Icon or press F5.
If your application uses serial I/O over USB, make sure that its initialization (Serial.begin(…) etc.) is done at the very beginning of the setup() function, and that the first breakpoint is set after the initialization. Open the Serial Monitor after continuing the execution after the first stop (in the library initialization code). After stopping the debugger, it is important to close the Serial Monitor before the next restart. See also chapter ‘Serial communication via USB port of the board does not work when debugging with Atmel ICE‘ below.
Problems / Trouble Shooting
Serial communication via USB port of the board does not work when debugging with Atmel ICE
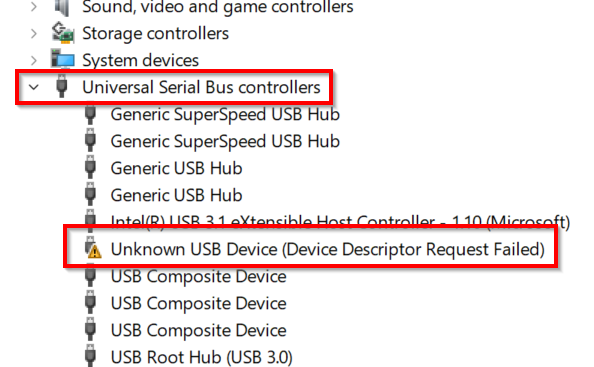
If your application uses serial I/O over USB, make sure that its initialization (Serial.begin(…) etc.) is done at the very beginning of the setup() function, and that the first breakpoint is set after the initialization. Open the Serial Monitor after continuing the execution after the first stop (in the library initialization code). After stopping the debugger, it is important to close the Serial Monitor before the next restart.If your application tries to initialize or write/read to/from Serial (e.g. Serial.begin(…), while (!Serial) or Serial.println(…)), while debugging with Atmel ICE, the application may hang or writing/reading to/from Serial console won’t work. After starting the application with the debugger you may also get an error message from Windows like ‘USB device not recognized‘. In Windows Device Manager you may see the error ‘Unknown USB Device (Device Descriptor Request Failed)‘:
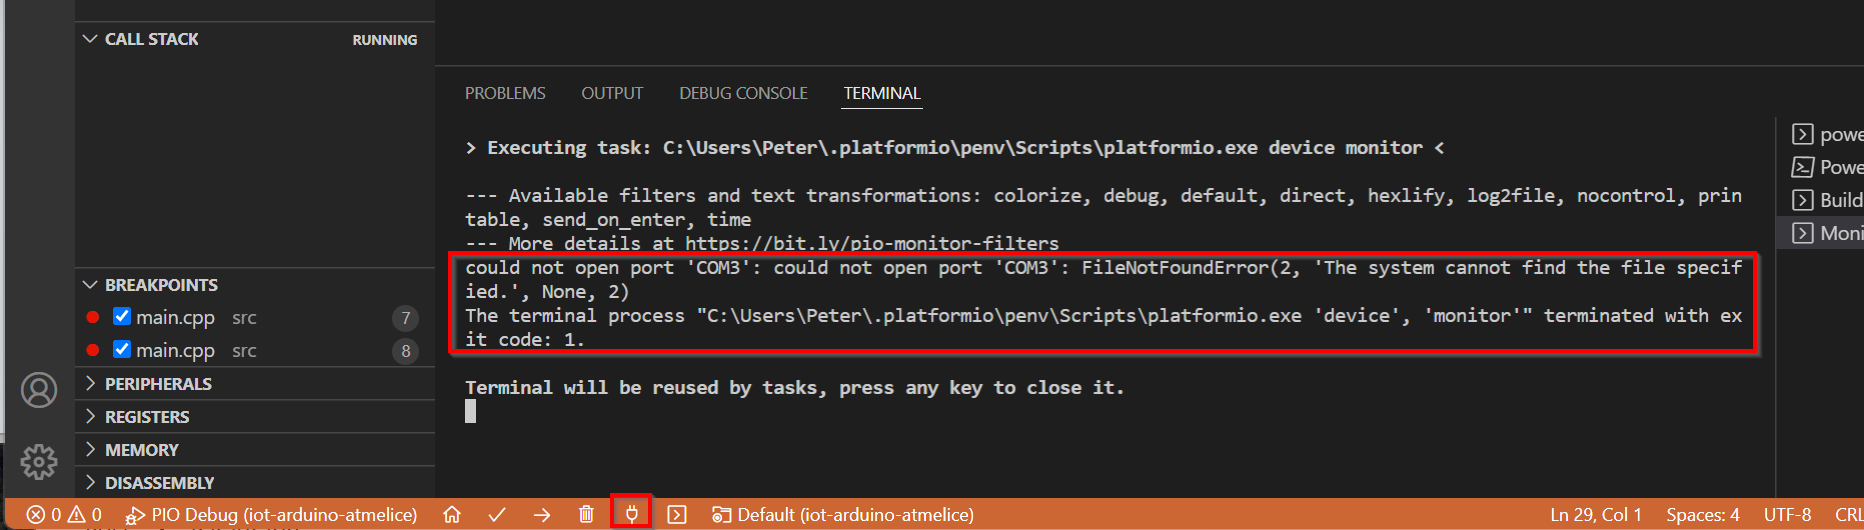
When you open the Serial Monitor (by clicking on the connector icon in status bar of PlatformIO/VS Code), you will see the error message ‘could not open port ‘COMx’ in the terminal output:
Solution
First, make sure that the Serial interface (USB) is initialized correctly:
- Put
Serial.begin(...)andwhile(!Serial)at the very beginning of thesetup()function. - Configure the same baud rate in
Serial.Begin(...)and in platformio.ini,monitor_speed = .... - Do not set any breakpoint on
Serial.begin(...)orwhile(!Serial)or before. Afterwhile(!Serial)breakpoints can be set.
Comment for the advanced user: It’s important that no breakpoint between usbd.attach() in {your-home-dir}\.platformio\packages\framework-arduino-samd\cores\arduino\USB\USBCore.cpp and while(!Serial) in your main.cpp interrupts the program execution!
void setup() {
    Serial.begin(115200);
    while (!Serial);
    Serial.println("setup() started.");

    // other initialization code comes here ...
}
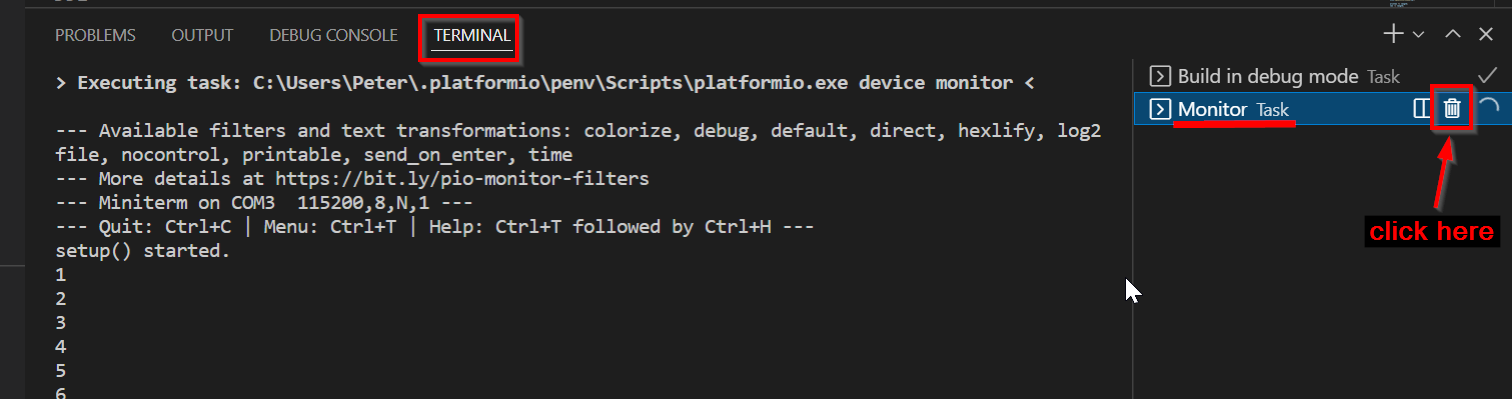
Second, close all open Serial Monitor tasks:
Third, start the debugger, this compiles the application, uploads it to the target and starts it:

The debugger may stop in the library initialization code. Click the Continue Icon or press F5.
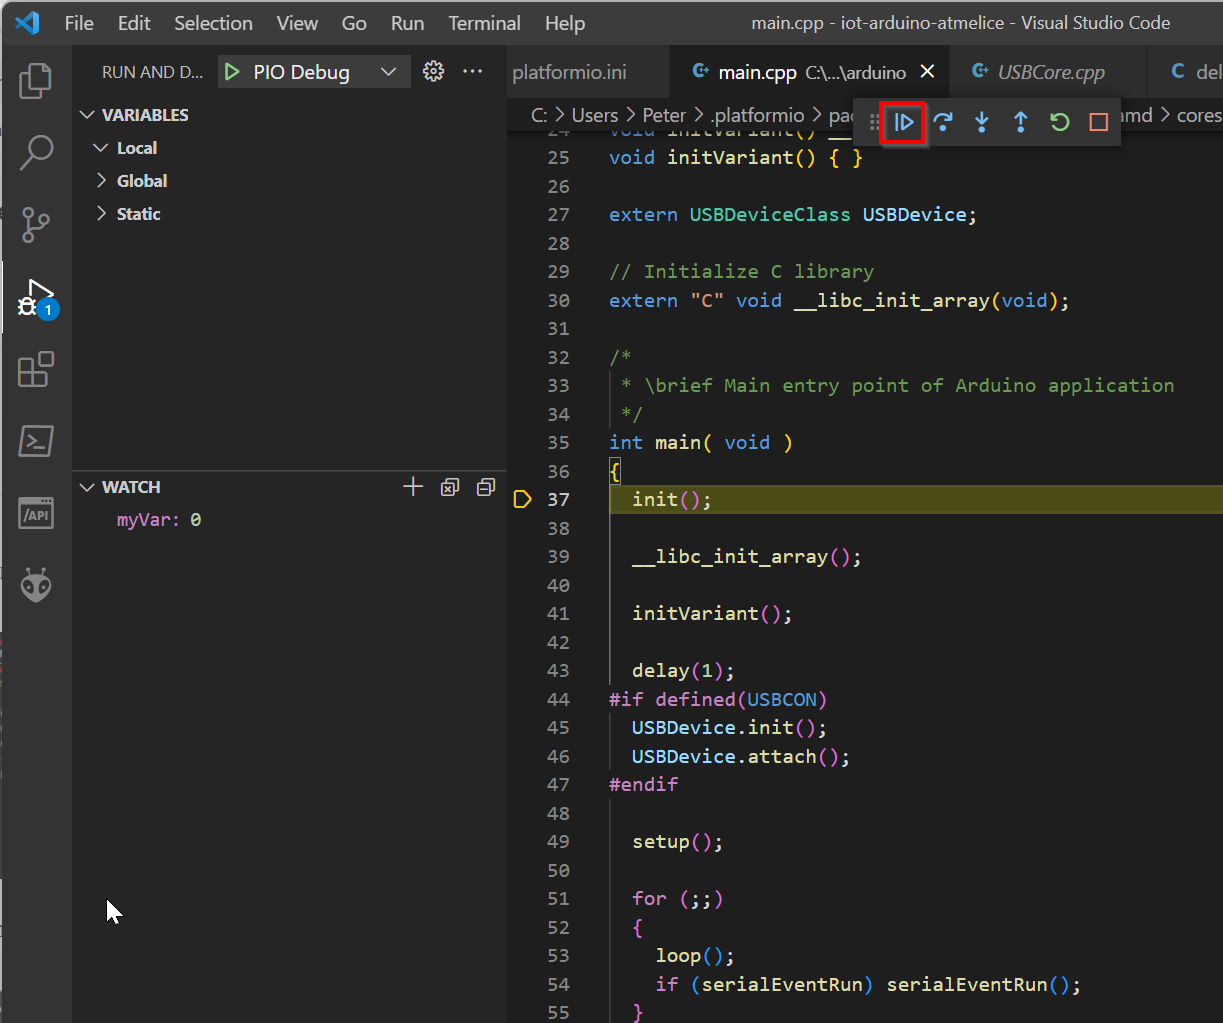
Execution continues by completing the initialization of the library and starting the setup() function in your application.
The execution will hang in the while(!Serial) loop of the setup() function. No breakpoint is hit, it looks like nothing is happening. This is the expected behavior.
Fourth, open the Serial Monitor by clicking the corresponding icon on the bottom toolbar:

The execution will exit the while(!Serial) loop and continue until it reaches a breakpoint.
If you continue to have problems with the USB serial communication, you can try the following;
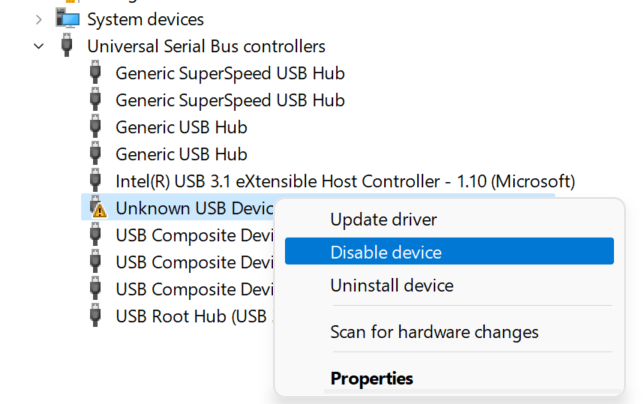
1st solution: Disable an re-enable the erroneous USB port using one of the following two solutions:
Use the the context menu in the Device Manager:
2nd solution: Execute the following PowerShell script (execute as Administrator!):
# ReenableUSB.ps1

#Requires -RunAsAdministrator

$global:InstanceId = Get-PnpDevice | Where-Object {$_.FriendlyName -eq 'Unknown USB Device (Device Descriptor Request Failed)' -and $_.Status -eq 'Error'} | Select-Object -ExpandProperty InstanceId
Write-Host $InstanceId
if ($global:InstanceId -eq '') {
    Write-Host "No 'Unknown USB Device (Device Descriptor Request Failed)' found."
    Exit
}
Write-Host `Disabling USB device with ID $global:InstanceId`
Disable-PnpDevice -InstanceId $global:InstanceId -Confirm:$false

Start-Sleep -Seconds 1

Write-Host `Enabling USB device with ID $global:InstanceId`
Enable-PnpDevice -instanceId $global:InstanceId -Confirm:$false
After disabling and re-enabling the USB port, the error in Device Manager should disappear immediately.
If it doesn’t solve the problem, disconnect and reconnect the USB cables of Atmel-ICE and your board, or even restart your PC.
jlink64.sys diver not compatible with Windows Memory Integrity
On Windows 11 I’ve got a message about driver jlinkx64.sys isn’t compatible with memory integrity (Windows Start Menu -> Settings -> Privacy & security -> Windows Security -> Device Security -> Core Isolation -> Memory Integrity -> try to switch on memory integrity or click “Scan” for incompatible drivers).
Solution: Keep ‘Memory Integrity’ off.
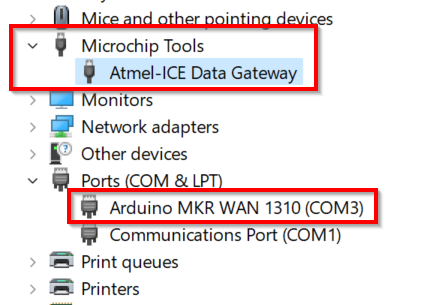
Find Atmel ICE in Windows Device Manager
Open Device Manager and look for Microchip Tools -> Atmel-ICE Data Gateway