Introduction
Instead of the Arduino IDE, Visual Studio Code can also be used as a development environment for Arduion projects. Visual Studio Code (VS Code) is a very powerful Integrated Development Environment (IDE) and is free. VS Code can be extended by thousands of so-called extensions.
The extension that will be used here is PlatformIO. It provides everything necessary for software development for embedded systems (microcontrollers). The entire toolchain for development, debugging and testing, libraries, frameworks, management tools, etc. for countless microcontrollers, microcomputers, platforms and hardware boards. PlatformIO can be used together with various development environments, but the integration with Visual Studio Code is probably the best and the most widely used.
Visual Studio Code and PlatformIO are not bound to a specific operating system, Windows, Mac OS X, Linux can be used as development platform. The upload and debugging to or with the target platform is done e.g. via USB or IP networks.
In this tutorial an Arduino Uno R3 with the microcontroller ATmega328P is used as target system.

Installation
Installing Visual Studio Code
Download from https://code.visualstudio.com/ and start installation.
Installing Visual Studio Code Extensions
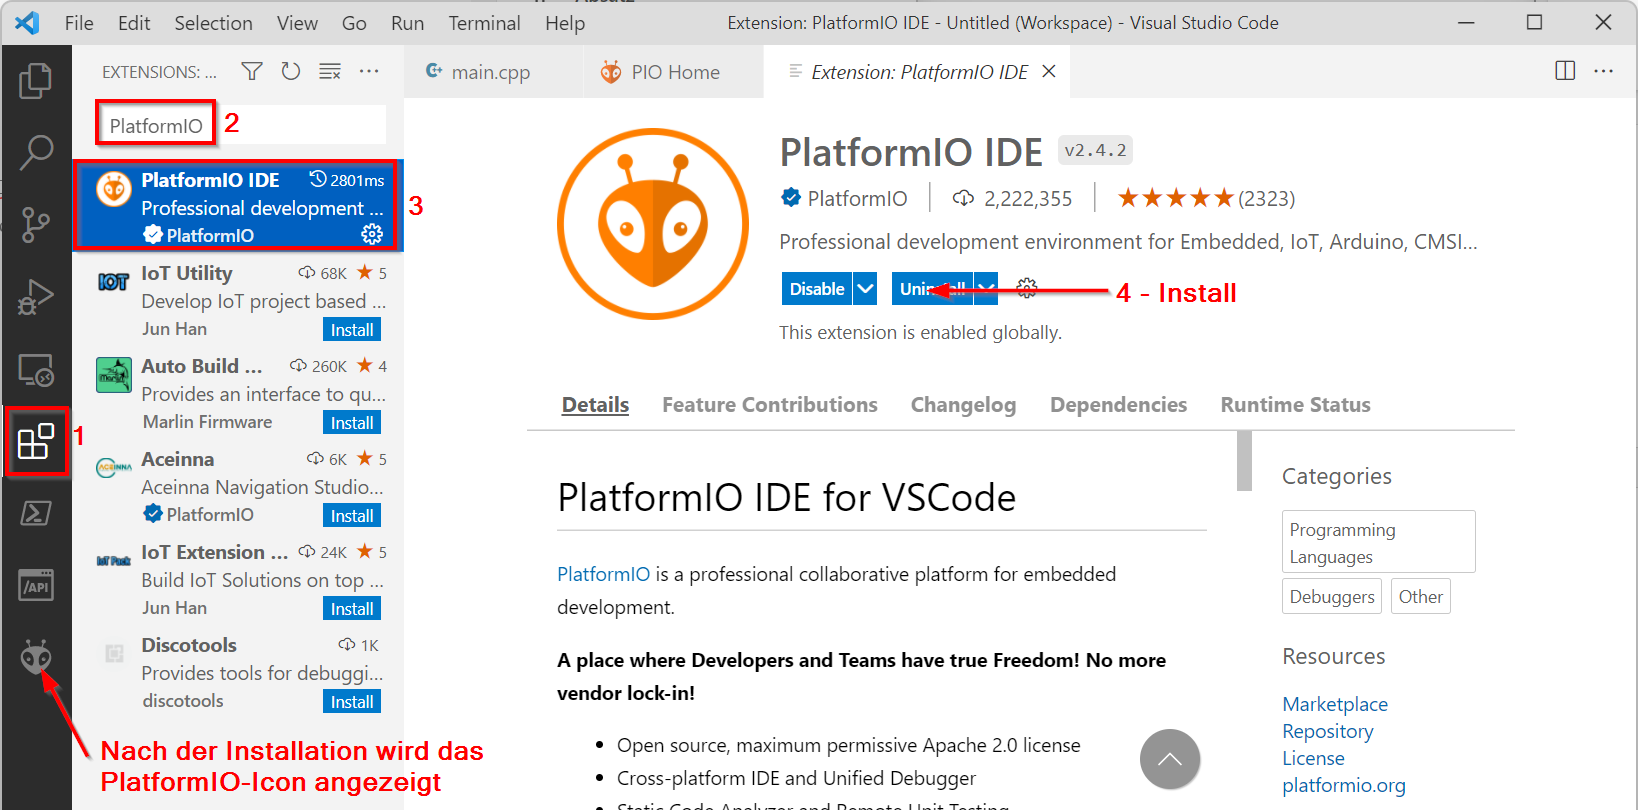
Start VS Code, on the left select “Extensions”, search for “PlatformIO”, select “PlatformIO IDE” and click “Install”. The installation will take some time. After completion, VS Code must be restarted. After that, the PlatformIO icon will be displayed on the left.
Select the target Platform
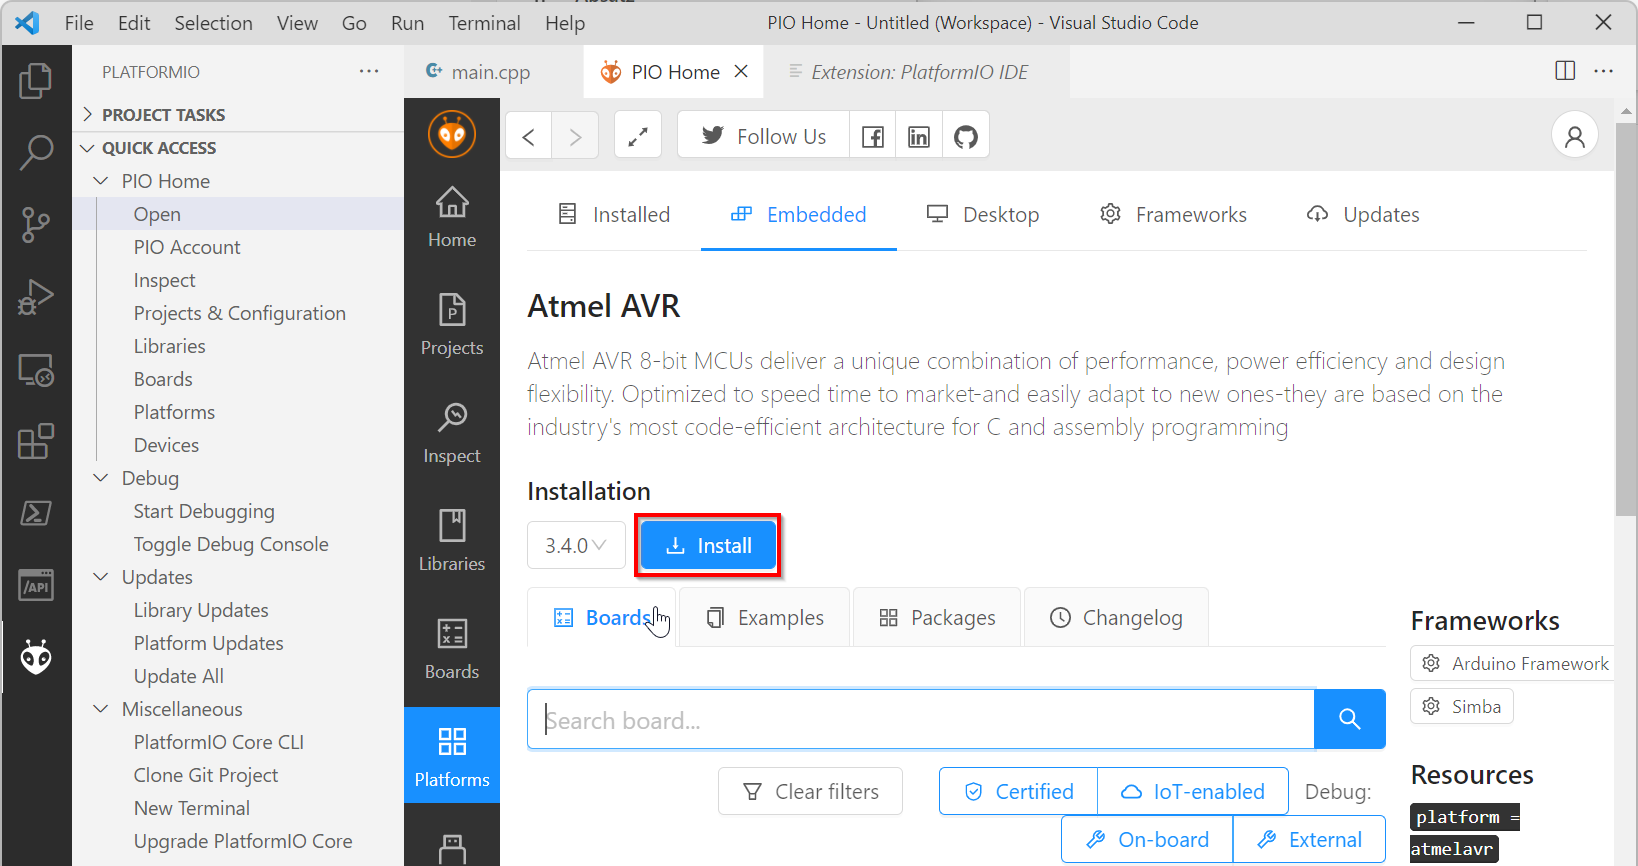
After that you have to install the appropriate framework for the used hardware. To do this, select the PlatformIO icon on the left, then click on “Platforms”, search for “Atmel” and select “Atmel AVR” …
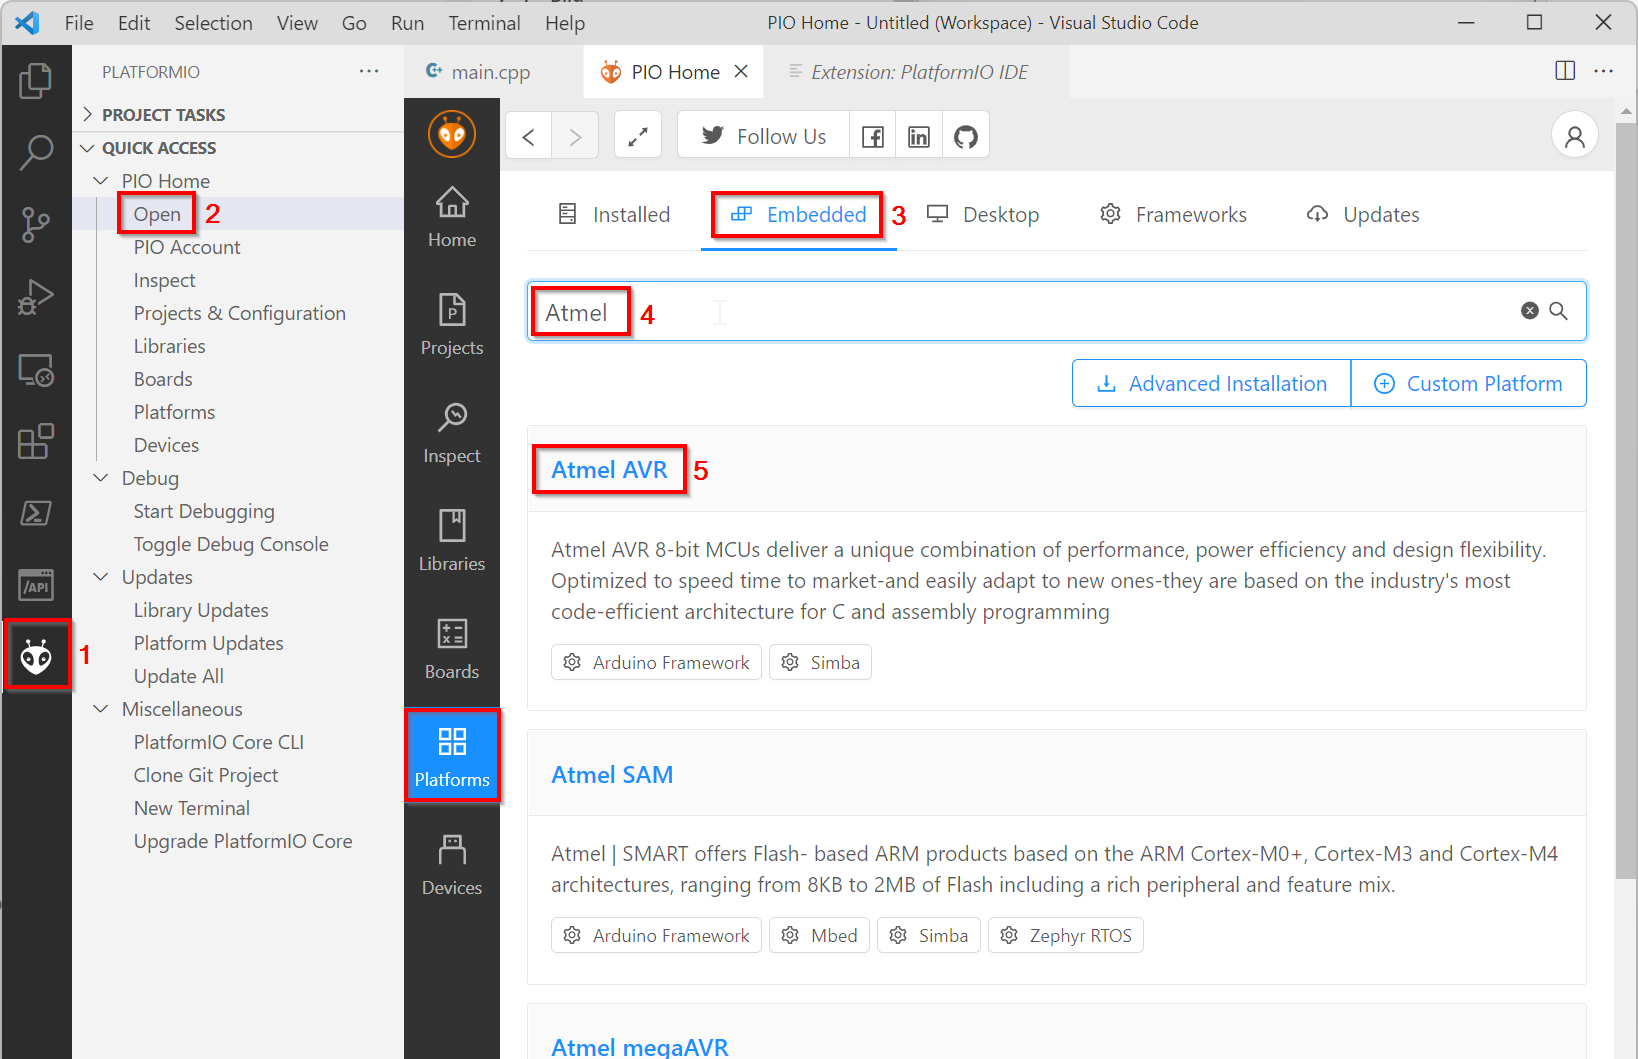
… and finally click “Install”.
The first program
Now the first program can be created and executed on the Arduino Uno.
Connect Arduino Uno to the PC using an USB cable.
Start VS Code and open an empty folder (Menu: File –> Open Folder…)
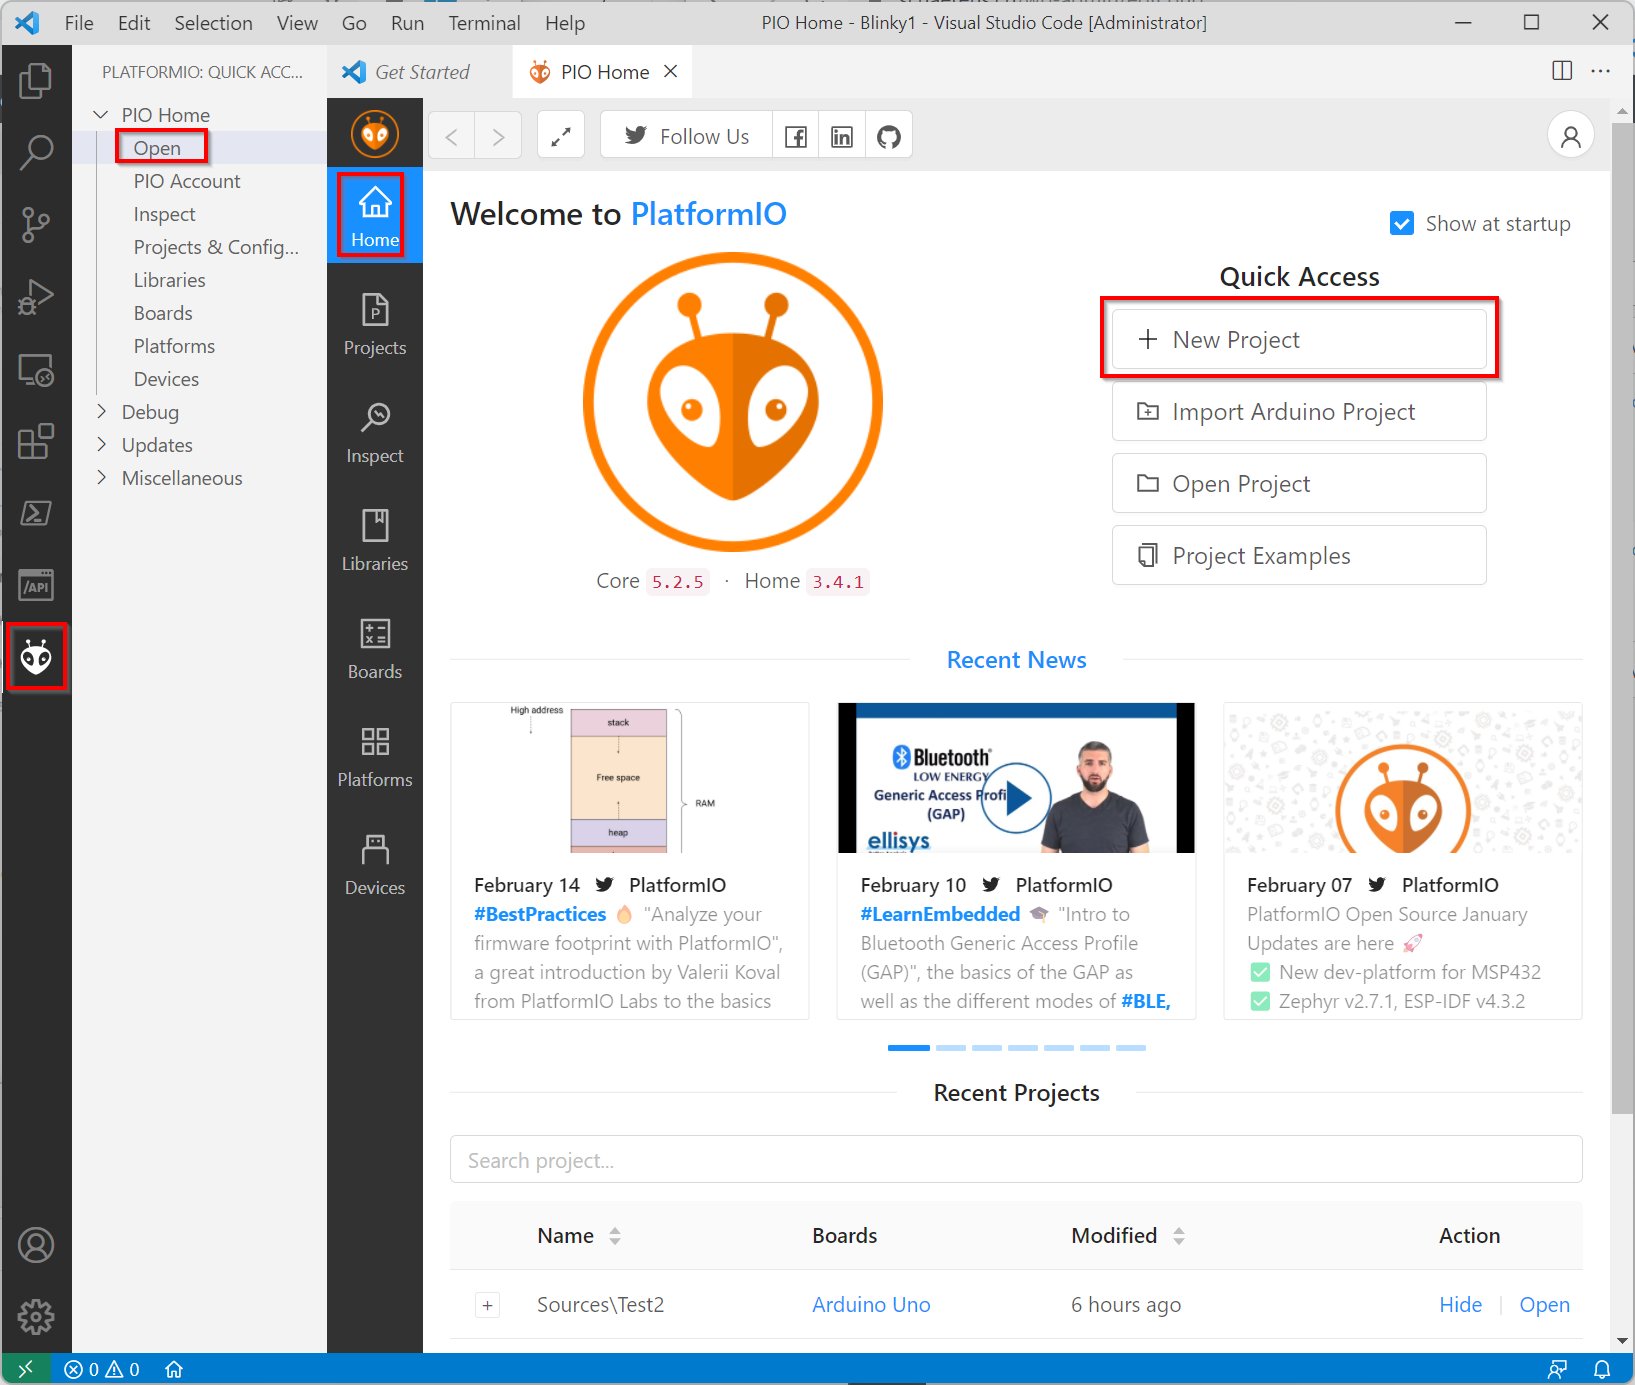
On the left click the “PlatformIO” icon, then select “PLATFORMIO QUICK ACCESS” –> “PIO Home” –> “Open” and “New Project”.
Enter the project name, select the used hardware board (here “Arduino Uno”) and select the parent folder for the new project or leave “Use Default Location”. Finish with “Finish”.
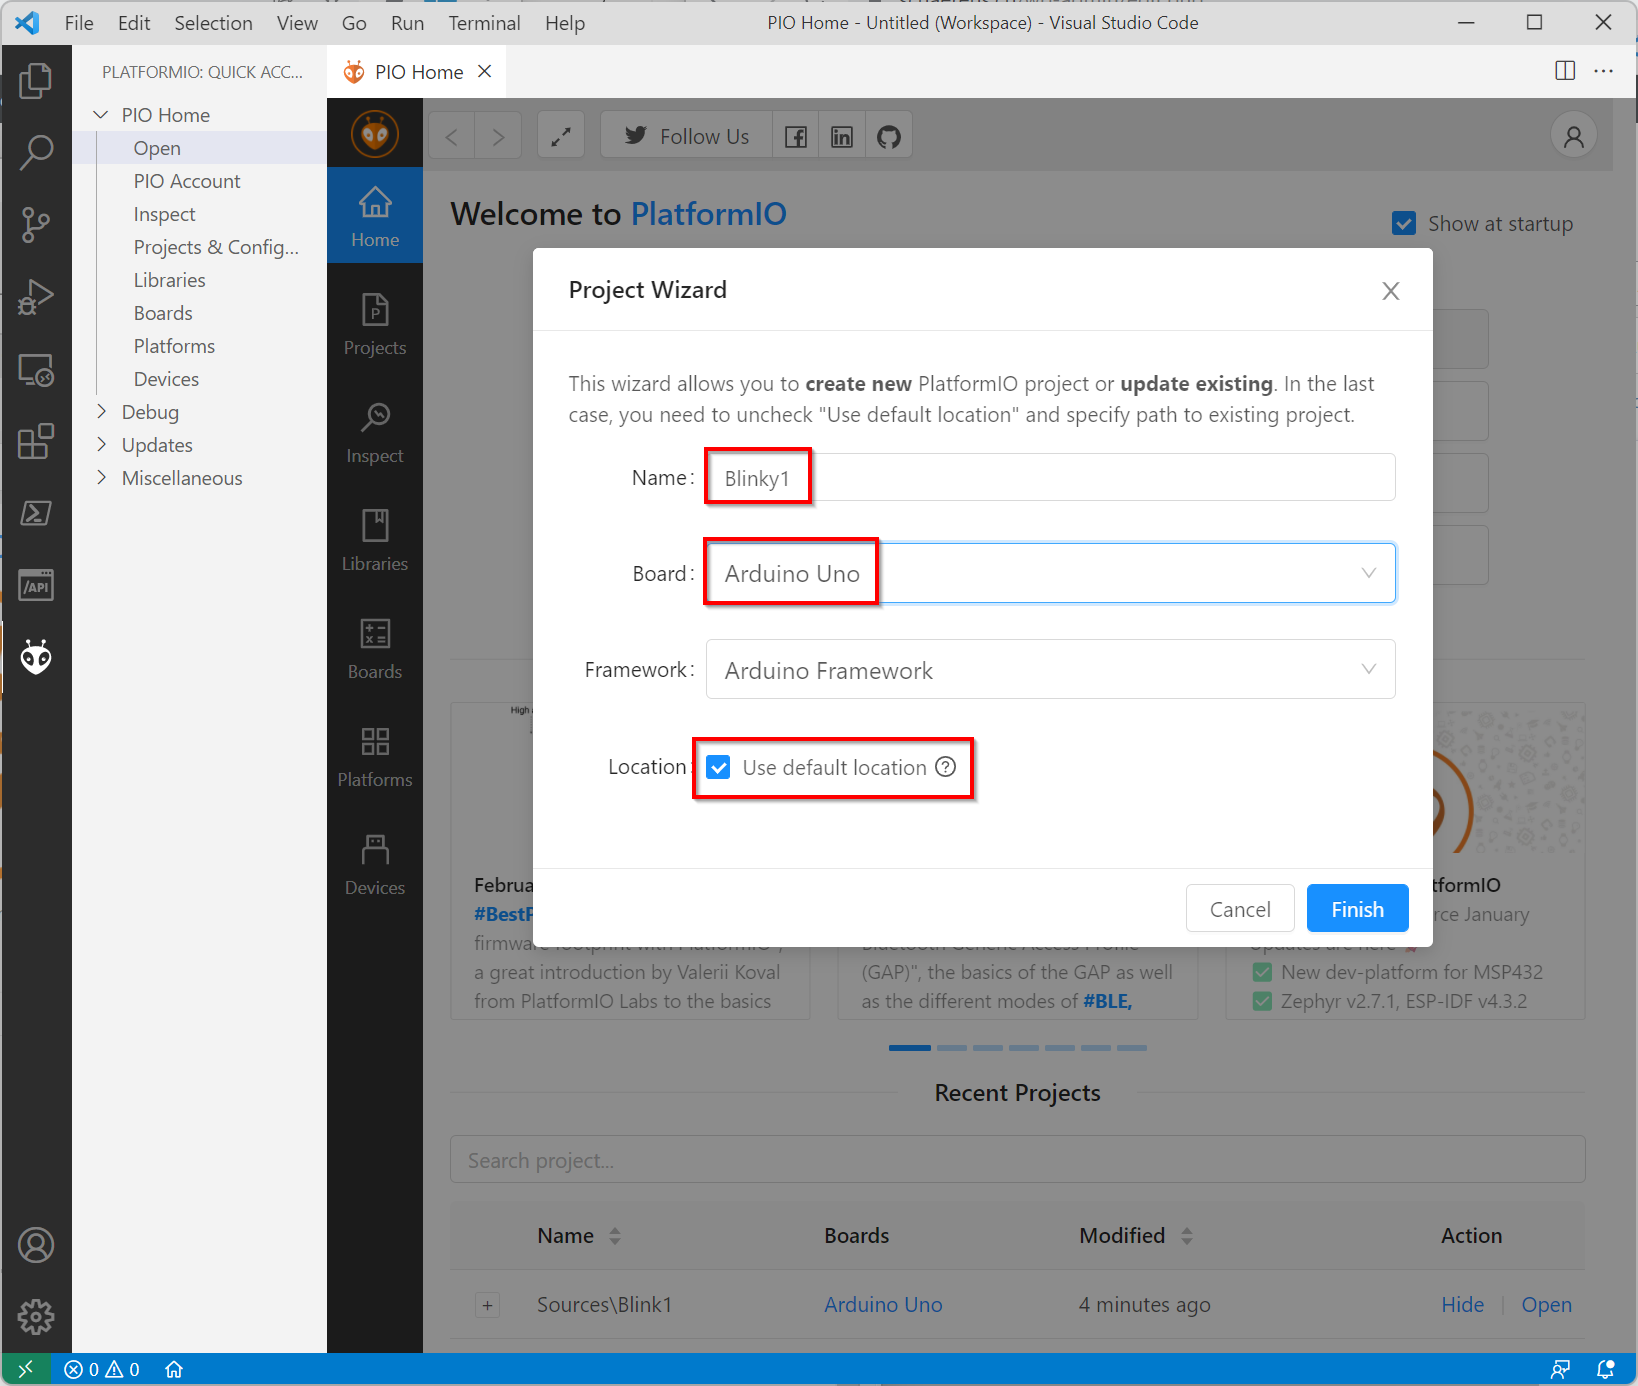
After that a new project is created with all necessary folders and files. main.cpp contains two empty functions for the initialization (setup()) and the actual program loop (loop()).
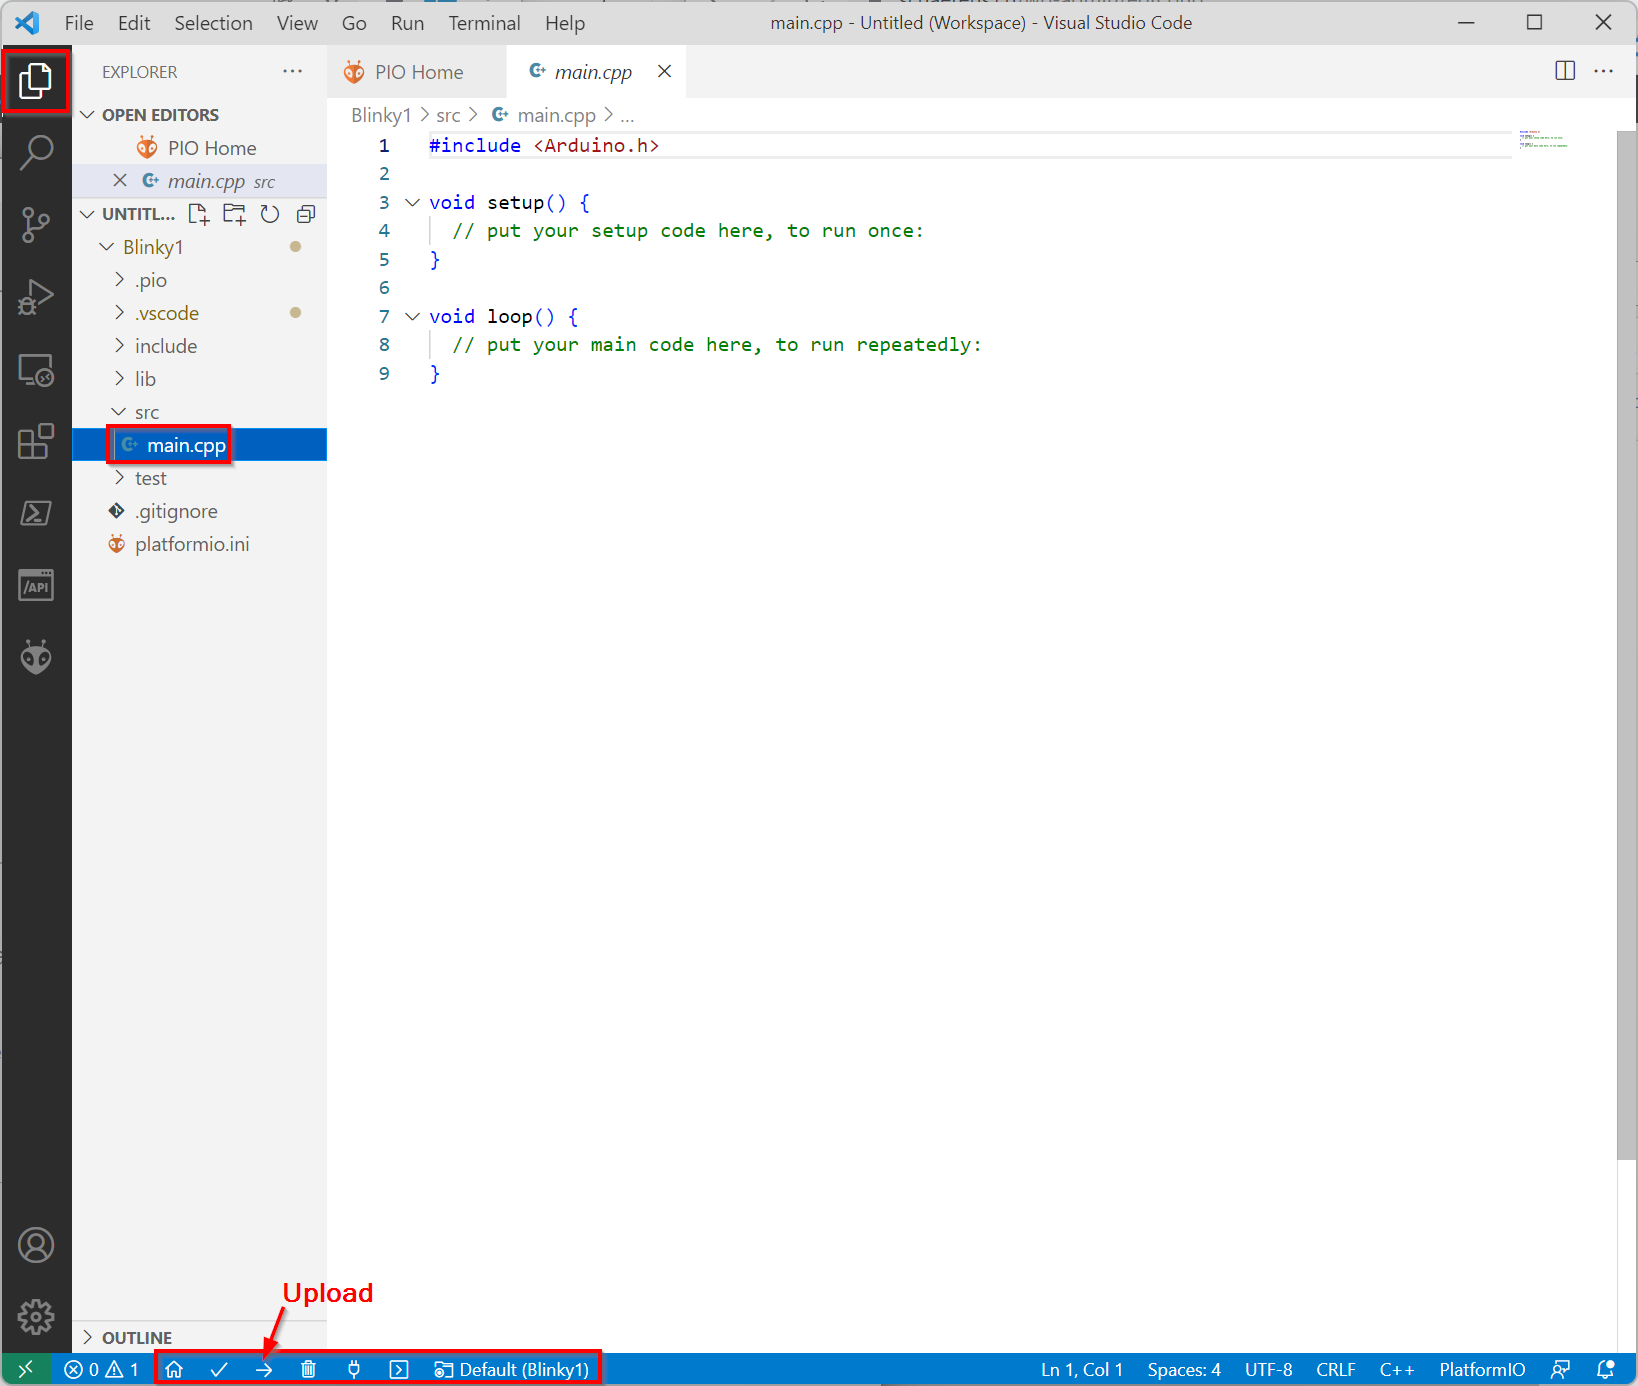
Modify the code in main.cpp with this one (https://github.com/schaeren/micro_controller/tree/master/arduino_avr/c/arduino_avr_blinky):
#include "Arduino.h"

void setup() {
    Serial.begin(115200);             // configure serial monitor (serial port over USB, 115200 is the speed)
    pinMode(LED_BUILTIN, OUTPUT);     // configure output for onboard LED
}

int loopCount = 0;

void loop() {
    digitalWrite(LED_BUILTIN, HIGH);  // turn the onboard LED on (HIGH is the voltage level)
    delay(5);                         // wait for 5 milliseconds
    digitalWrite(LED_BUILTIN, LOW);   // turn the onboard LED off
    delay(500);                       // wait for 500 milliseconds
    Serial.print("loopCount = ");
    Serial.println(++loopCount);
}
Because this program uses the serial monitor you have to configure in the PlatformIO Project Configuration File platfomio.ini the monitor port (add the two lines at the end):
; PlatformIO Project Configuration File
;
;   Build options: build flags, source filter
;   Upload options: custom upload port, speed and extra flags
;   Library options: dependencies, extra library storages
;   Advanced options: extra scripting
;
; Please visit documentation for the other options and examples
; https://docs.platformio.org/page/projectconf.html

[env:uno]
platform = atmelavr
board = uno
framework = arduino

monitor_port = COM5
; monitor_speed = 115200
Click on the following icon in the status bar of VS Code to compile the program and load it on the target computer (Arduino Uno):

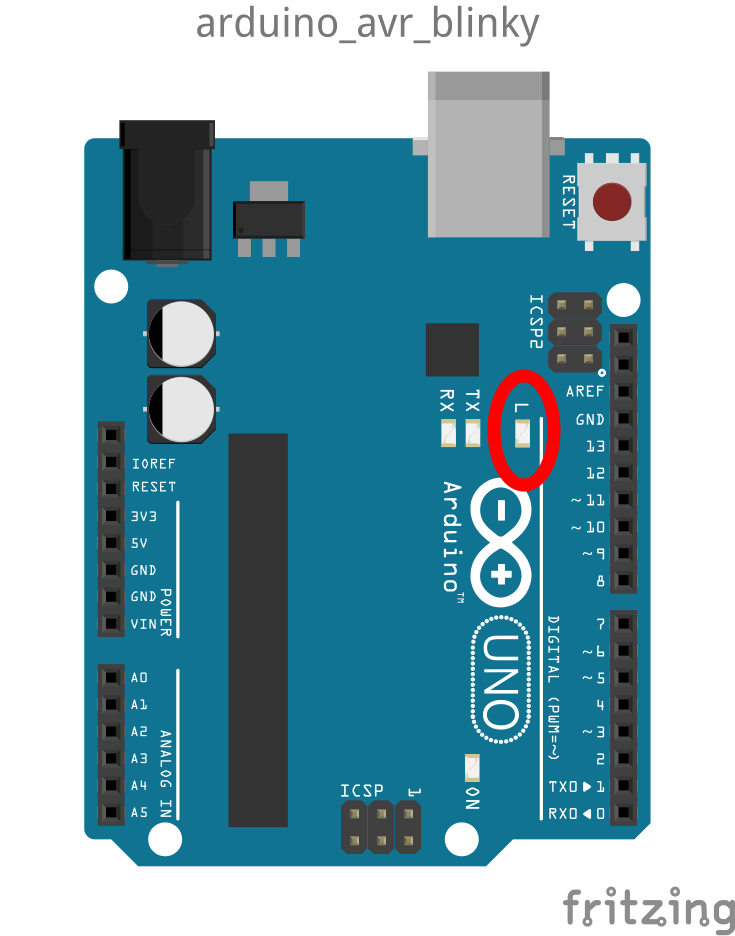
After uploading to the Arduino Uno the LED L flashes (5 ms light followed by 500 ms dark):
The PlatformIO icons in the statusbar:

| 1 | Home | Show PlatformIO Home. Form here you can create a new project or have access to libraries, boards, platforms. devices, etc. |
| 2 | Build | Build (compile) the current project. |
| 3 | Upload | Build (compile) the current project and upload it to the target. |
| 4 | Clean | Clean project (temporary files). |
| 5 | Serial Monitor | Show the Serial Monitor window: the terminal shows the output from the application running on the target (Serial.print...())x§ |
| 6 | New Terminal | Open a new terminal window. |
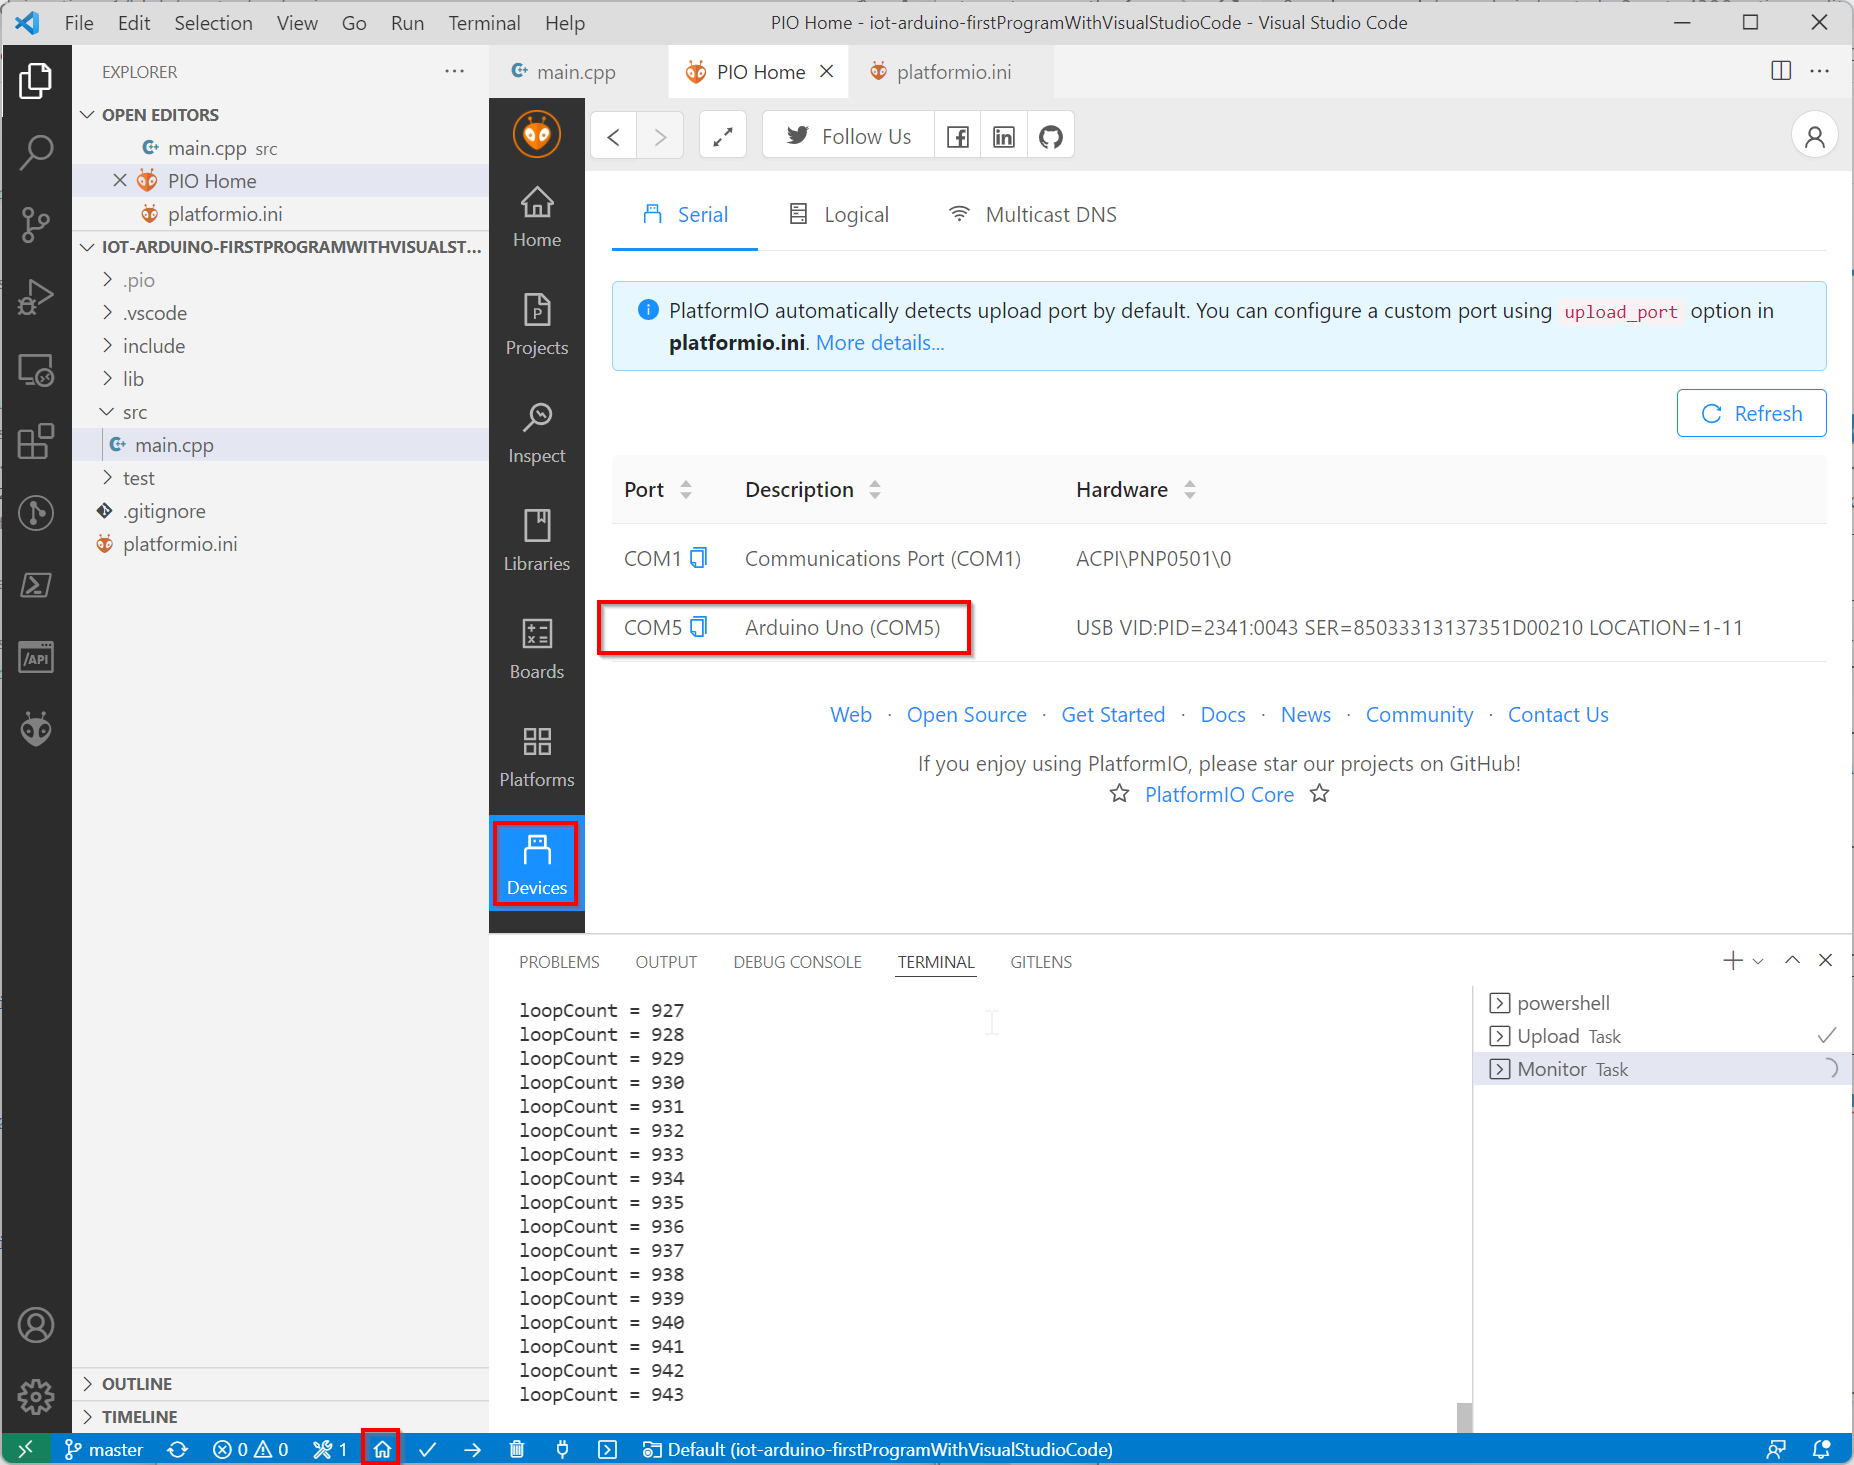
Click the “Serial Monitor” icon in the statusbar to see the output (Serial.print...()) from the program.
If it doesn’t work you may have to configure the monitor_port in platformio.ini. To check which port is used you can click on the “Home” icon in the statusbar and select “Devices”:
Debugging
Preparation
Programs running on the target may be debugged with VS Code and PlatformIO at source code level. For example, breakpoints can be set in the source code and variables can be viewed.
The ATmega 328P microcontroller on the Arduino Uno supports remote debugging via the USB port without additional hardware.
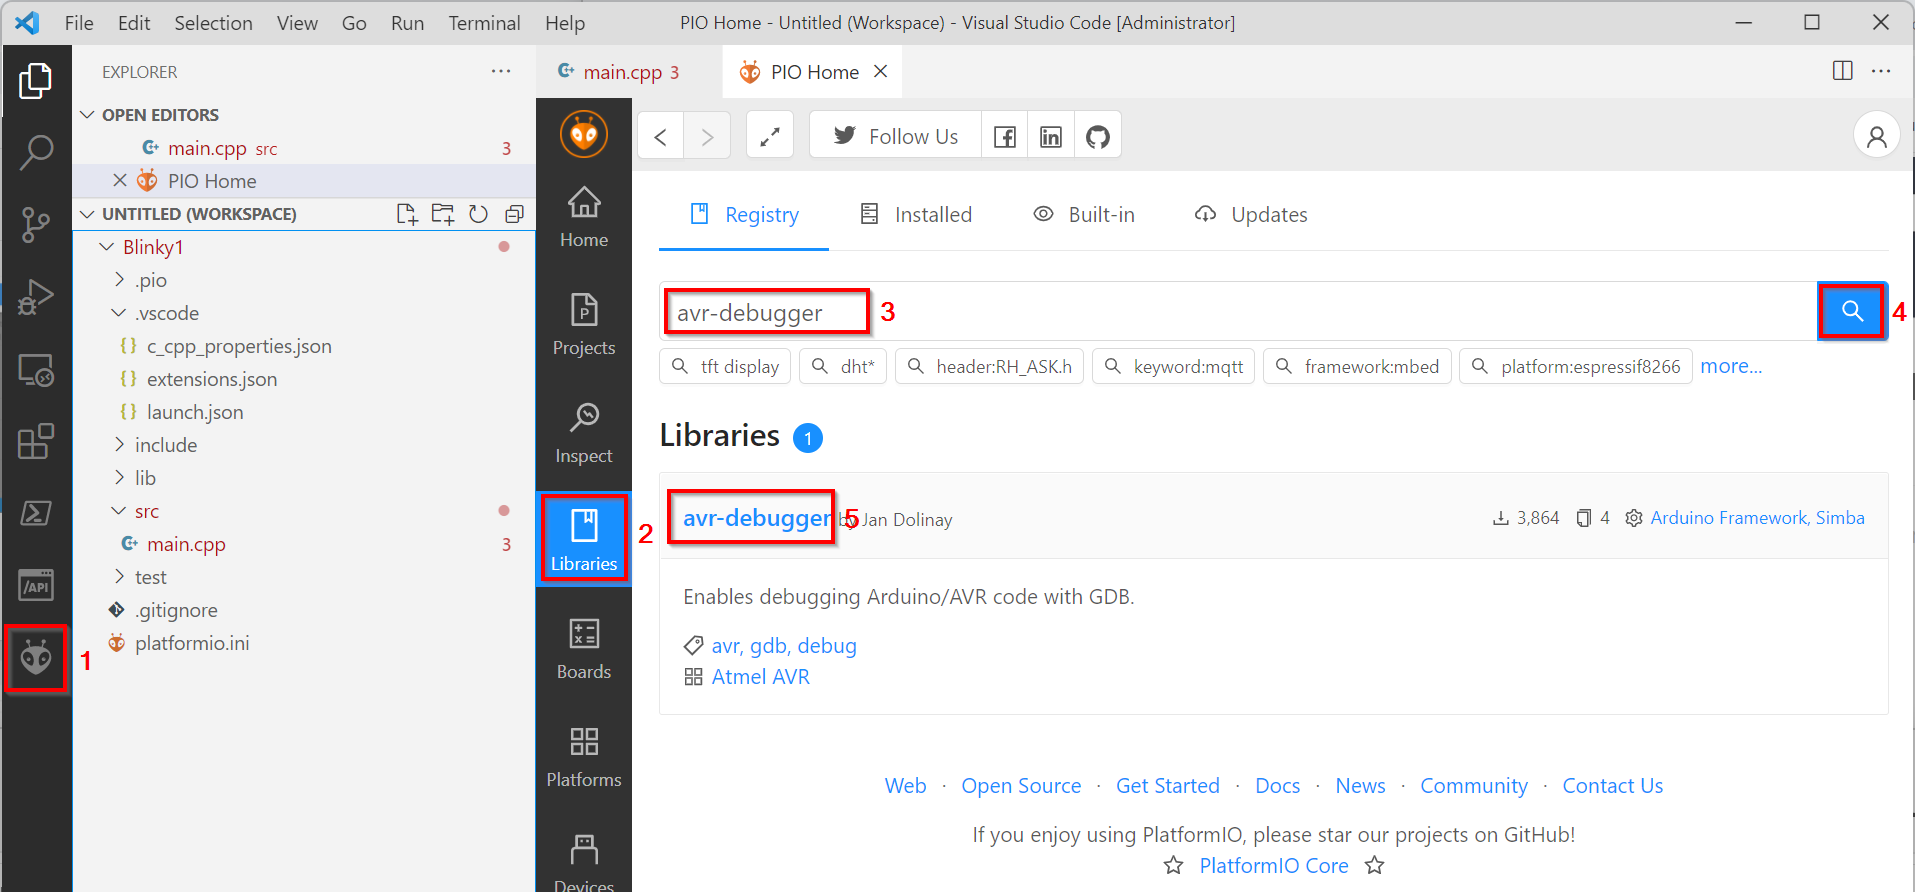
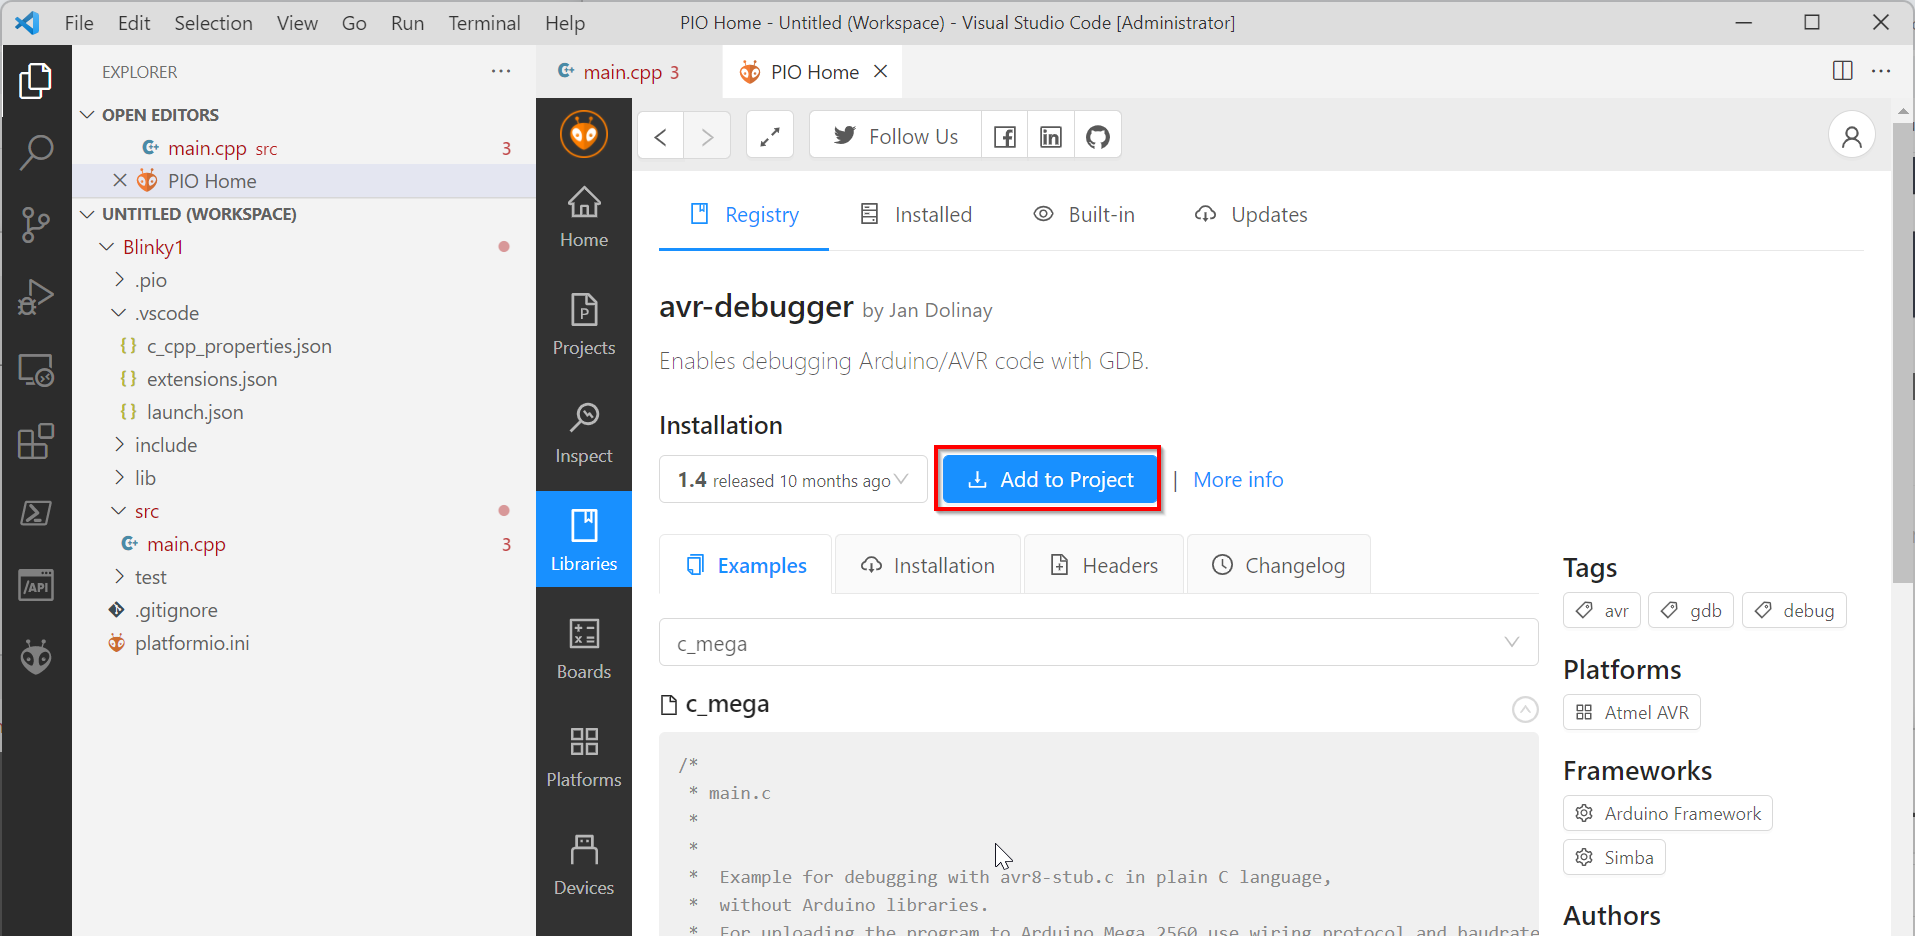
To do this, a debug library avr-debugger must be added to the program …
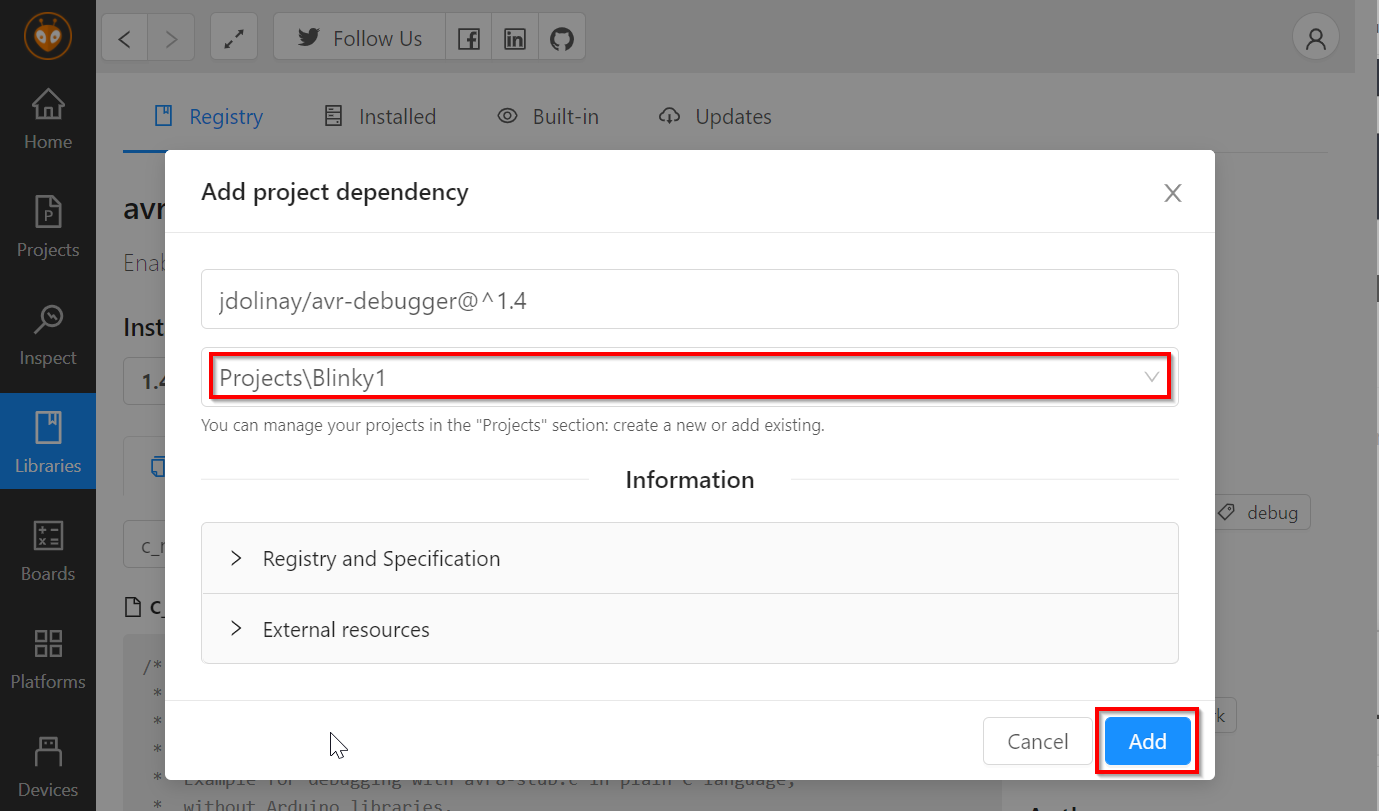
… then click on Add to Project …
… and if necessary select the project:
Furthermore, the following additions must be made in the platformio.ini configuration file (lines 6…20) (https://github.com/schaeren/micro_controller/tree/master/arduino_avr/c/arduino_avr_blinkyWithDebugger):
[env:uno]
platform = atmelavr
board = uno
framework = arduino
; settings for avr-debugger
build_type = debug
debug_tool = avr-stub
debug_port = COM5    ; <-- debug_port may be wrong, check with 'PlatformIO Home' -> 'Devices'
lib_deps =
    jdolinay/avr-debugger @ ~1.4
debug_build_flags =
    -Og
    -g2
    -DDEBUG
    -DAVR8_BREAKPOINT_MODE=1
For more information about debug build flags see https://docs.platformio.org/en/latest/projectconf/section_env_debug.html#debug-build-flags.
Furthermore, the debugger must be initialized in the program (here lines 2 and 3, as well as line 17), see the following example (https://github.com/schaeren/micro_controller/tree/master/arduino_avr/c/arduino_avr_blinkyWithDebugger):
#include "Arduino.h"
#include "avr8-stub.h"
#include "app_api.h" // only needed with flash breakpoints

double cycleTime;
double dutyCycle;
double step;
bool increase;

void setup() {
    cycleTime = 10.0; // Duration [ms] of a cycle consisting of one light and one dark phase
    dutyCycle = 0.0;  // duty cycle light on vs. off during one cycle [0.0...1.0]
    step = 0.01;      // dutyCycle increment between two cycles
    increase = true;  // true -> light becomes brighter / false -> light becomes darker

    pinMode(LED_BUILTIN, OUTPUT);
    debug_init();
}

// LED periodically becomes brighter and darker again.
// Duration from dark to bright or vice versa (time of a half period): (1/step)*cycleTime [ms] aprox.
void loop() {
    int on = dutyCycle * cycleTime;
    int off = (1.0 - dutyCycle) * cycleTime;
    digitalWrite(LED_BUILTIN, HIGH);
    delay(on);
    digitalWrite(LED_BUILTIN, LOW);
    delay(off);
    dutyCycle += increase ? step : -step;
    if (dutyCycle <= 0.0) {
        dutyCycle = 0.0;
        increase = !increase;
    }
    else if (dutyCycle >= 1.0) {
        dutyCycle = 1.0;
        increase = !increase;
    }
}
Important: If the debugger is used, i.e. if debug_init() is used, then Serial.print...() cannot be used, because the serial connection is already needed for debugging.
Start program with debugger
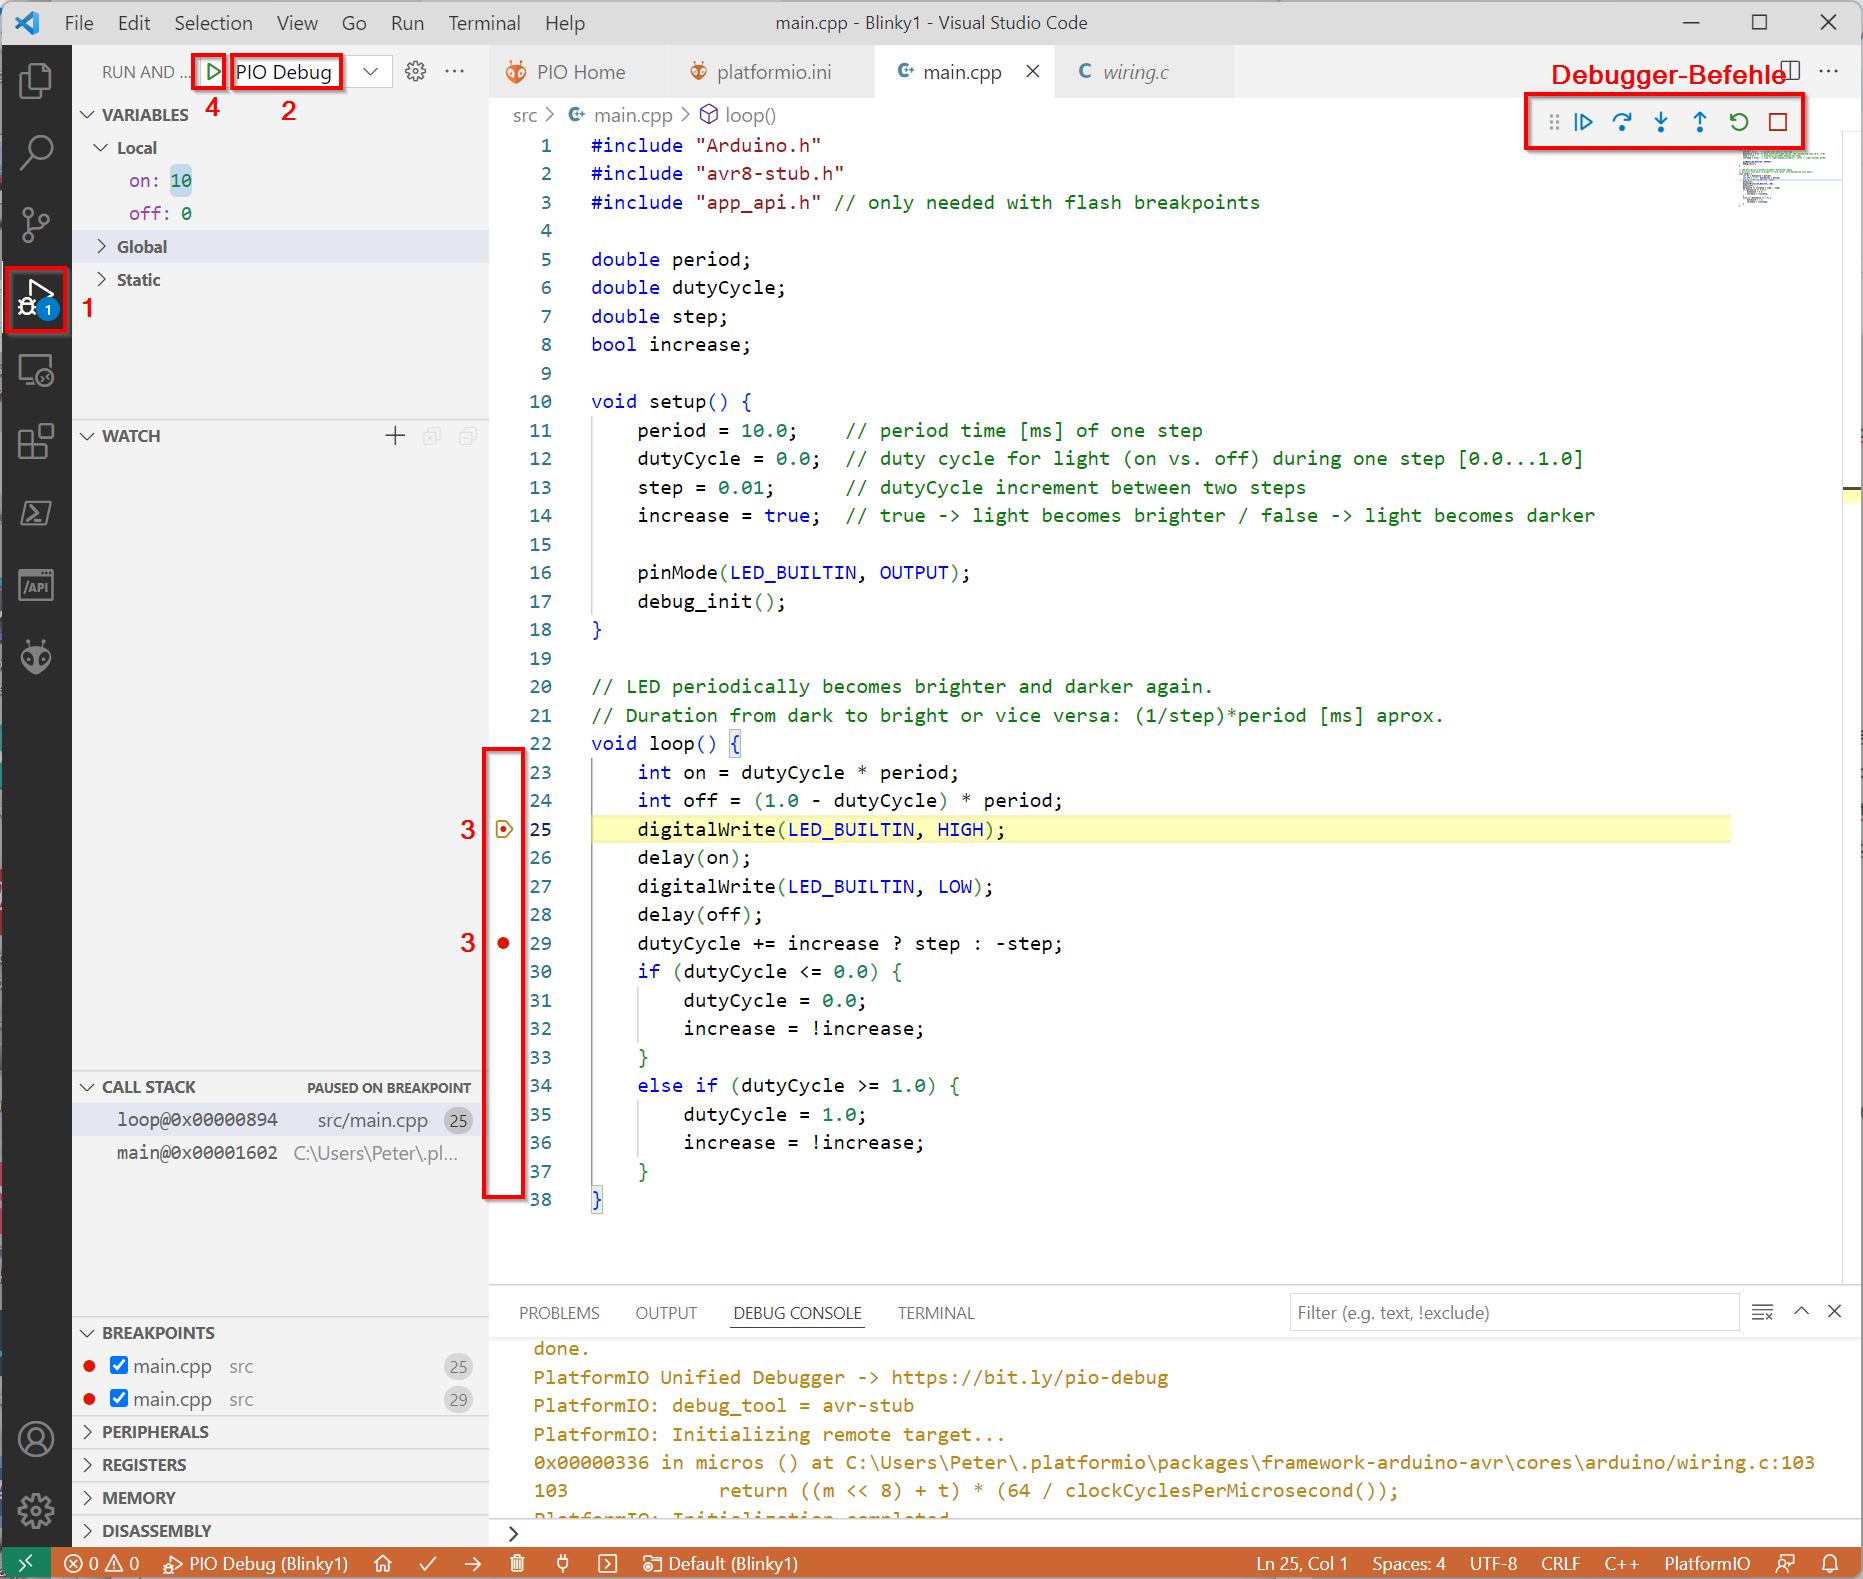
- Select the debugger view in the toolbar on the left.
- Select debug configuration PIO Debug.
- Set breakpoints as required.
- Compile the program, load it on the target system and start it.
Starting takes a few seconds, i.e. the program is started first and then the debugger. This means that the loop() function has already been started and possibly run several times before the debugger stops at a breakpoint. For the same reason breakpoints in the setup() function are ignored. Beachten sie auch, dass die Ausführung des Programms wesentlich verlangsamt wird, auch wenn Codeteile ohne Breakpoint ausgeführt werden.
Technical details: With default breakpoint mode enabled (platformio.ini: build_flags = -DAVR8_BREAKPOINT_MODE=1), the debugger on the target triggers a software interrupt after executing each (machine) instruction to check if the program has to be stopped due to a breakpoint. This can slow down the execution by a factor of 100 or more. Other breakpoint modes are possible, but require special debugging hardware (debug probe) and/or a special bootloader that can write and erase breakpoints directly in the flash memory (but this can then significantly reduce the lifetime of the flash memory and thus of the microcontroller; typically only 10,000 write cycles are specified).
Weitere Informationen
- Arduino Debugger: avr_debug.pdf
- avr_stub configuration (PlatformIO): https://docs.platformio.org/en/latest/plus/debug-tools/avr-stub.html
Add an additional target/board to an existing project
If you want to use another Arduino board, you only have to enter the corresponding code in the file platformio.ini at the entry board = ,,,. You can find the code e.g. by calling PlatformIO Home in VS Code (Home icon in the status bar), then clicking on Boards, searching for the desired board and copying the code into the platformio.ini file.
If you want to add an additional board of other type to an existing project, then you must proceed as described here:
Assumtion: The existing project supports the target Arduino Uno and you want to add an Arduino Mega R3 2560 board to this project.
- Open PlatformIO Home (click Home icon in the status bar).
- Select Home.
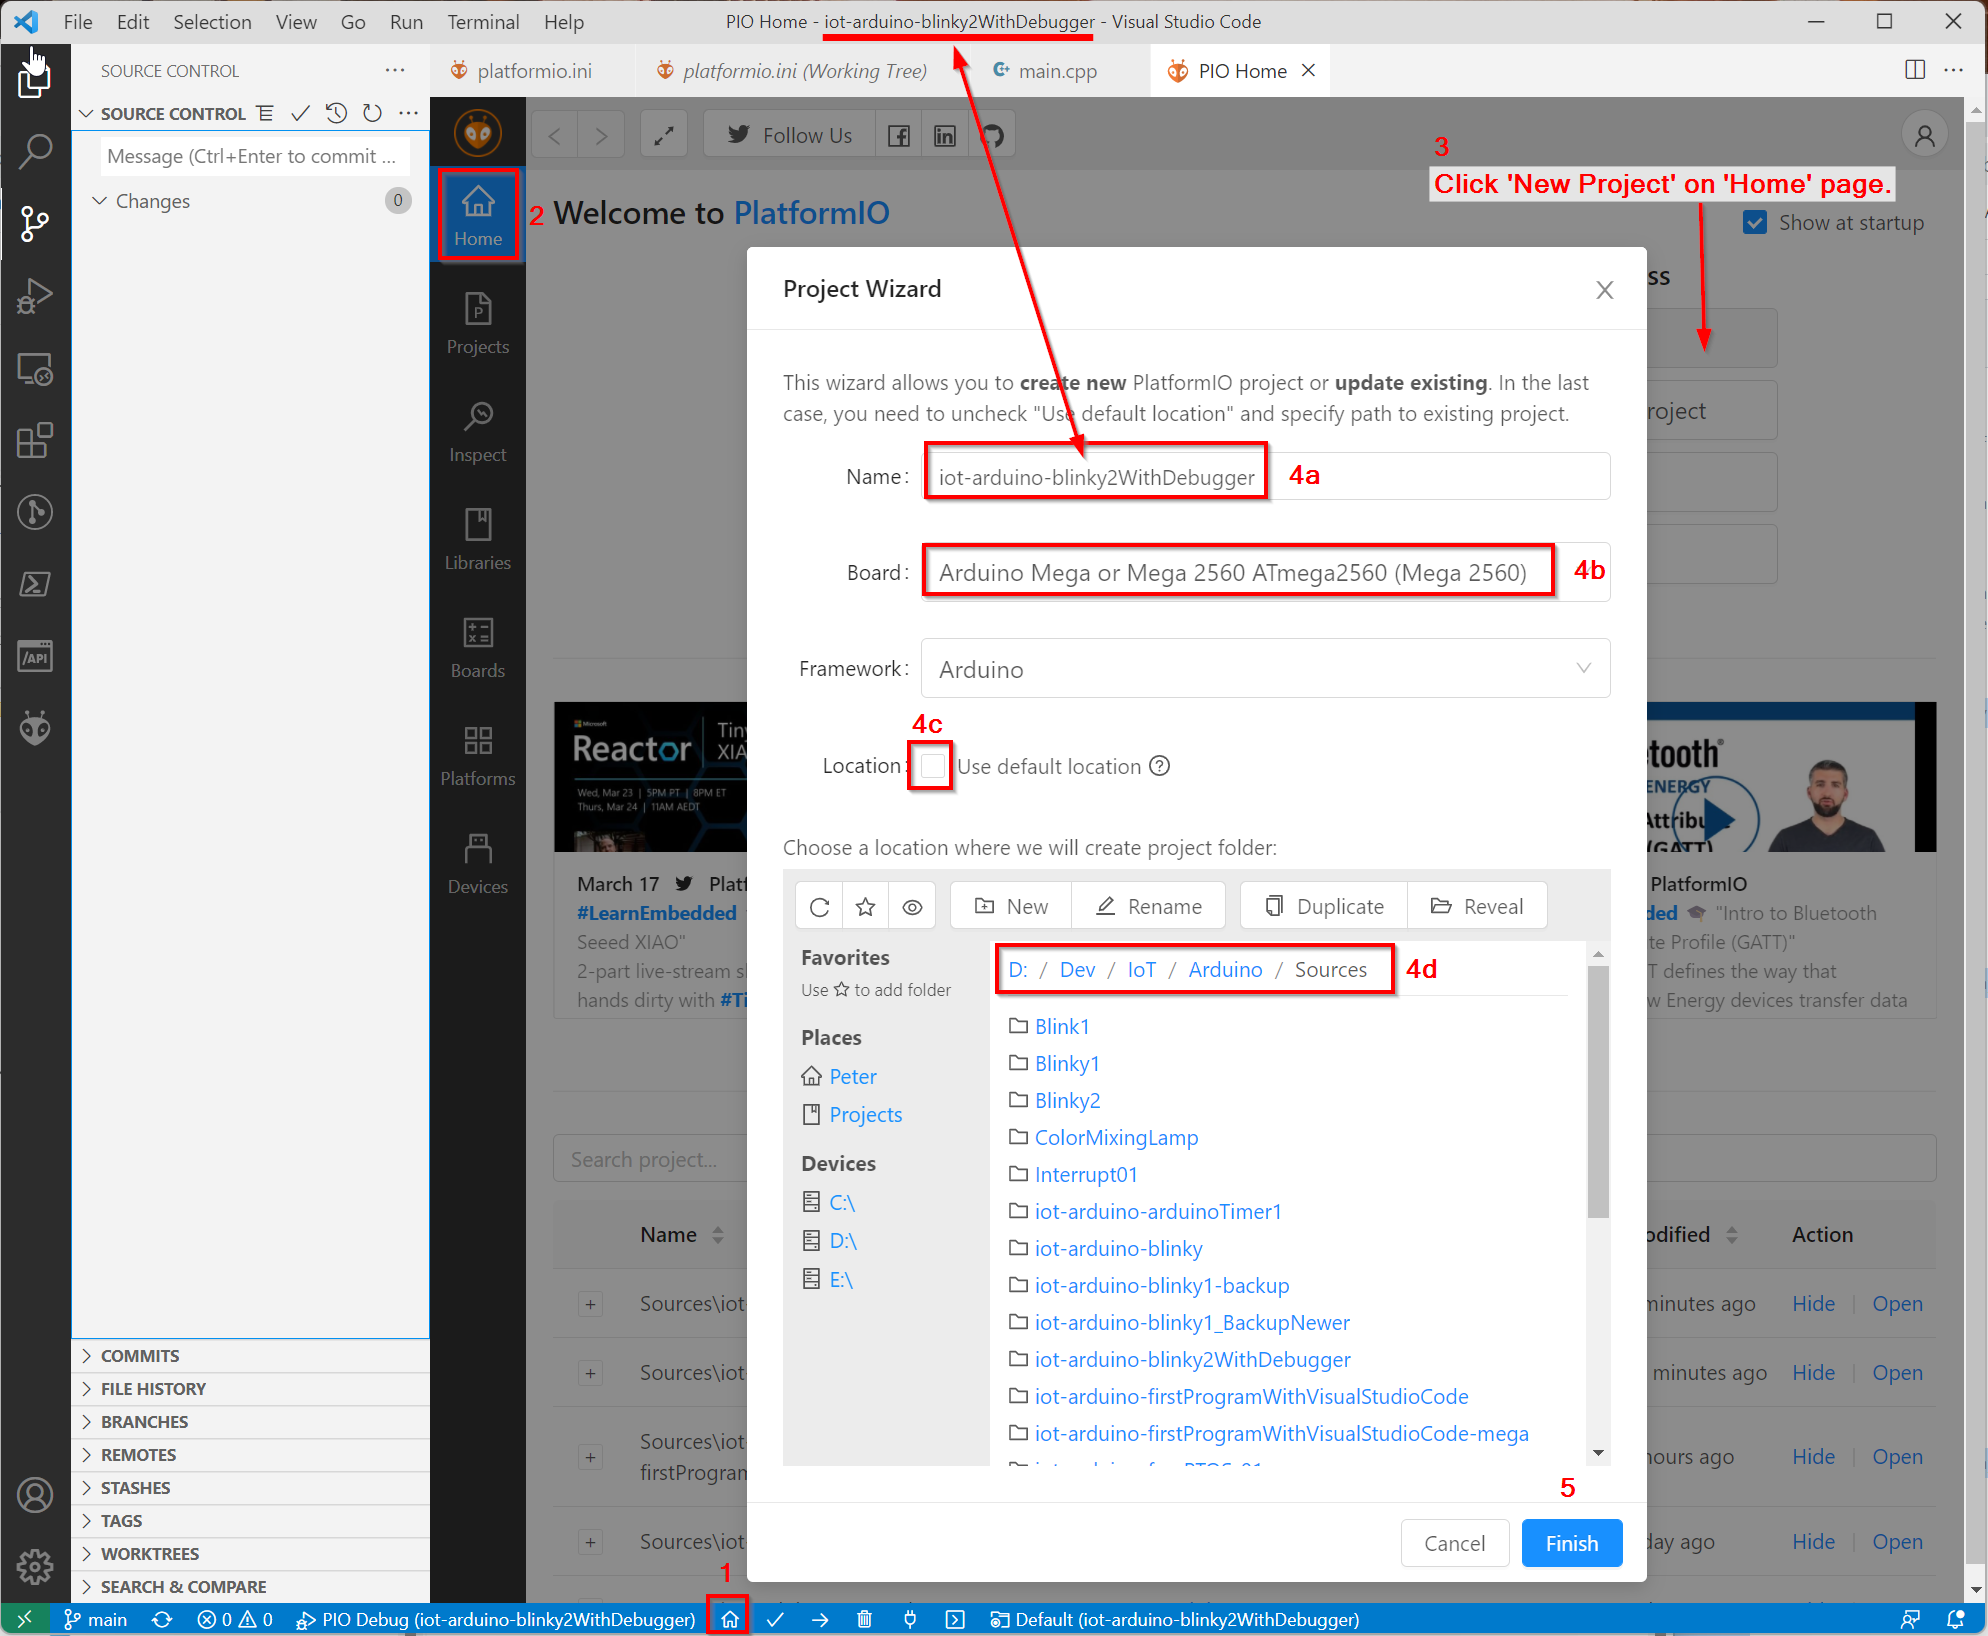
- Click New Project.
- The Project Wizard is displayed:
- Enter exactly the same project name that is already open.
- Select the board to be added.
- Uncheck Use default location and …
- … select the parent directory of the current project (the one that is already open).
- Click Finish.
Now open the file platformio.ini: A new section for the new board (environment) has been added:
...
[env:megaatmega2560]
platform = atmelavr
board = megaatmega2560
framework = arduino
Copy any missing settings (e.g. for debugging) from the existing section to the new section and add a new section [platformio] with the setting default_envs = {new environment}. Often you also have to adjust the COM port for the debugger. How to find the appropriate port has already been described above, search for configure the monitor_port in platformio.ini.
Finally you should have something like this:
[platformio]
default_envs = megaatmega2560   ; <-- set board/environment, 'uno' or 'megaatmega2560'

[env:uno]
platform = atmelavr
board = uno
framework = arduino
; settings for avr-debugger
build_type = debug
debug_tool = avr-stub
debug_port = COM5    ; <-- debug_port may be wrong, check with 'PlatformIO Home' -> 'Devices'
lib_deps =
    jdolinay/avr-debugger @ ~1.4
debug_build_flags =
    -Og
    -g2
    -DDEBUG
    -DAVR8_BREAKPOINT_MODE=1

[env:megaatmega2560]
platform = atmelavr
board = megaatmega2560
framework = arduino
; settings for avr-debugger
build_type = debug
debug_tool = avr-stub
debug_port = COM6    ; <-- debug_port may be wrong, check with 'PlatformIO Home' -> 'Devices'
lib_deps =
    jdolinay/avr-debugger @ ~1.4
debug_build_flags =
    -Og
    -g2
    -DDEBUG
    -DAVR8_BREAKPOINT_MODE=1