Enable SSH on Raspberry Pi
SSH (Secure Shell Protocol) allows to login and execute commands on a remote Raspberry Pi from your computer (PC).
Before SSH can be used, it must be enabled on the Raspberry Pi. There are different ways to do this:
Using the GUI:
- Start the Raspberry Pi and login, e.g. with username ‘pi’ and your password (initial/default password: ‘raspberry’):
- On the Raspberry Pi open Start –> ‘Preferences‘ –> ‘Raspberry Pi Configuration‘
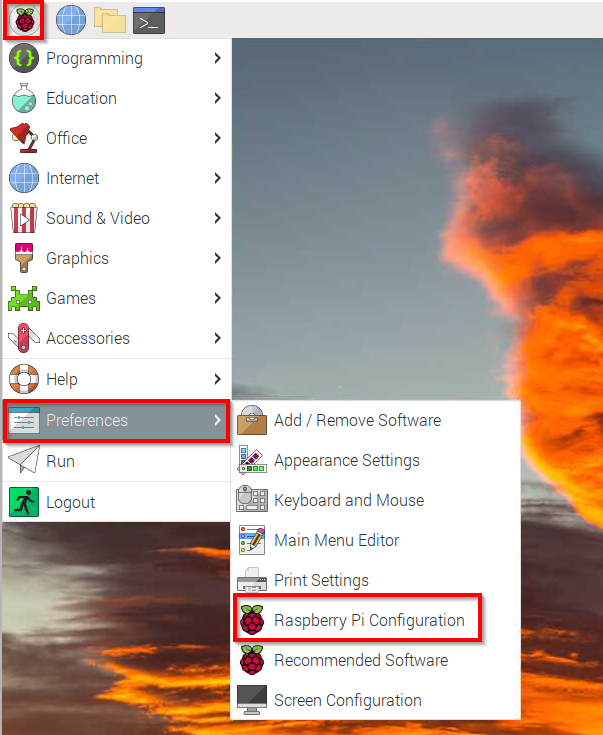
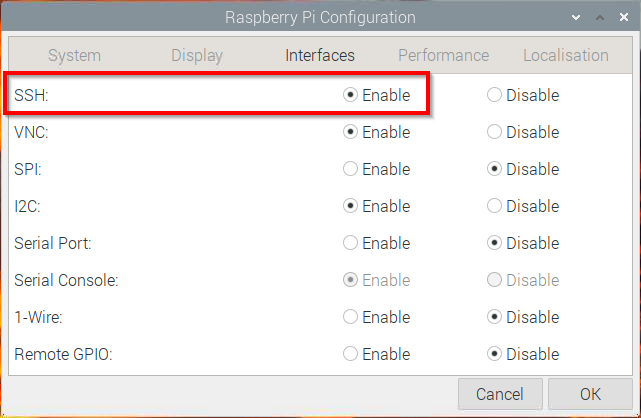
- and enable ‘SSH‘:
- On the Raspberry Pi open Start –> ‘Preferences‘ –> ‘Raspberry Pi Configuration‘
Using the command line:
- Start the Raspberry Pi and login, e.g. with username ‘pi’ and your password (initial/default password: ‘raspberry’):
- Open a terminal and enter the following commands on the command line:
sudo systemctl enable sshsudo systemctl start ssh
- Open a terminal and enter the following commands on the command line:
There are other ways to enable SSH, e.g. also for a Raspberry Pi without screen and keyboard (headless mode).
Setting up SSH on Windows
You can install and use one of the third-party tools like Putty or just use tools already exiting on your Windows 10/11.
How to use Windows on-board tools is described in the Microsoft article ‘Get started with OpenSSH‘. In summary, do the following: On Windows open a PowerShell with administrator privilege (Window button -> search for ‘Windows PowerShell’ and open with ‘Run as administrator‘) and enter the following commands:
Get-WindowsCapability -Online | Where-Object Name -like 'OpenSSH*'
Response:
Name  : OpenSSH.Client~~~~0.0.1.0
State : Installed

Name  : OpenSSH.Server~~~~0.0.1.0
State : Installed
If the state of of any service is ‘NotPresent‘ install it using its name from the response:Add-WindowsCapability -Online -Name OpenSSH.Client~~~~0.0.1.0
Add-WindowsCapability -Online -Name OpenSSH.Server~~~~0.0.1.0
Remark: Install also the OpenSSH.Server, some modules installed together with it are used to generate public/private keys, see next section.
Login to Raspberry Pi using SSH using username/password
Now you should be able to log in to your Raspberry Pi from your Windows PC.
Open a PowerShell or Command Prompt window and enter the following command:
ssh [email protected]Replace pi is your username on the Raspberry Pi.
Replace 192.168.1.147 with the IP address of your Raspberry Pi.
After accepting Raspberry Pi’s fingerprint (a random string that uniquely identifies the remote computer) and entering successfully your password for Raspberry Pi, you will get the command line prompt from Raspberry Pi’s operating system.
To exit the remote session enter the following command:exit
Login to Raspberry Pi using public/private-key pair
On your Window PC execute the following commands in a PowerShell window to generate a public key/private key pair and copy the public key to your Raspberry Pi.
If your personal ~\.ssh directory doesn’t already exist, create one:mkdir ~\.ssh
Generate a new public/private key pair:cd ~ssh-keygen -f .ssh\id_rsa
Generates two files, one with the public key (id_rsa.pub) and one with the private key (id_rsa) in your private directory ~\.ssh.
With command line options you may define filenames other than the default ones or use a stronger (safer) encryption algorithm for the keys, see Microsoft documentation).dir ~\.ssh
This command displays the files with the generated keys:
id_rsa –> private key
id_rsa.pub –> public key
The private key or the file with the private key must be kept secret!
Finally, the public key must be copied to the user’s private .ssh folder on the Raspberry Pi into the file authorized_keys (if on the Raspberry Pi no ~/.ssh folder exists yet, it must be created first):cd ~ssh [email protected] 'mkdir ~/.ssh'scp .ssh\id_rsa.pub [email protected]:~/.ssh/authorized_keys
Replace pi with your username on the Raspberry Pi.
Replace 192.168.1.147 with the IP address of your Raspberry Pi.
Now you should be able to log in to the Raspberry Pi without providing your password:ssh [email protected]
Replace pi is your username on the Raspberry Pi.
Replace 192.168.1.147 with the IP address of your Raspberry Pi.
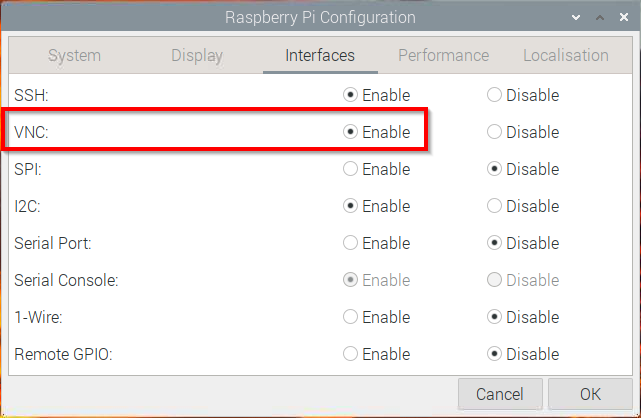
Using VNC remote desktop
With VNC (Virtual Network Computing) the screen of the Raspberry Pi can be displayed e.g. on a Windows PC within a window or Full Scrren (similar to Remote Desktop).
The VNC access can be enabled on the Raspberry Pi similar to the SSL access (see above):
On the Windows PC you have to install a VNS client, there are free and paid solutions on the Internet.
More information
Get started with OpenSSH (Microsoft)
OpenSSH key management (Microsoft)
Remote Access (Raspberry Pi Documentation)
How to Set Up a Headless Raspberry Pi, Without Ever Attaching a Monitor (Tom’s Hardware)