Introduction
This article shows how to develop applications for the Raspberry Pi using C# programming language and .NET 6.0 framework. A Windows PC with Visual Studio Code is used as the development environment, the programs are cross-compiled on the PC and then downloaded to the Raspberry Pi. Debugging is also done in Visual Studio on source code level. A normal IP network (WLAN or Ethernet) is used as connection between PC and Raspberry Pi.
| For this series of articles, we assume that a target computer with the following characteristics is used: – Raspberry Pi 4 Model B with at least 2 Gbytes RAM. – Raspberry Pi OS , version 11, 32-Bit (for 64-bit you have to install the Arm64 version of .NET instead of Arm32). The chapter ‘The first C#/.NET application cross-developed on Windows PC‘ contains instructions for both Raspberry Pi OS versions, 32-bit and 64-bit. |
Setting up SSH remote access with SSH
First you have to enable remote access from Windows PC to Raspberry Pi. You may follow the instruction in the article ‘Raspi – Setting up remote access with SSH‘.
Installation on Raspberry Pi
Installing .NET 6 on Raspberry Pi
To check if you are using a 32-bit or 64-bit version of Raspberry Pi OS execute the following command in a Terminal on Raspberry Pi: uname -m
If it returns ‘armv7l’ you are using the 32-bit version.
If it returns ‘aarch64’ you are using the 64-bit version.
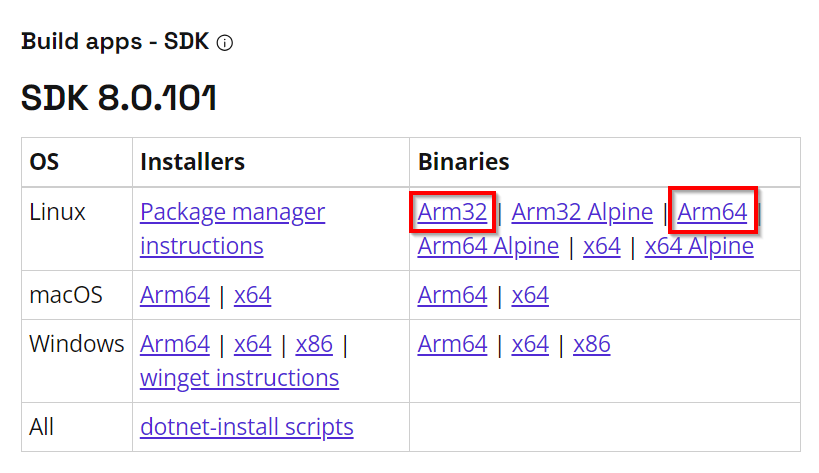
On your Windows PC open a Web Browser and go to https://dotnet.microsoft.com/en-us/download/dotnet/8.0 and download the SDK corresponding to your Raspberry Pi OS version to a local Windows folder …
Copy the compressed SDK file to your Raspberry Pi, replace [email protected] with your username and IP address of the Raspberry Pi:
ssh [email protected] 'mkdir ~/dotnet-sdk'
scp the-file-just-downloaded.tar.gz [email protected]:~/dotnet-sdk
Log in to the Raspberry Pi and install the SDK:
ssh [email protected]pi> sudo mkdir /usr/share/dotnet
pi> sudo chmod 755 /usr/share/dotnetpi> sudo tar zxf ~/dotnet-sdk/the-file-just-downloaded.tar.gz -C /usr/share/dotnetpi> rm -r ~/dotnet-sdk
Finally expand the $PATH environment variable to include the /usr/share/dotnet directory:pi> echo 'export PATH=$PATH:/usr/share/dotnet' >> ~/.bashrc
… and restart the shell:
pi> exit
ssh [email protected]
pi>
To verify the the .NET SDK just installed execute the following command:pi> dotnet --version
The very first C#/.NET program for Raspberry Pi
Now we can create, compile and execute oure very first C*/.NET application locally on the Raspberry Pi.
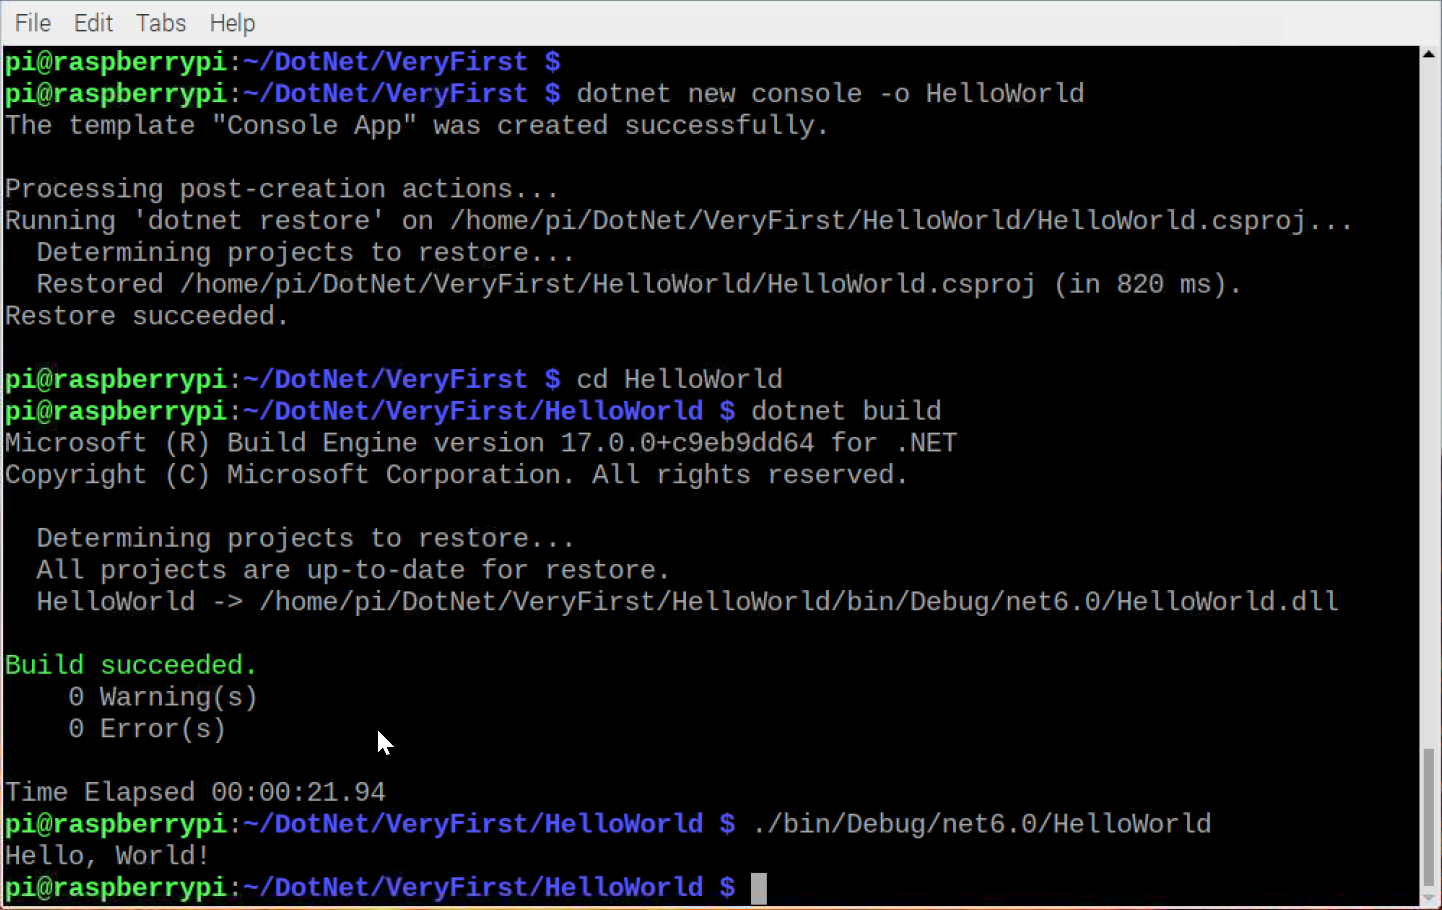
Log in to the Raspberry Pi, go to the directory where you want to create the new C#/.NET application project and execute the following commands to get started: dotnet new console -o HelloWorldcd HelloWorld
dotnet add package Iot.Device.Bindings
The first command creates a new console application with a famous ‘Hello, World!’ output, the last one adds the Iot.Device.Bindings package to the project. Actually, these bindings are not needed as long as no Raspberry Pi specific hardware is addressed.
To compile and execute the application use the following commands (still in the same directory):dotnet build
./bin/Debug/net8.0/HelloWorld
Output: Hello, World!
Cross-development environment on Windows PC
Normally, you probably prefer to develop your C#/.NET applications for the Raspberry Pi on the Windows PC, upload them to the Raspi and debug them remotely, all together using your well known tools on your PC (we call this cross-development).To prepare, you need to perform the following steps.
Installing .NET 8 SDK
On your Windows PC download and install .NET SDK 8.0.xxx from https://dotnet.microsoft.com/en-us/download/dotnet/8.0.
Installing Visual Studio Code
On your Windows PC download from https://code.visualstudio.com/ and start installation.
Installing Visual Studio Code Extensions
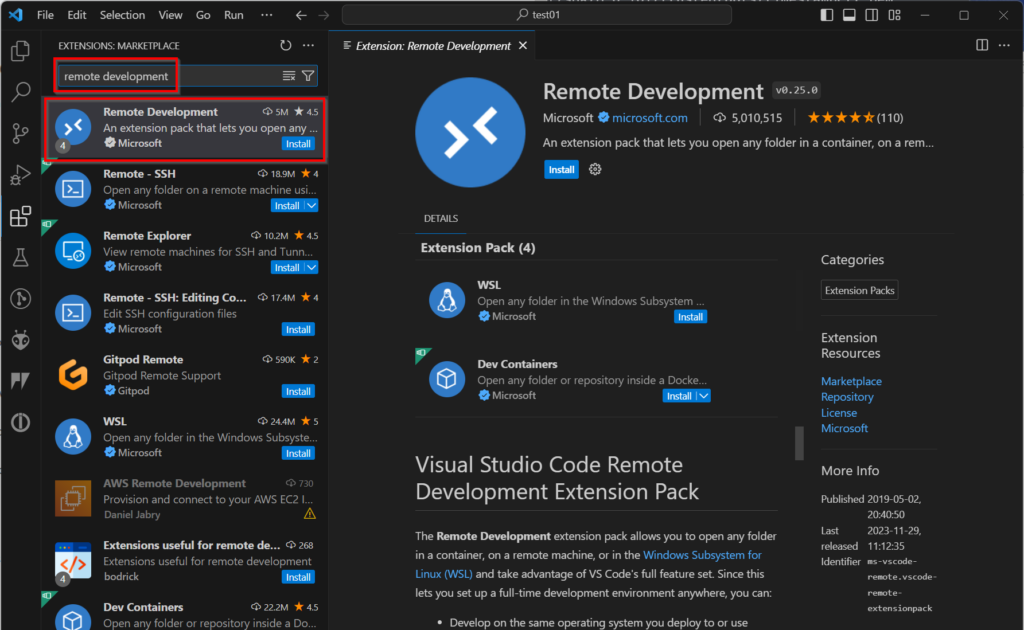
On your Windows PC start VS Code, on the left select “Extensions”, search for “C#”, select “C# Dev Kit” and click “Install”. The installation will take some time.

Extension “RemoteDevelopment”
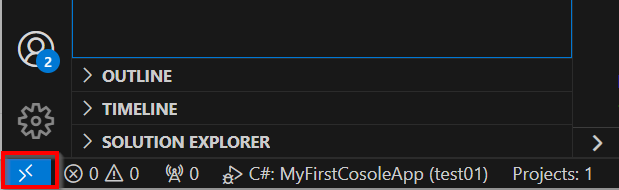
Lower left, click blue button “Open a Remote Window”
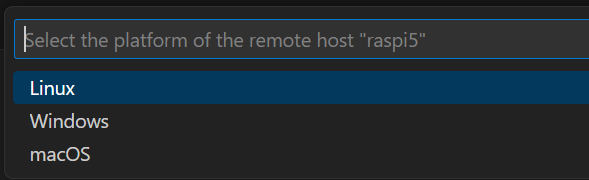
You then have to select on the top the remote platform: Linux
This may take some time (it shows this message in the lower right):

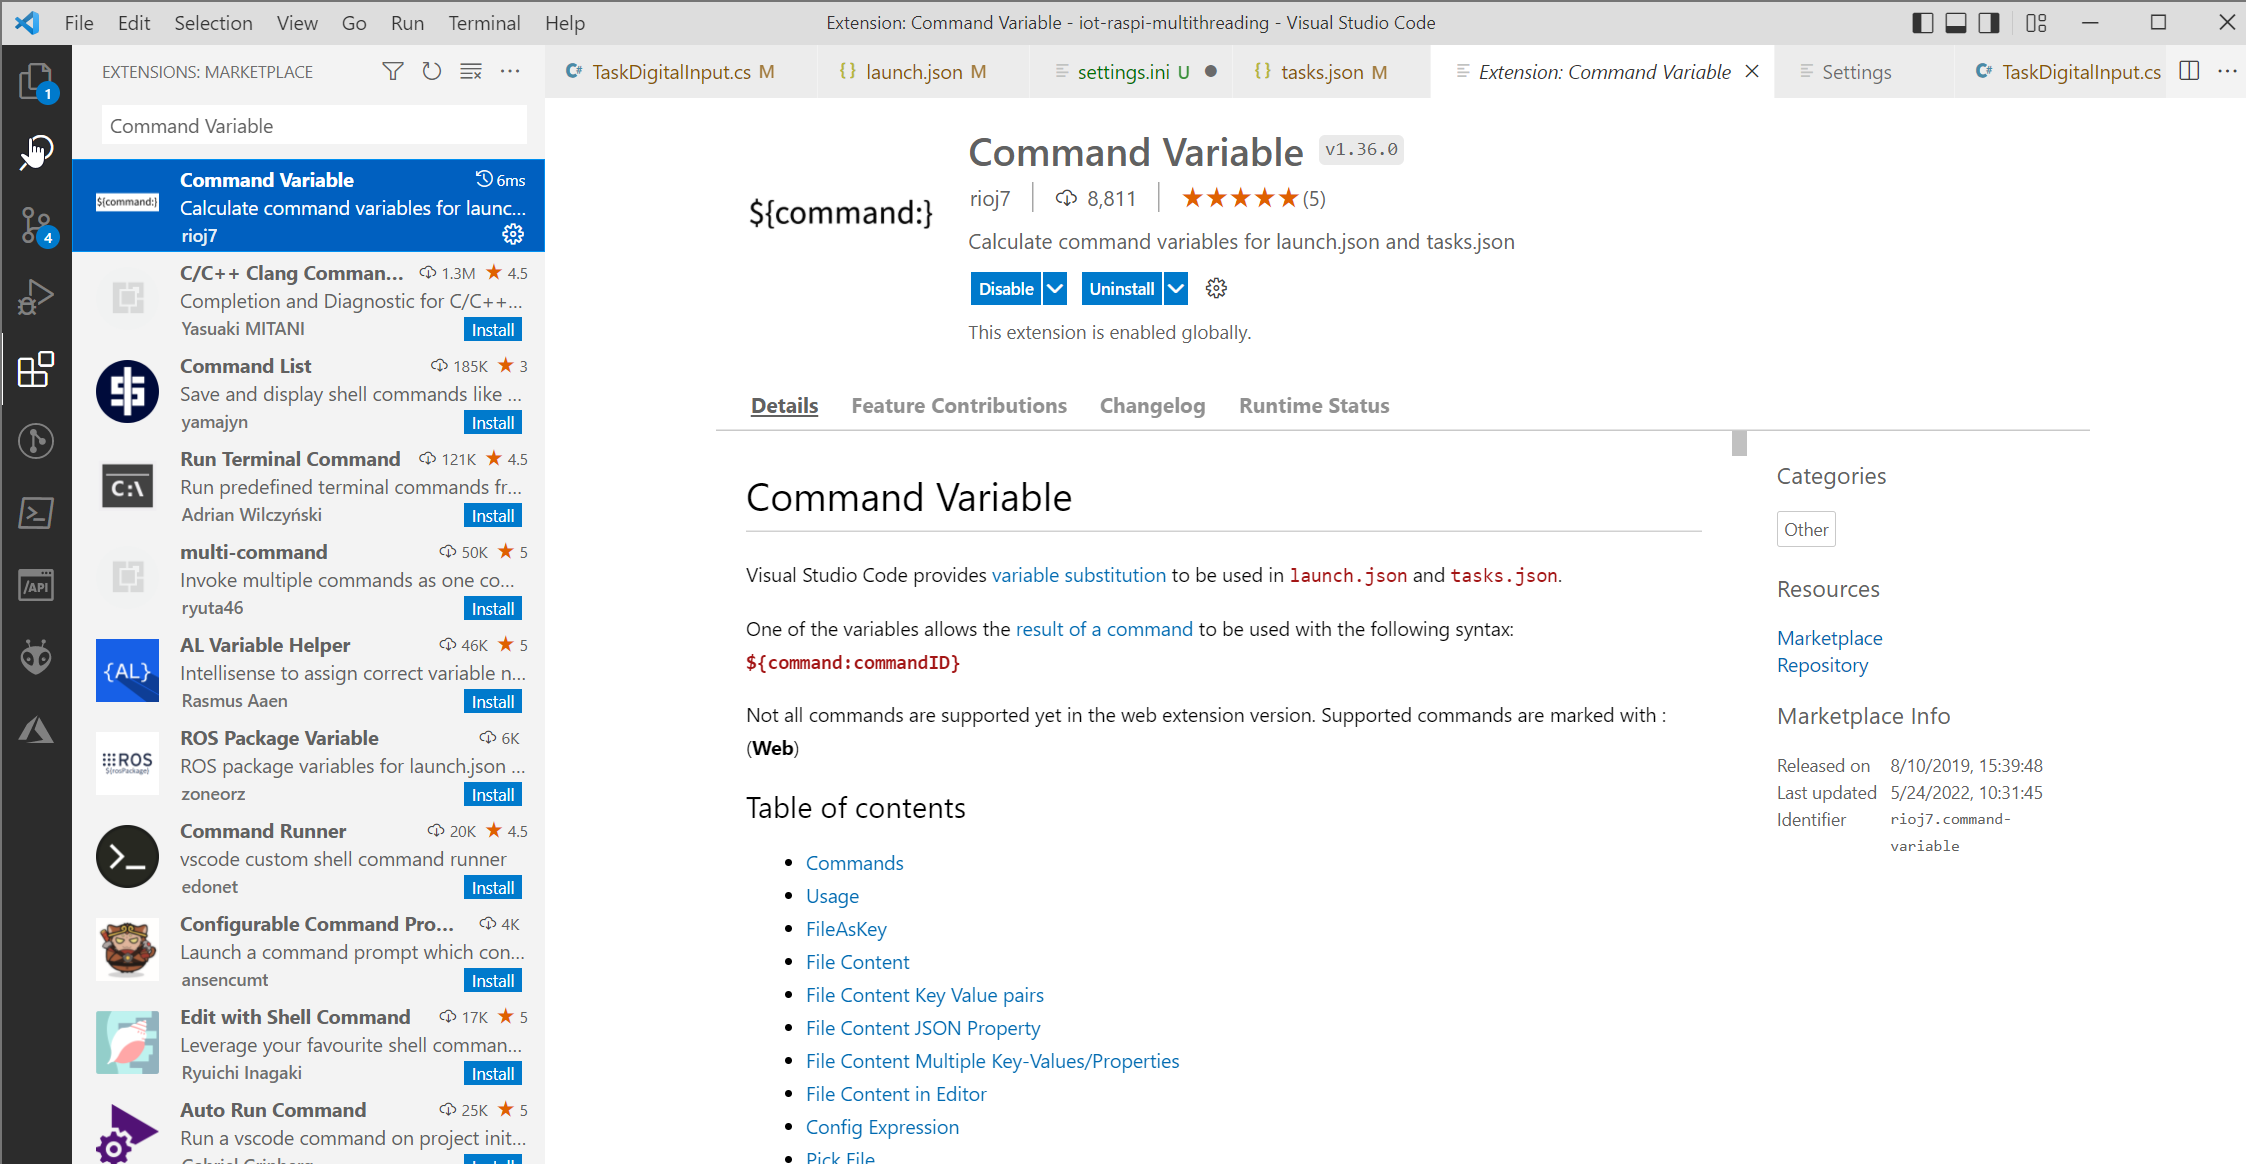
If you want to automate the process of compiling, uploading and debugging (see chapter ‘Automating the build process and debugging‘), you also need to install the ‘Command Variable’ extension.
The following extensions are recommended:
- NuGet Package Manager GUI (aliasadidev)
- C# XML Documentation Comments (Keisuke Kato)
Installing Visual Studio Remote Debugger
To enable remote debugging we have to install the Visual Studio Remote Debugger on Raspberry Pi: Execute the following command in a terminal running on your Raspberry Pi: curl -sSL https://aka.ms/getvsdbgsh | /bin/sh /dev/stdin -v latest -l ~/vsdbg
Self-contained vs. framework-dependent .NET application
When cross-compiling a .NET application for a target system, you can choose whether to create a self-contained or a framework-dependent application:
- self-contained
Applications of this type contain all necessary .NET libraries. Such applications can be run even without .NET Framework installed on the target. - framework-dependent (not self-contained)
Applications of this type are much smaller, but require a .NET framework of the correct version already installed on the target.
The type can be specified during cross-compilation of the application (see below).
The first C#/.NET application cross-developed on Windows PC
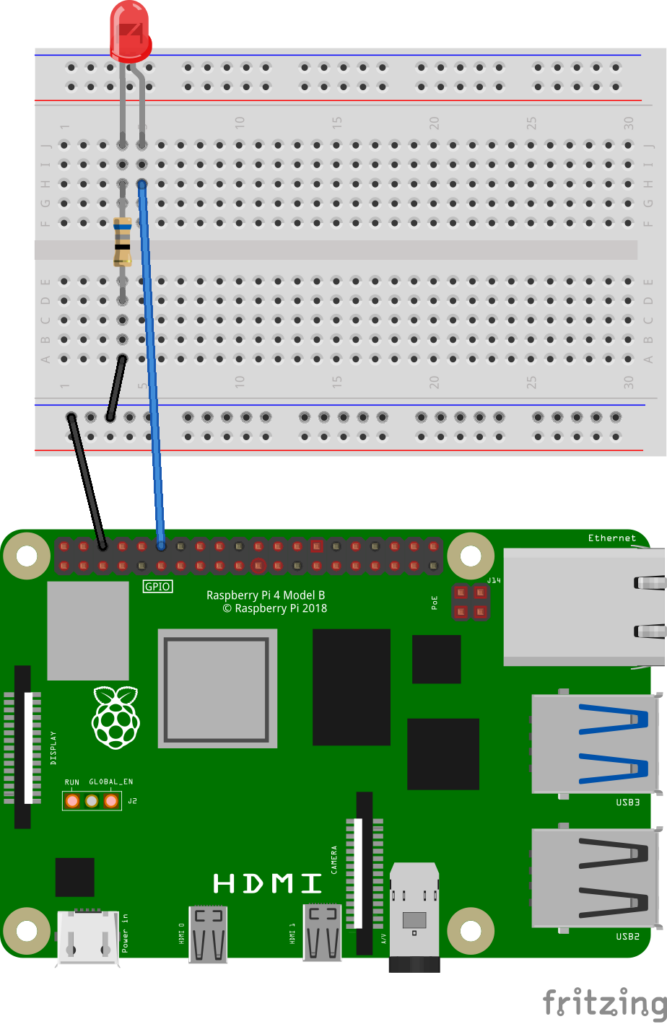
For the first example we use a Raspberry Pi 4 Model B. The very small application flashes a LED connected to GPIO18 (pin 12 of the connector). the LED is switched on for 200 ms and off for 1000 ms in an endless loop. The value of a loop count variable is written to the console output (USB). The Raspi is connected with an USB cable to a Windows PC.
On your Windows PC, proceed as follows:
Create a new .NET application
Start Visual Studio Code (VS Code), from the menu select File -> Open Folder …, select the parent directory for the new project, still in the Open Folder dialog create an new folder with the name of your new project, e.g. iot-raspi-blinky.
In VS Code select from the menu View -> Terminal, this opens in the right lower part of VS Code a Terminal with the command prompt in your project folder.
In the Terminal, execute the following command:dotnet new console --framework net6.0
This creates a new terminal :NET 6 application that outputs ‘Hello, World!’ to the standard output (console).
Still in the Terminal execute the following command:dotnet add package Iot.Device.Bindings --version 2.1.0-*
This adds the Iot.Device.Bindings package to the project. This .NET package is used to access Raspberry Pi related hardware, e.g. digital inputs and outputs.
In the left toolbar of VS Code select Explorer (the top most icon) and in the Explorer select the file Program.cs.
In the file Program.cs replace the existing code with the following one (………………..):
using System;
using System.Device.Gpio;

namespace iot.raspi.blinky
{
    class Program
    {
        static void Main(string[] margs)
        {
            Console.WriteLine("Blinking LED. Press Ctrl+C to end.");
            int ledPin = 18;
            using var controller = new GpioController();
            controller.OpenPin(ledPin, PinMode.Output);
            var loopCount = 1;
            while (true)
            {
                Console.WriteLine($"loop {loopCount++}");

                controller.Write(ledPin, PinValue.High);
                Thread.Sleep(200);
                controller.Write(ledPin, PinValue.Low);
                Thread.Sleep(1000);
            }
        }
    }
}
Cross-compile the application
To cross-compile the application for Raspberry Pi, enter the following command in VS Studio’s Terminal (if you don’t see the Terminal, open it from VS Code’s menu View -> Terminal):dotnet publish --runtime linux-arm --no-self-contained
Some options:
--runtime linux-arm
Compile for the 32-bit version of Raspberry Pi OS.--runtime linux-arm64
Compile for the 64-bit version of Raspberry Pi OS.--self-contained
Creates a self-contained application including all required .NET libraries. (1)--no-self-contained
Creates a framework-dependent application, i.e. .NET runtime is required on target. (1)--configuration Debug(default)
Create a debuggable version of application. Output directory: bin\Debug\net6.0\linux-arm\publish-- configuration Release
Create a Release version. Output directory: bin\Release\net6.0\linux-arm\publish
(1) See chapter ‘Self-contained vs. framework-dependent .NET application‘ above for more information.
Upload the application to the Raspberry Pi
Now you must deploy the compiled application to the Raspberry Pi. The files to be copied to the target are in the project sub-directory bin\Debug\net6.0\linux-arm\publish. On the target you can choose for deployment any directory you want, e.g. ~/DotNet/iot-raspi-blinky.
If any target directory doesn’t exist, you must create it before deploying, e.g. using SSH, replace [email protected] with your username and IP address of the Raspberry Pi (enter in VS Code’s Terminal):ssh [email protected] 'mkdir ~/iot-raspi-blinky'
The you can deploy the compiled application with the following command, once more replace [email protected] with your username and IP address of the Raspberry Pi (enter in VS Studio’s Terminal):scp -r .\bin\Debug\net6.0\linux-arm\publish\* [email protected]:~/iot-raspi-blinky
For 64-bit Raspberry Pi OS replace linux-arm with linux-arm64.
Finally you must set the execution right on the application file (replace hostname and IP address) (enter in VS Studio’s Terminal):ssh [email protected] 'chmod 700 ~/iot-raspi-blinky/iot-raspi-blinky'
Start the application remotely on the Raspberry Pi
To start the application remotely use this command (replace hostname and IP address) (enter in VS Studio’s Terminal):ssh [email protected] '~/iot-raspi-blinky/iot-raspi-blinky'
Debug the application remotely on the Raspberry Pi
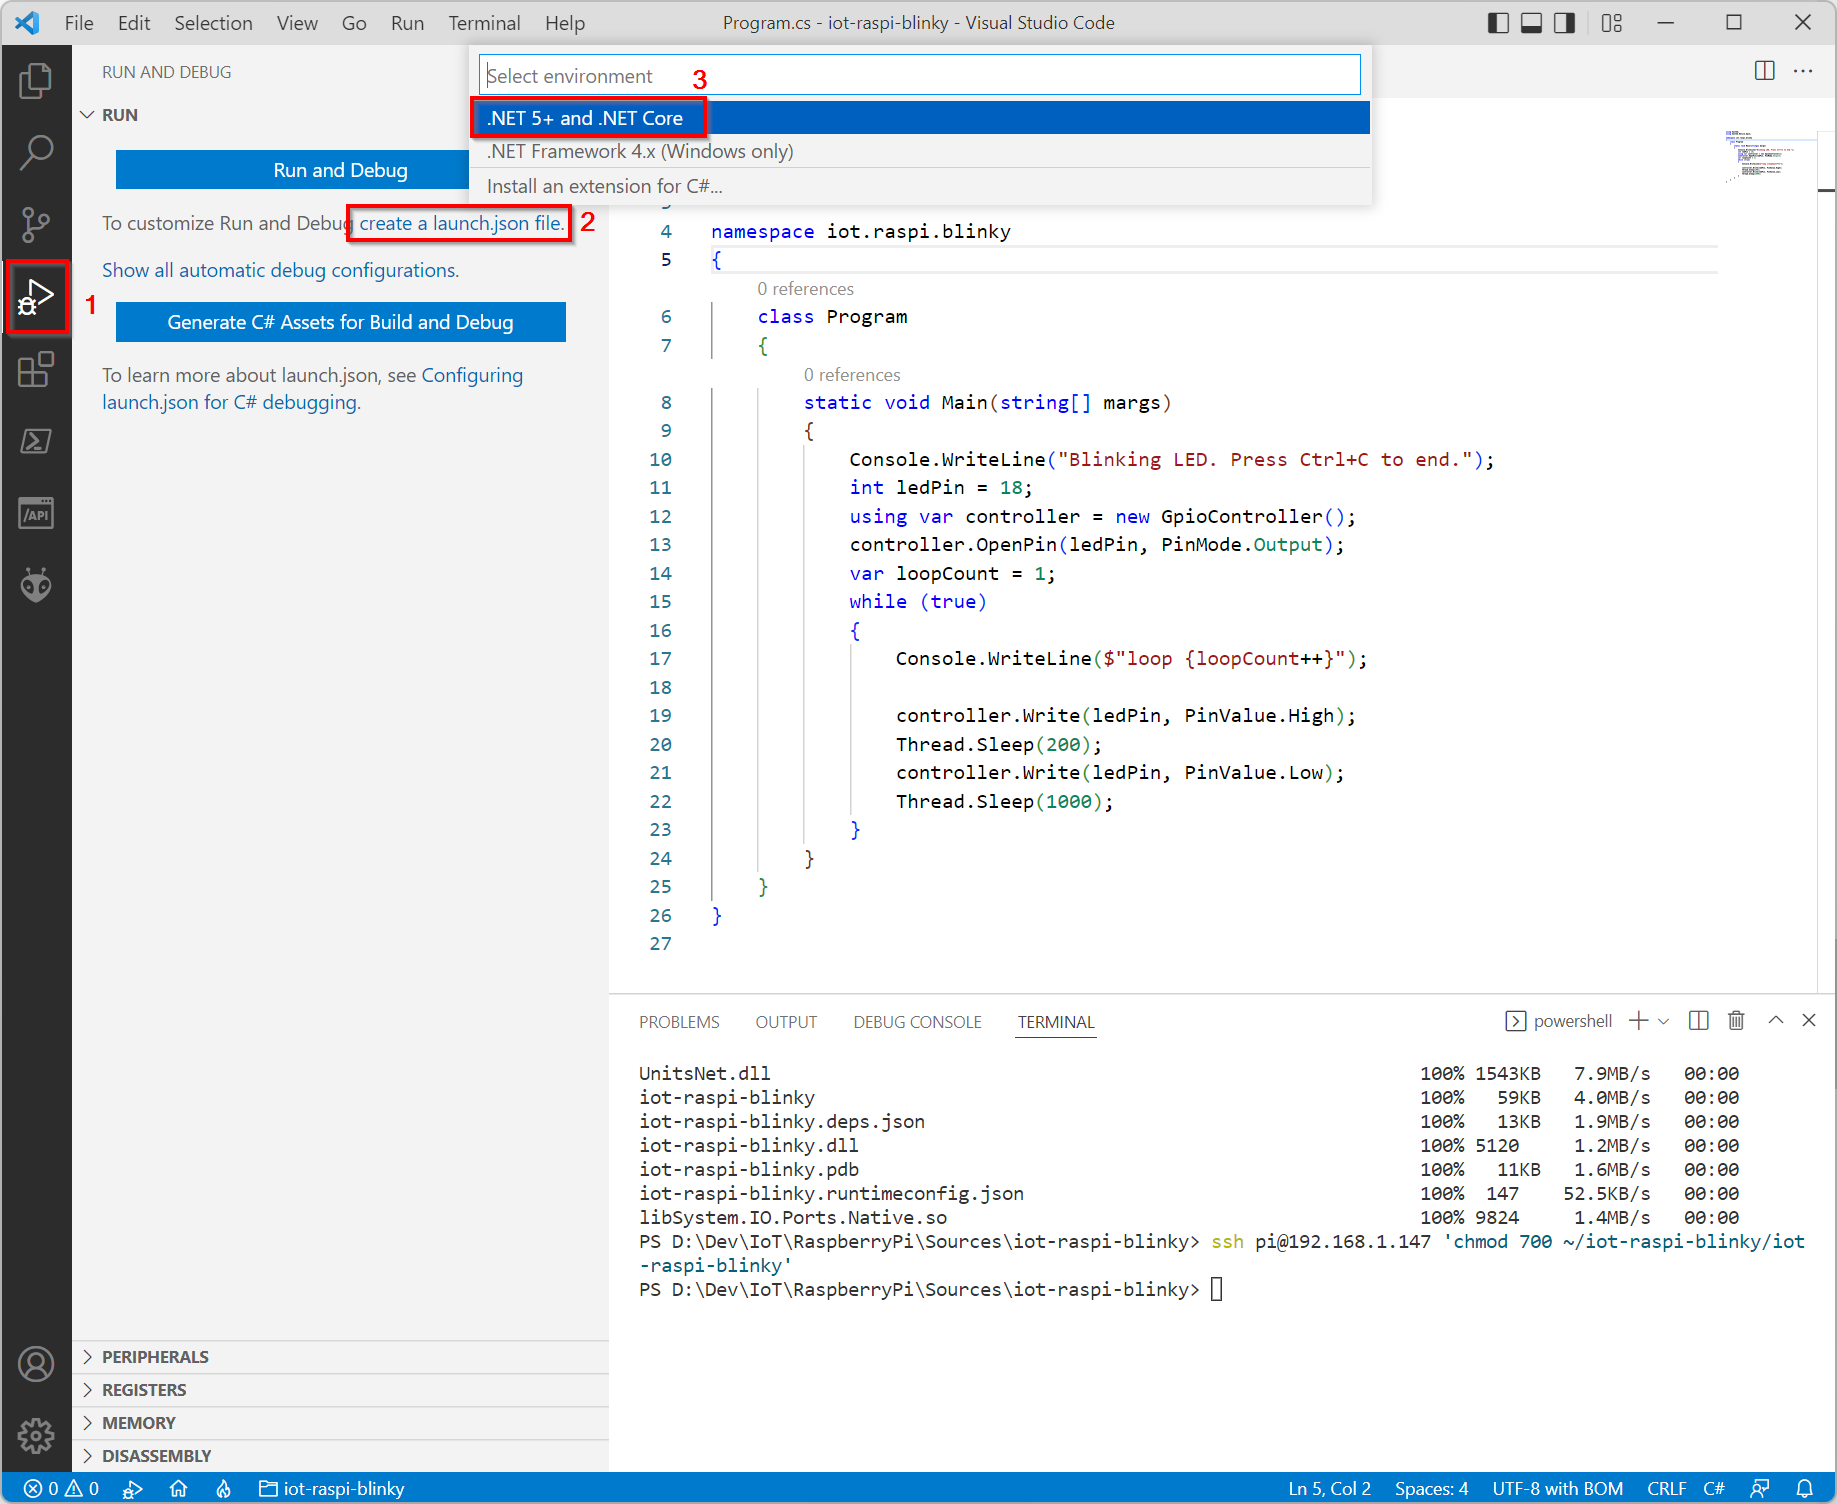
Instead of just starting the application like with the last command, you can start it for remote debugging directly in VS Code (on the PC). But, first you have to create a launch file used by VS code. To do this select in the left toolbar the Run and Debug icon and then click the link ‘create a launch.json file‘ and select ‘.NET 5+ and .NET Core‘.
This shows on the right side the file launch.json with some default content. Replace this content with the following one:
{
    "version": "0.2.0",
    "configurations": [
        {
            "name": ".NET Remote Launch - Self-contained",
            "type": "coreclr",
            "request": "launch",
            // Path to the application's executable file on the target (Raspberry Pi)
            "program": "~/iot-raspi-blinky/iot-raspi-blinky",
            "args": [],
            // Path to the working directory for the application
            "cwd": "~/iot-raspi-blinky",
            "stopAtEntry": false,
            "console": "internalConsole",
            "pipeTransport": {
                "pipeCwd": "${workspaceRoot}",
                // Path to the SSH utility
                "pipeProgram": "C:\\Windows\\System32\\OpenSSH\\ssh.exe",
                "pipeArgs": [
                    // username and IP address to be used to access the target using SSH
                    "[email protected]"
                ],
                "debuggerPath": "~/vsdbg/vsdbg"
            }
        },
    ]
}
Adapt the content of launch.json to your environment:
- “program”: … -> path to the application’s executable file on the target (Raspberry Pi)
- “cwd”: … -> path to the working directory for the application
- “pipeProgram”: … -> path to the SSH utility
- “pipeArgs”: … -> username and IP address to be used to access the target using SSH
See ‘Raspi – Setting up remote access with SSH‘ for more information about how to set up SSH and configure login with public/private key-pair, i.e. without password.
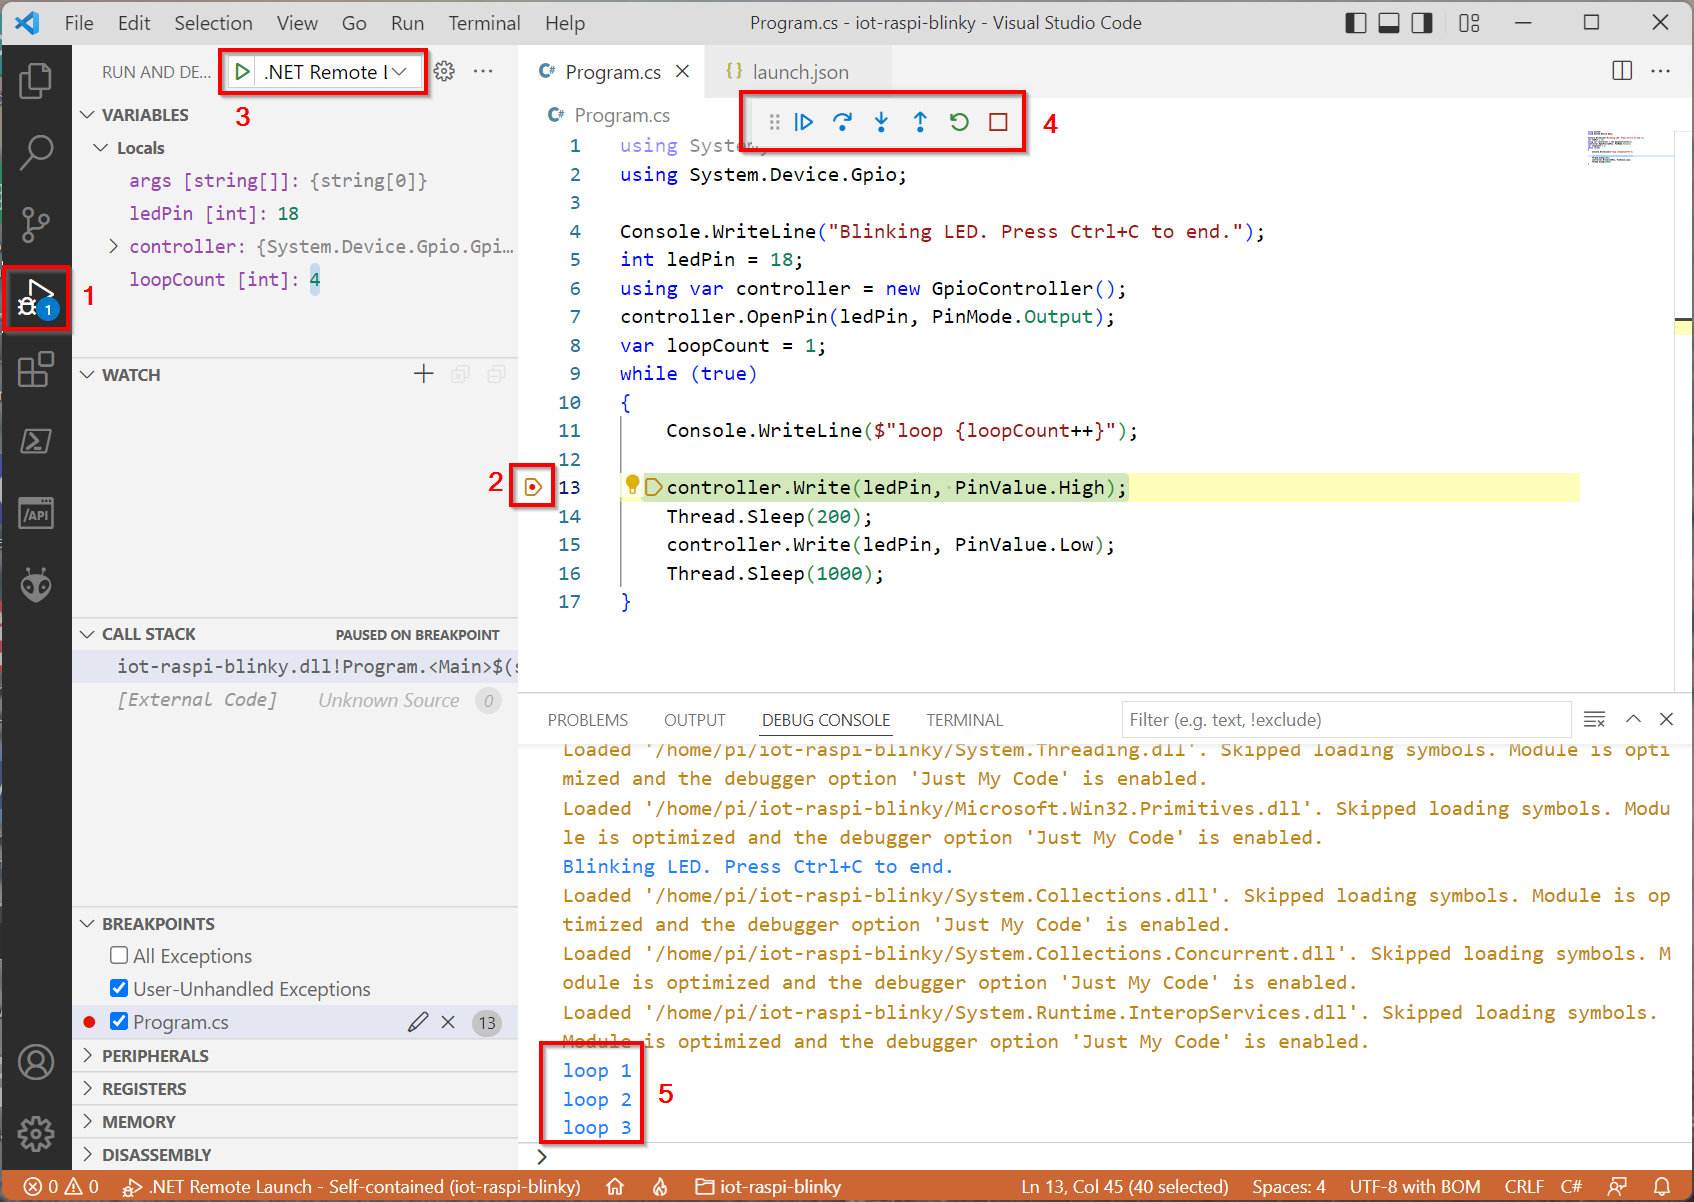
Now you can set breakpoints and launch the application for remote debugging:
- In the left toolbar click the ‘Run and Debug‘ icon.
- Set breakpoints by clicking left of the line numbers.
- Select the launch configuration ‘.NET Remote Launch – Self-contained‘ and click the green ‘Start Debugging‘ icon to start the application on the target.
- Use theses buttons to control the debugger, e.g. the ‘Continue‘ icon continues execution after a breakpoint.
- VS Code’s Debug Console shows the output of the application.
To modify the application, stop the debugger (red icon of the debugger buttons), modify the source code and recompile and upload with the following commands (enter in VS Studio’s Terminal):dotnet publish -r linux-arm --no-self-containedscp -r .\bin\Debug\net6.0\linux-arm\publish\* [email protected]:~/iot-raspi-blinky
Automating the build process and debugging
The steps described above for compiling, uploading and debugging can be automated so that they are performed with a single click. For this, the three files settings.ini, launch.json and tasks.json must be created/updated in the subfolder .vscode. You have to modify settings.ini to reflect your development environment. With these three files you need a single click to the green ‘Start Debugging‘ icon to compile, upload and start debugging.
Complete source code is available here: https://github.com/schaeren/iot-raspi-blinky
# settings.ini
# IMPORTANT: Superfluous spaces are not allowed in the assignments!

# For Raspberry Pi OS (32-bit) use linux-arm
# For Raspberry Pi OS (64-bit) use linux-arm64
TARGET-ARCHITECTURE=linux-arm

# username@raspberryPiHostname to be used with for SSH
[email protected]

# Path to SSH command on Windows
SSH-COMMAND=C:\\Windows\\System32\\OpenSSH\\ssh.exe
// launch.json
{
    "version": "0.2.0",
    // Read some settings from .vscode\settings.ini and define corresponding command variables.
    // IMPORTANT: This requires the VS code extension 'Command Variable'.
    "inputs": [
        {
            "id": "SSH-DESTINATION",
            "type": "command",
            "command": "extension.commandvariable.file.content",
            "args": {
                "fileName": "${workspaceFolder}\\.vscode\\settings.ini",
                "key": "SSH-DESTINATION",
                "default": "[email protected]"
            }
        },
        {
            "id": "SSH-COMMAND",
            "type": "command",
            "command": "extension.commandvariable.file.content",
            "args": {
                "fileName": "${workspaceFolder}\\.vscode\\settings.ini",
                "key": "SSH-COMMAND",
                "default": ""
            }
        }
    ],
    "configurations": [
        {
            "name": "Build, deploy, launch on Pi",
            "type": "coreclr",
            "request": "launch",
            "preLaunchTask": "pi-build-and-deploy",
            // Path to the application's executable file on the target (Raspberry Pi)
            "program": "~/${workspaceFolderBasename}/${workspaceFolderBasename}",
            "args": [],
            // Path to the working directory for the application
            "cwd": "~/${workspaceFolderBasename}",
            "stopAtEntry": false,
            "console": "internalConsole",
            "pipeTransport": {
                "pipeCwd": "${workspaceFolder}",
                // Path to the SSH utility
                "pipeProgram": "${input:SSH-COMMAND}",
                "pipeArgs": [
                    // username and hostname/IP address to be used to access the target using SSH
                    "${input:SSH-DESTINATION}"
                ],
                "debuggerPath": "~/vsdbg/vsdbg"
            }
        },
        {
            "name": "Launch on Pi",
            "type": "coreclr",
            "request": "launch",
            "program": "~/${workspaceFolderBasename}/${workspaceFolderBasename}",
            "args": [],
            // Path to the working directory for the application
            "cwd": "~/${workspaceFolderBasename}",
            "stopAtEntry": false,
            "console": "internalConsole",
            "pipeTransport": {
                "pipeCwd": "${workspaceFolder}",
                // Path to the SSH utility
                "pipeProgram": "${input:SSH-COMMAND}",
                "pipeArgs": [
                    // username and hostname/IP address to be used to access the target using SSH
                    "${input:SSH-DESTINATION}"
                ],
                "debuggerPath": "~/vsdbg/vsdbg"
            }
        }
    ]
}
// tasks.json
{
    "version": "2.0.0",
    // Read some settings from .vscode\settings.ini and define corresponding command variables.
    // IMPORTANT: This requires the VS code extension 'Command Variable'.
    "inputs": [
        {
            "id": "TARGET-ARCHITECTURE",
            "type": "command",
            "command": "extension.commandvariable.file.content",
            "args": {
                "fileName": "${workspaceFolder}\\.vscode\\settings.ini",
                "key": "TARGET-ARCHITECTURE",
                "default": "linux-arm"
            }
        },
        {
            "id": "SSH-DESTINATION",
            "type": "command",
            "command": "extension.commandvariable.file.content",
            "args": {
                "fileName": "${workspaceFolder}\\.vscode\\settings.ini",
                "key": "SSH-DESTINATION",
                "default": "[email protected]"
            }
        }
    ],
    // Task pi-build-and-deploy executes tasks pi-build, pi-mkdir, pi-deploy, pi-chmod in this sequence.
    "tasks": [
        {
            "label": "pi-build-and-deploy",
            "dependsOn": ["pi-build", "pi-mkdir", "pi-deploy", "pi-chmod"],
            "dependsOrder": "sequence"
        },
        {
            "label": "pi-build",
            "command": "dotnet",
            "type": "process",
            "problemMatcher": "$msCompile",
            "args": [
                "publish",
                "--runtime",
                "${input:TARGET-ARCHITECTURE}",
                "--no-self-contained"
            ],
            "presentation": {
                "clear": true
            }
        },
        {
            "label": "pi-mkdir",
            "command": "powershell",
            "type": "shell",
            "args": [
                "ssh '${input:SSH-DESTINATION}' \"mkdir --parents ~/${workspaceFolderBasename}\""
            ],
        },
        {
            "label": "pi-deploy",
            "command": "powershell",
            "type": "process",
            "args": [
                "$SrcDir = '.\\bin\\Debug\\net6.0\\${input:TARGET-ARCHITECTURE}\\publish\\*';",
                "$DestDir = '${input:SSH-DESTINATION}' + ':~/' + '${workspaceFolderBasename}';",
                "scp -r $SrcDir $DestDir"
            ],
        },
        {
            "label": "pi-chmod",
            "command": "powershell",
            "type": "shell",
            "args": [
                "ssh '${input:SSH-DESTINATION}' \"chmod 755 ~/${workspaceFolderBasename}/${workspaceFolderBasename}\""
            ],
        },
        {
            "label": "watch",
            "command": "dotnet",
            "type": "process",
            "args": [
                "watch",
                "run",
                "${workspaceFolder}/iot-raspi-mqtt-02.csproj",
                "/property:GenerateFullPaths=true",
                "/consoleloggerparameters:NoSummary"
            ],
            "problemMatcher": "$msCompile"
        }
    ]
}
More information
- Deploy .NET apps to Raspberry Pi (Microsoft)
- Debug .NET apps on Raspberry Pi (Microsoft)
- Intro to IOT with .NET Core for Beginners (YouTube video series)
- Blink an LED (Microsoft)